Planon Extension – Logic Flow Builder
Formerly known as Configurable BusinessRule.
Introduction
Logic Flow Builder is a powerful visual development tool that enables you to design and implement business logic without writing any code. Using an intuitive graphical editor, you can model complex business processes by simply dragging, connecting, and configuring functions.
Why Logic Flow Builder?
Traditional business rules often require extensive programming knowledge or custom development. Logic Flow Builder breaks through this barrier by offering:
- Visual Design: Build logical flows with an easy-to-use drag-and-drop interface
- No Coding Required: Create complex business rules without Java or other programming languages
- Flexibility: Combine over 150 pre-built functions for diverse use cases
- What you see is what you get: During configuring the result can be tested directly which makes it very fast to implement.
- Transparency: Gain insight into your business processes through visual representations
- Easy Maintenance: Modify flows effortlessly without technical debt
Use Cases
Logic Flow Builder is ideal for:
- Event-Driven Logic: React to system events with custom business rules
- Process Automation: Automate repetitive business tasks and workflows
- Data Integration: Connect Planon with external systems via web services
- Validation & Compliance: Implement complex validation rules and approval workflows
- Notification Management: Send emails, create notifications, and handle user communications
- … and much more …
Function Overview
The tool provides over 150 functions, organized into the following categories.
| Category | Functions |
|---|---|
| ⚡ Actions | Add to LogViewer, Notification |
| 📊 Comparison | Contains, EndsWith, Equal, Equal All, Equal to string, Exists In List, Greater, GreaterEqual, Is Null, Lesser, … |
| 🔍 Conditional | All Fields changed, All Fields empty, Field changed, Field empty, Is current, One field changed, One field empty |
| 🔄 Conversion | Format Date, Format Number, Parse BigDecimal, Parse Date, Parse Integer |
| 📅 Date | Calculate date, Convert String to TimeZone, Convert date to Timezone, Reference date, System date, Goto timezone element, Timezone of user |
| 📁 Element | Alias businessobject, Archive businessobject, Change BOType, Clear field value, Copy businessobject, Copy value of field, Create Sub DataObject, Create businessobject, Create lifecyle, … |
| Send Email, Send Email (dynamic) | |
| 📎 File | Is extension of file, Generate downloadable link |
| 💰 Financial | IBAN Check |
| 🔄 Flow | FlowCounter, FlowCounter |
| 📊 JSON | Add to JSON Array, Create JsonArray, Create JsonObject, Parse JSON |
| 🧠 Logical | And, ExpressionLogic, Or |
| ➗ Math | Divide, Max, Min, Multiply, Round, Subtract, Sum |
| 💾 Memory | Get Variable, Is variable set, Set Variable |
| 🔔 Notification | Show confirmation, Show error, Show warning |
| 👤 Session | Current person, Current user, Current username, Is Language, Is TriggerMoment, Language, Timezone of user, Timezone of user as DAO, TriggerMoment, … |
| 📄 State | Get state, Is state, Set state, State changed |
| 🏷️ Static | Static BigDecimal, Static Boolean, Static Date, Static Datetime, Static Integer, Static NULL, Static String |
| 🔤 String | Capture RegEx, Comments, Concatenate string, DataObject to String, Format string, Generate UUID, Length, Lowercase, Split, … |
| 🚀 TSI-Action | Redirect to URL, Refresh Grid |
| 🌐 Webservice | Basic HTTP Auth, Call webhook, Generate downloadable link, Get HTTP Code, Get HTTP Method, Get Header, Get UUID, OAuth Client Credentials, … |
| 📄 XML | Create XML Object, Parse XML, Xslt transformation |
There is an extensive functions manual available in the app as soon it is installed in the environment. The functions manual will be generated based on the actual functions so it will be up-to-date all the time. Please see manual section for more information.
Prerequisites
Environment
This solution will be designed to work with Planon Live 105 and above. It is highly recommended to have the latest version installed if possible. All new features and bugfixes will be available from the version of the moment of creation minus 3 versions.
Constraints
- Only the app itself is technically supported by Planon support. Configurations which are created with this app are not supported by Planon support. Of course Planon consultants can help creating those configuration. When it turns out that a problem is in the app and not in the configuration, this will of course be resolved in the app within the license.
- Like with any addition to the system, each addition brings a certain performance impact. Therefore, adding business rule configurations is always limited depending on the environment.
- There might be combinations and/or certain configurations that introduce issues which cannot be resolved. In this case it is possible to fall-back to the tailor made BusinessRule in Java created by a Planon consultant.
- States in Planon can only contain AlphaNumeric characters and spaces. Unfortunately this is not (yet) a constraint in Planon itself.
- Functions marked with the
 tag are in initial state. This means those are not as mature as other functions. If any issues occur while using these Beta function, please create a ticket with support. We will attempt to resolve the problems, but priority will at all times be given to the non-beta functions.
Required (free)fields
This app will make use of a (optional) free module. This can be every module which is still available in the environment. The actual free module used can be configured in the modulesettings.
Components of App
Visual Editor
This app contains a visual editor which will make it intuitive and easy to use. Configuration can be created by dragging and dropping functions to the panel.
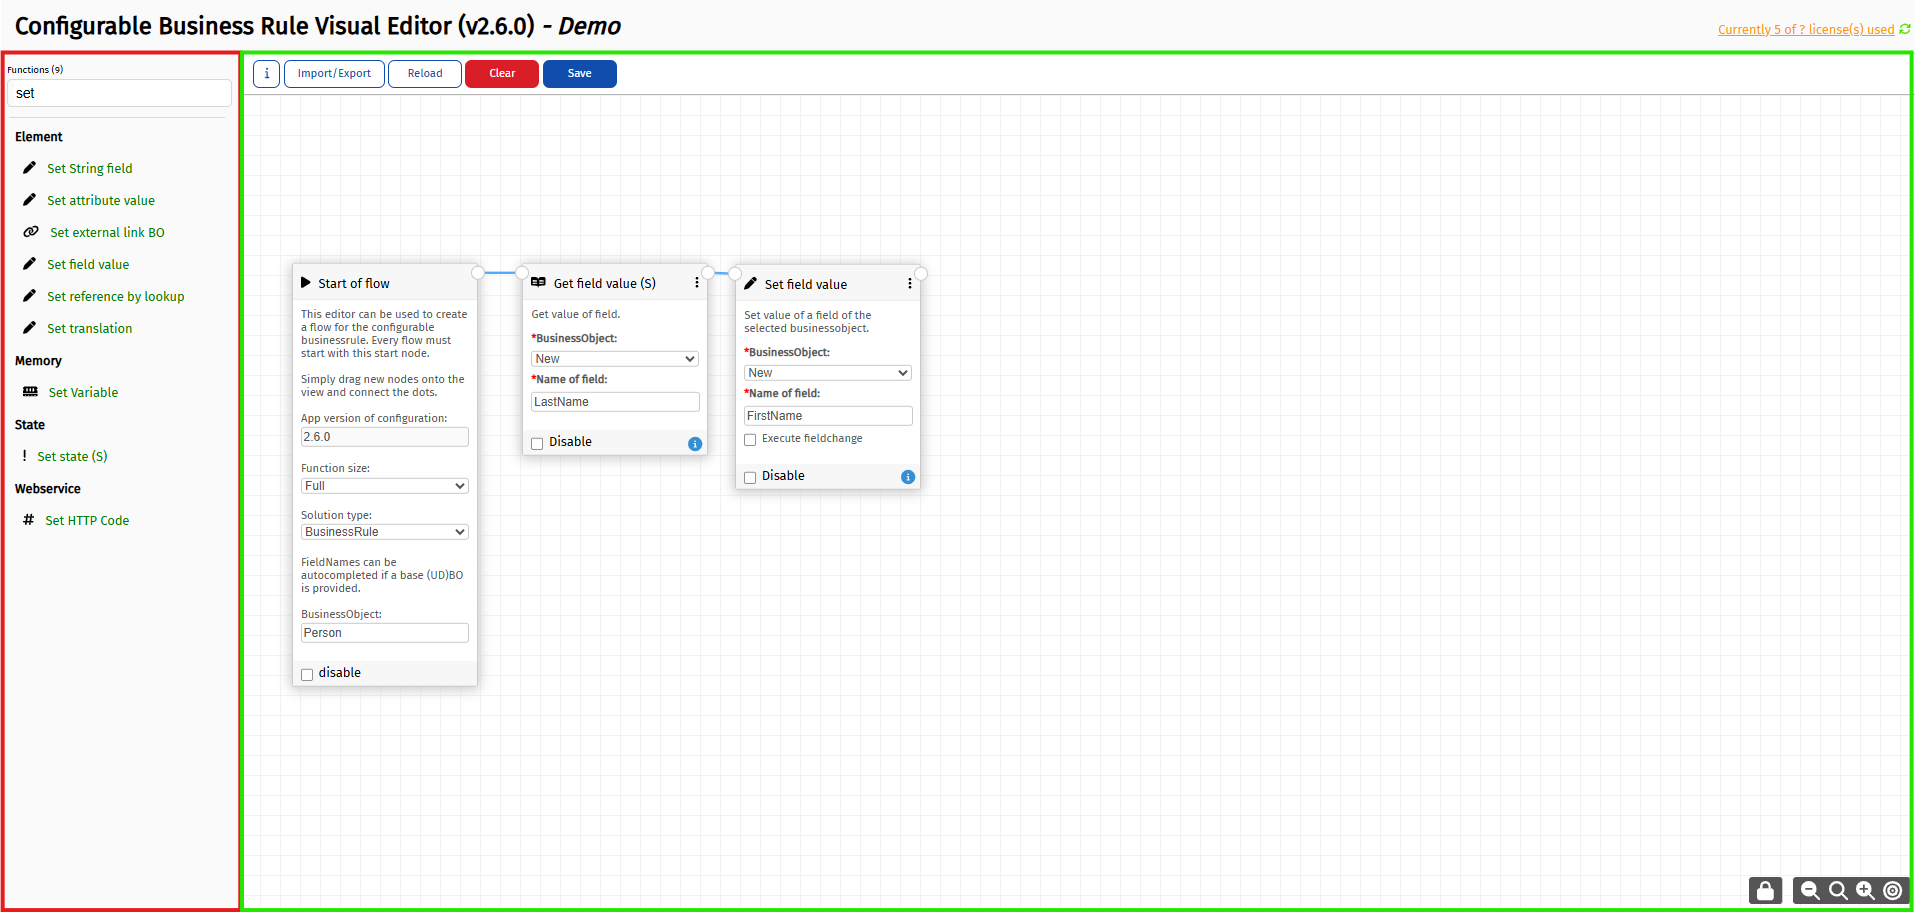
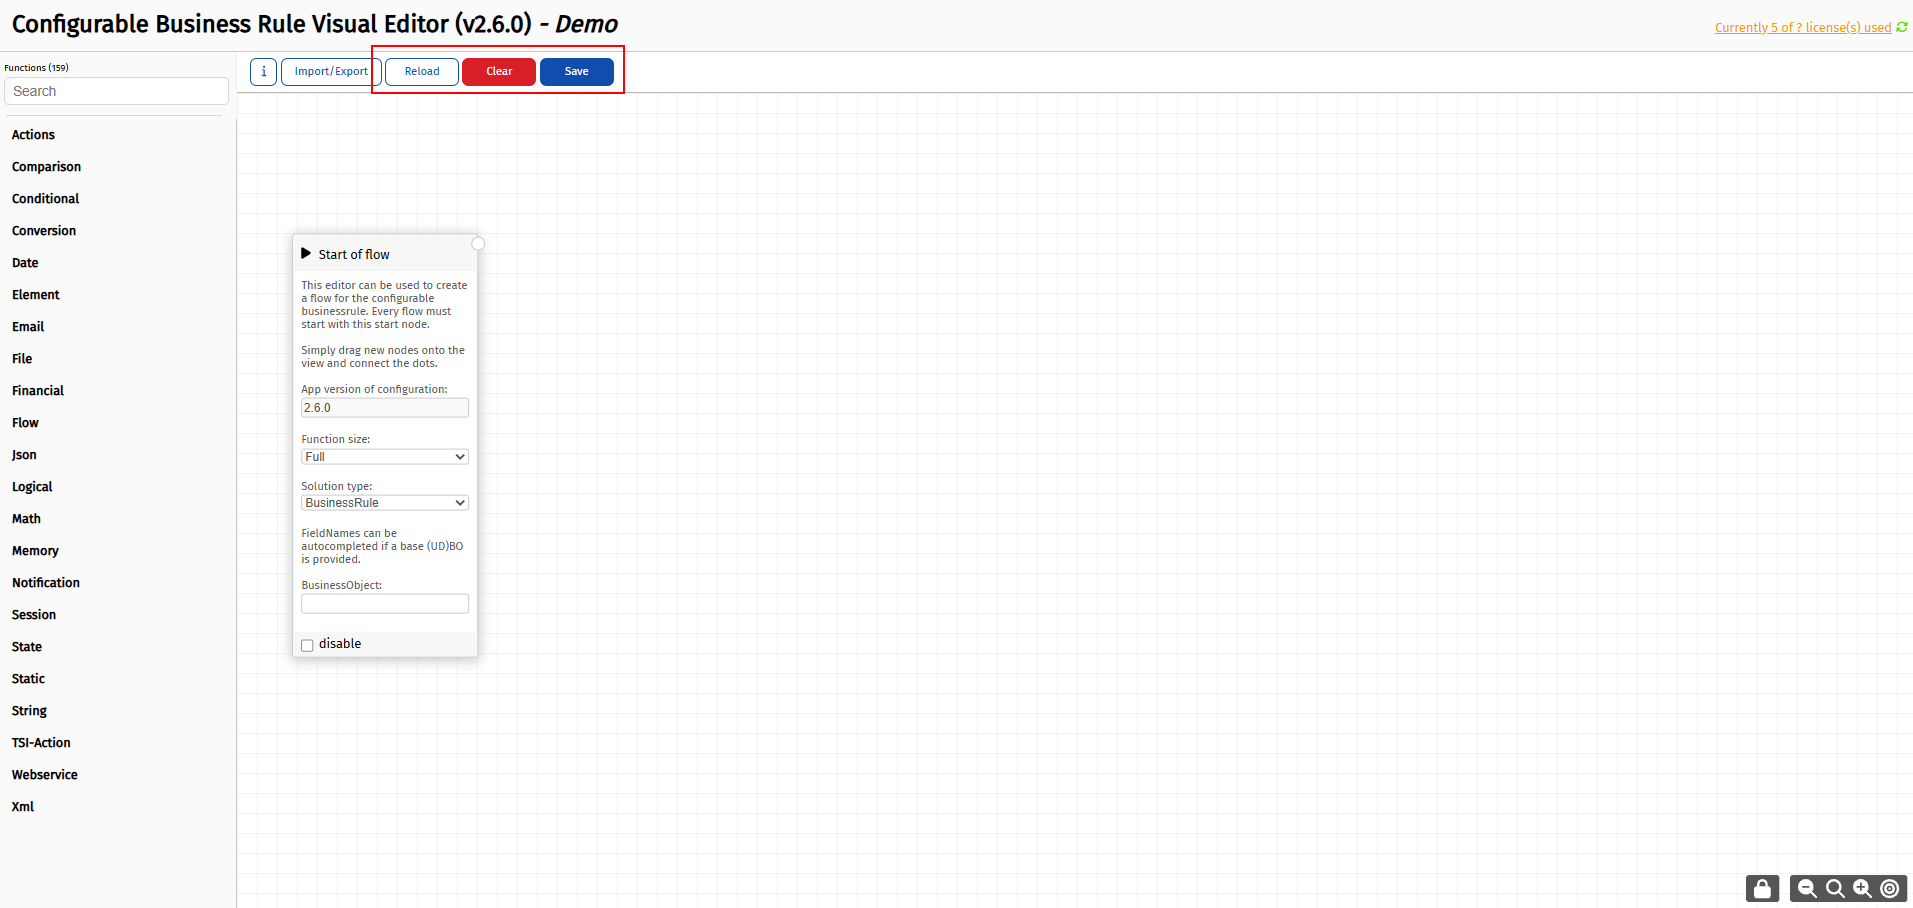
The left side (red outline) contains all functions which are available and can be dropped on the flow panel on the right side (green outline).
Action buttons
The buttons on the top can be used for:
: Remove every configured (on right screen) function from the flow.

: Save the flow to Planon.

: Reload the flow from Planon. All changes will be discarded.

: Shows a popup to import and export the configuration.In this popup it is possible to copy or download the current configuration. When providing (pasting) the configuration it can also be imported easily. This way it is very easy to share configurations between environments and customers.

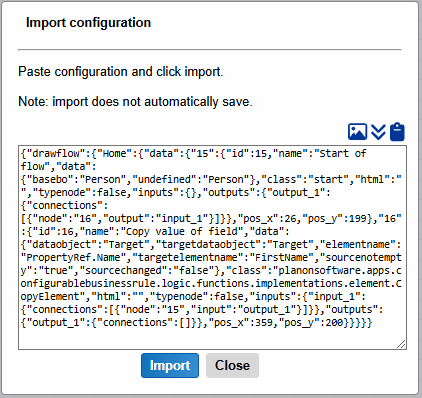
- : Go to in app manual page. Functions manual will be generated dynamically.

Manual
A manual of all functions will be dynamically generated in the app. To access this documentation click the I (information) button or click the Logic Flow Builder visual editor header. It is also possible to directly go the the specific function in the manual by clicking the on the bottom of every function.

In-App manual page
This app will also contain a manual page which is mainly auto-generated. This page will contain several tabs which will give extended information about functions, release notes and license usage. This manual can be reached by clicking the button in the editor.
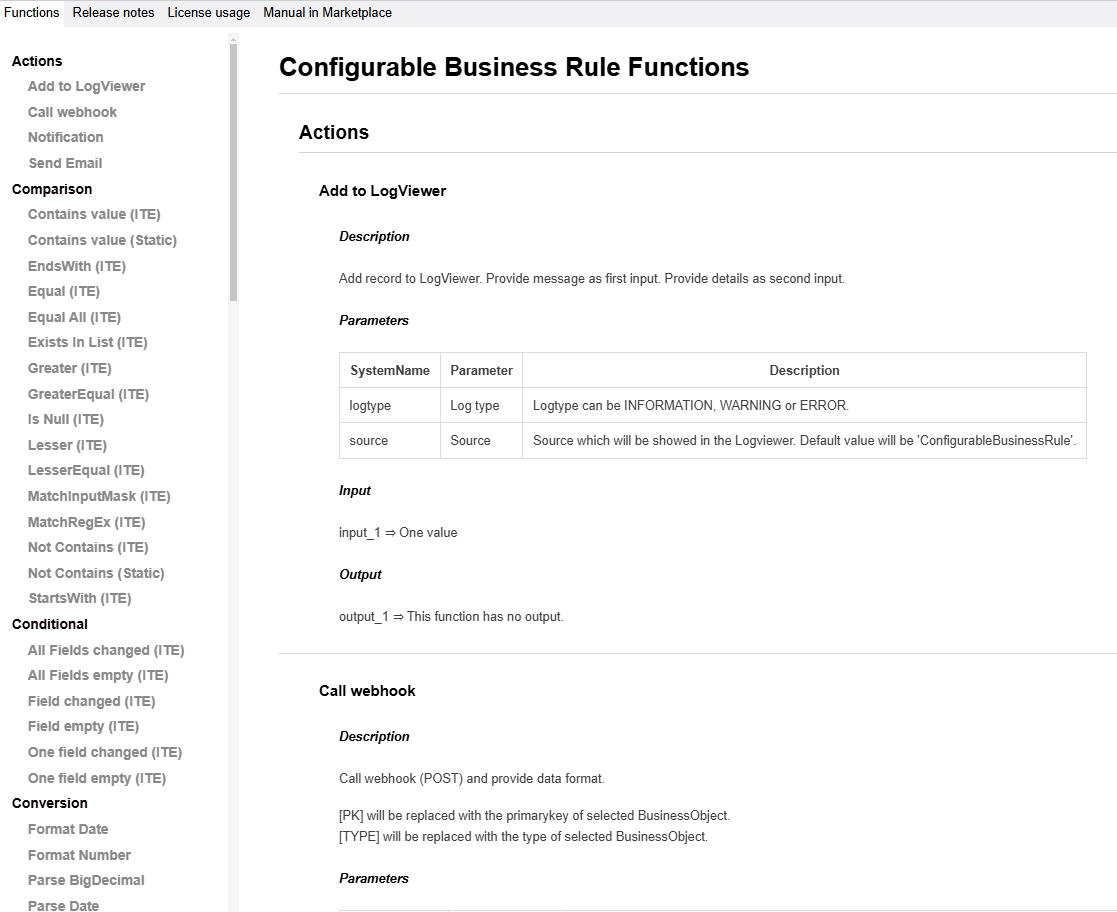
Tip: this page will be opened in a separate tab and can be put on another screen to have direct access next to the editor.
Functions
All available functions will be auto-generated. This means the documentation is always up to date.
Release notes
Release notes will contain updated and new functionality. This way it is possible to check in which version a specific function is created or changed.
License usage
This page will show the current license usage. The app license contains an amount of licenses which can be used. License usage will be counted by the following rules:
- BusinessRules: each unique combination of System BusinessObject and Configuration will count as a single license.
- ScheduledTasks: each registration with a unique configuration will count as a single license.
- BusinessEvents: each registration with a unique configuration will count as a single license.
- Incoming Webservice: each unique configuration, which is marked as a webservice, will count as a single license. Note: This option is not available in the standalone version.
- TSI-Action: each registration with a unique configuration will count as a single license.
Functions
Each function has its own purpose and logics. The description will give a brief explanation about the logics and the manual can be consulted for more information.
The following parts can be distinguished within a basic function:
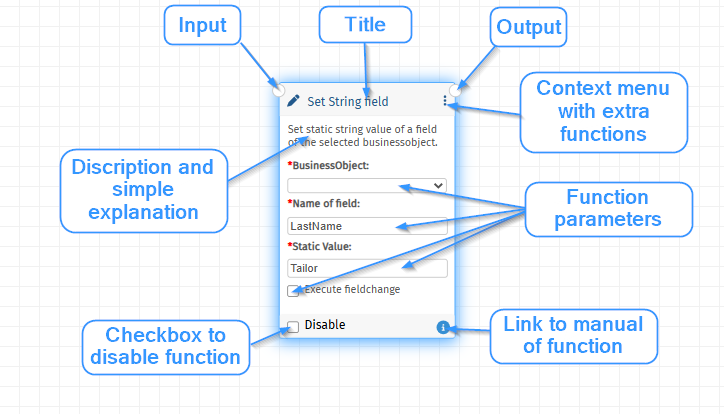
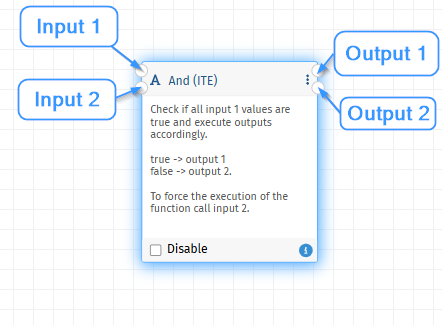
There are also functions available which have multiple inputs and/or outputs.Those functions are called collector functions because they can have an unlimited amount of input connections on input 1.
The following function is an AND function, as example, which can have 1 or more input booleans on input 1. If all input values are TRUE, output 1 will be called. In all other cases output 2 will be called.
Input 2 can be manually called to force the execution of the function. See next chapter “Logical flow” for more information.
Logical flow
Each flow will always start with the “Start of flow” node. This special node has several parameters:
App version: this will show the saved version of the configuration.
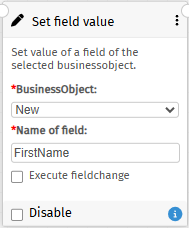
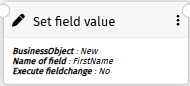
Function size: select the view-type of the functions.
Full: Show full-size function with all editable fields.
Simple: Show a summary of all selected values.
Small: Show only title of function.

Processing order
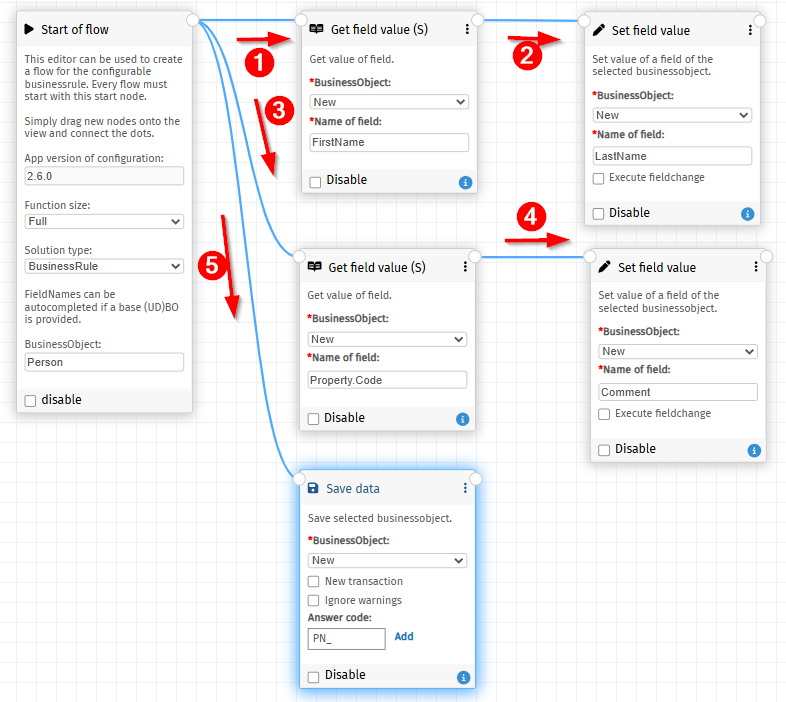
Note: each connection will be executed which means duplicate connections between functions will also result in double executions. The following example will show that the person will be saved twice which is not intended:
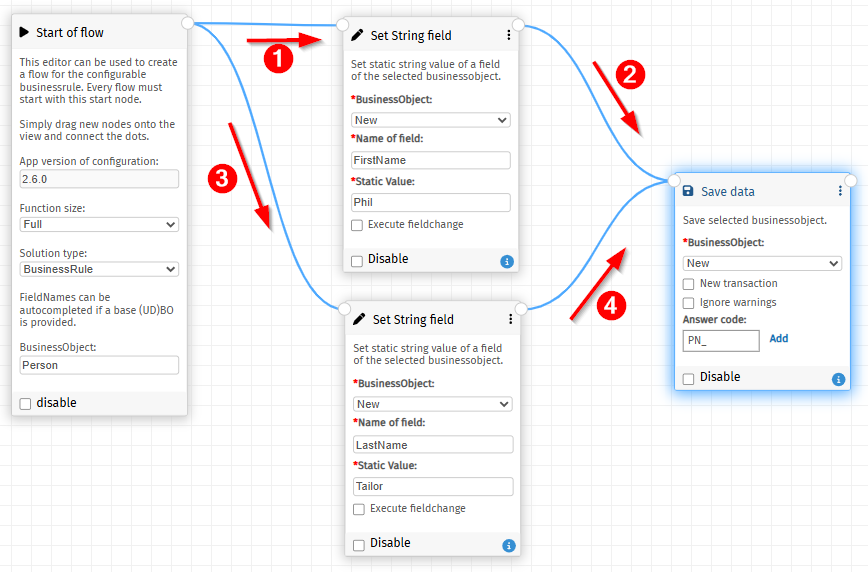
There are 2 possibilities to make this work, remove the top connection because the save must be executed after the update of the second field:
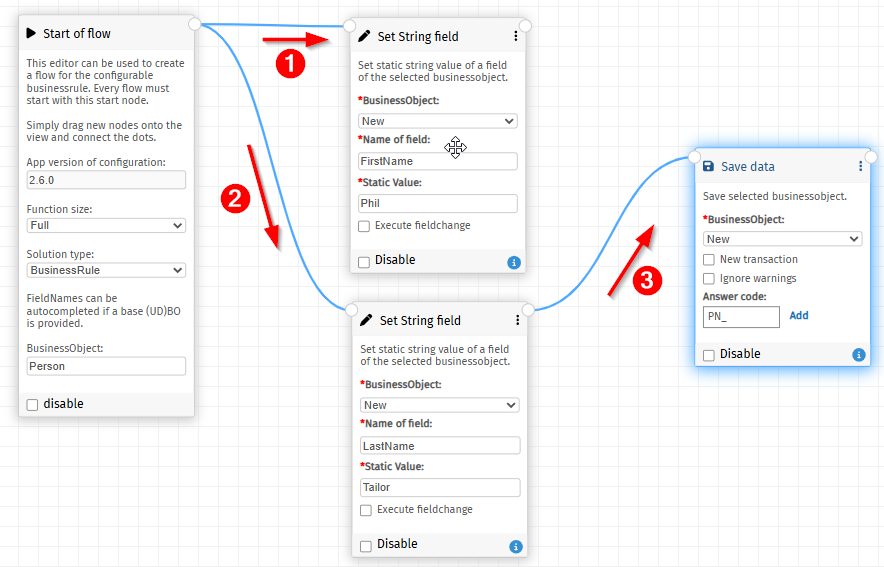
Or connect all functions in a sequence:
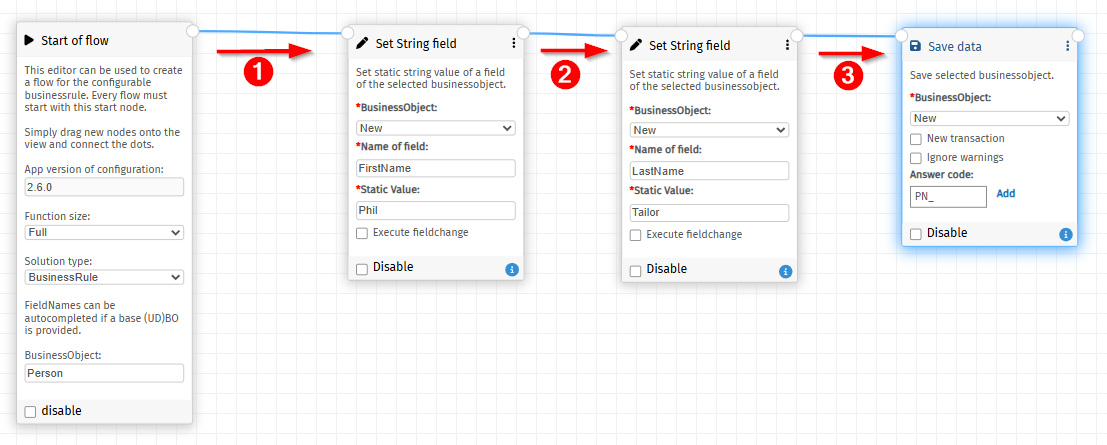
As previously indicated, the order of execution is determined topdown by the position of the sub-function as seen from the current function. This will be illustrated in the following example:
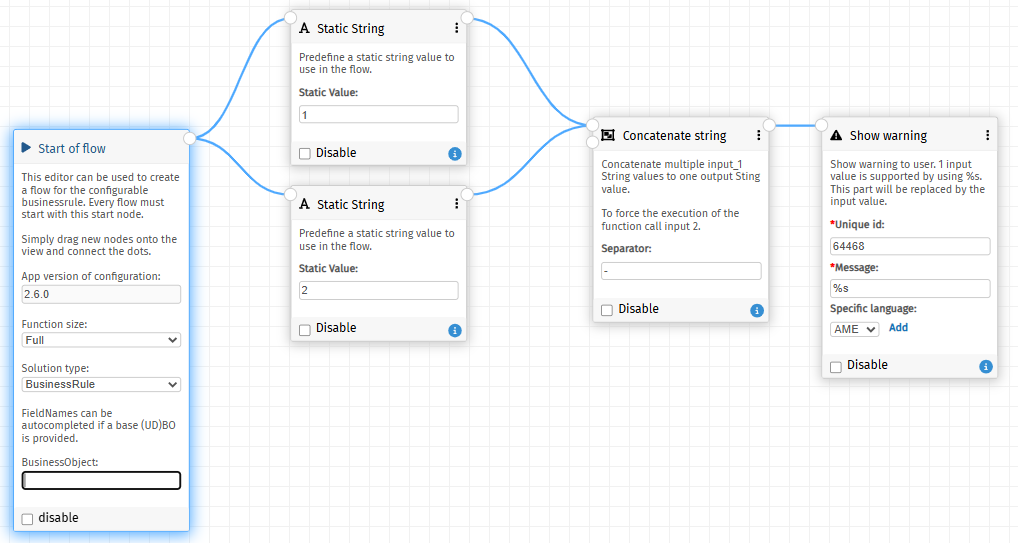
Start of flow will check which subfunction is on top. In this case value 1 so the output here will be “1-2”.
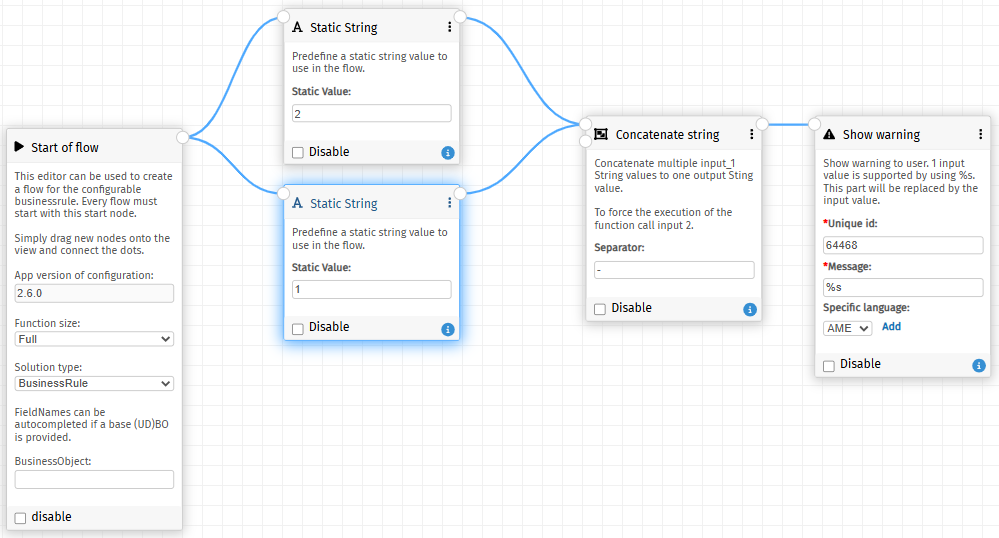
In this example, value 2 in on top so the output will be “2-1”.
Collector functions
As discussed before, collector functions will be used to collect multiple inputs to combine into an output value.
The system will gather input values on input 1 and when all logic has been executed all collector functions will be executed automatically by the Start of flow function.
The following example will combine several fields to one output field Email and will illustrate the flow which will go wrong. FirstName = “Steve”, LastName = “Weller”
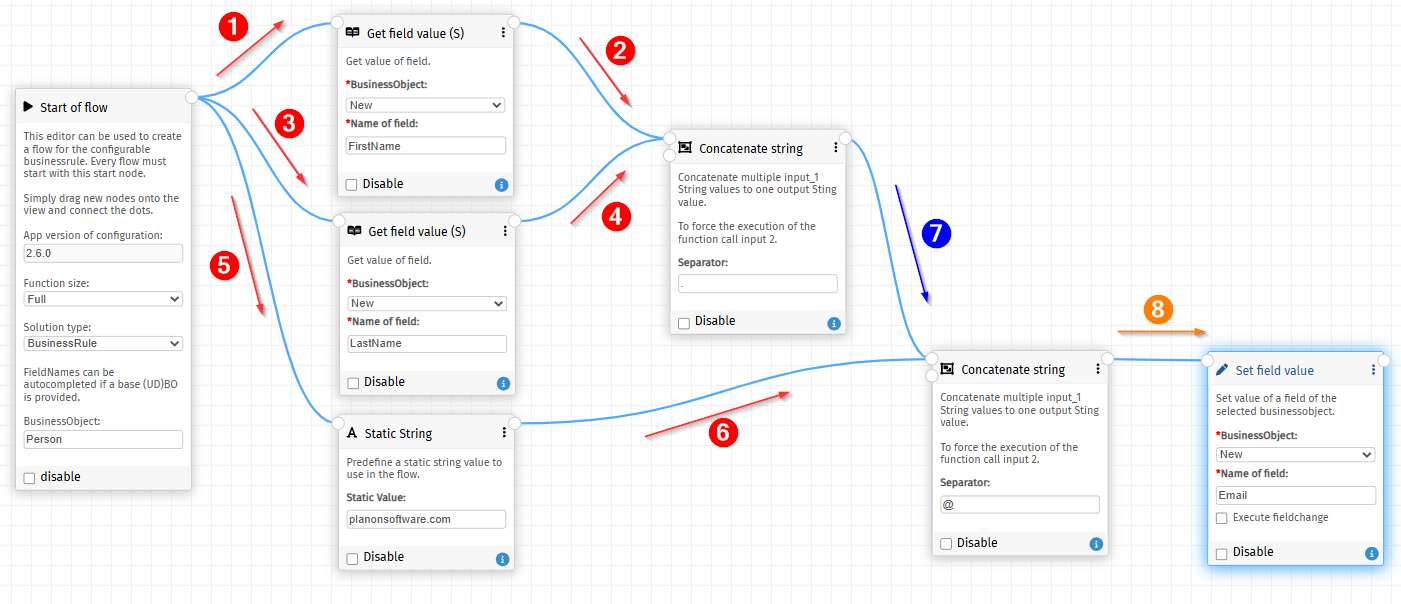
As shown above the concatenate functions will be executed after step 6 which will result in adding “planonsoftware.com” first to the second concatenate function. After that the first concatenate function will be executed which will give the second input “Steve.Weller” to the second concatenate function. The result in the output will be in this case which is incorrect.[planonsoftware.com@Steve.Weller]
To solve this problem an input 2 is being created. This input can be executed manually so it is possible to force the correct order of executions. Example:
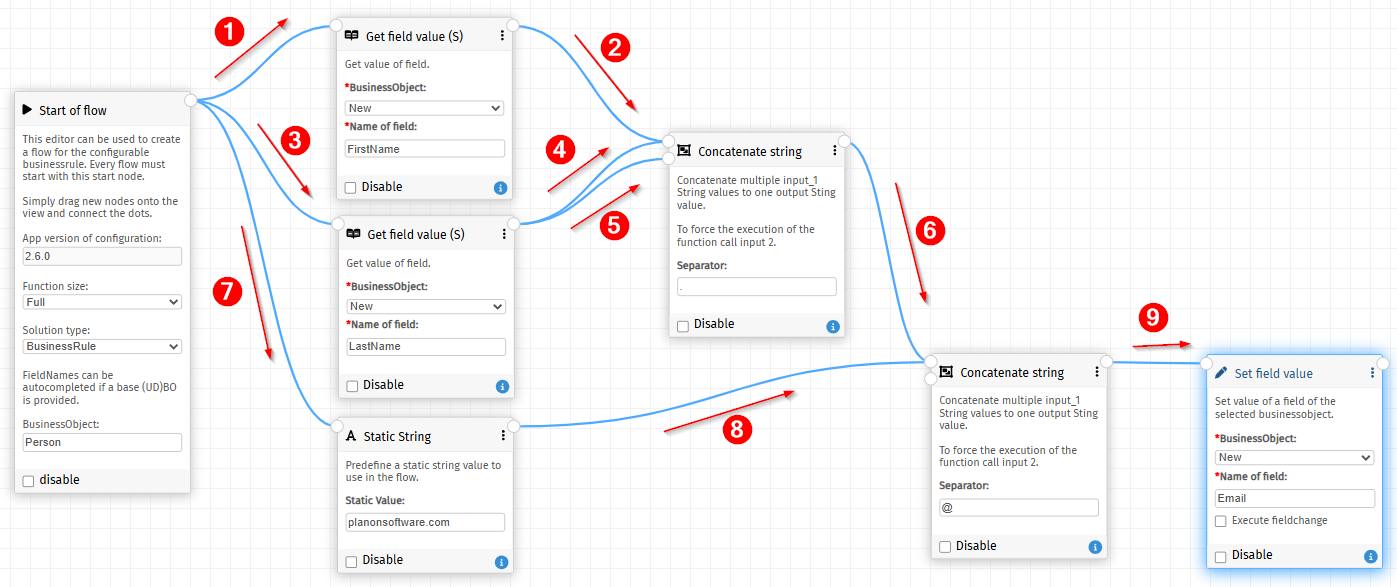
In this example an extra step 5 is created to be executed. The function get field value of LastName will first provide the LastName to the concatenate function and afterwards it will also call the second input of the concatenate. This will result that the concatenate will directly be executed, and the output is pushed to the second concatenate. This configuration will result in the correct outcome: [Steve.Weller@planonsoftware.com]
Best practice is to always connect the second input of a collector input to make it controllable and prevent creating “unexplainable” logics. Make sure to connect it to on of the previous functions when all inputs are being provided.
Convenience functions
Each function has its own (mostly) simple task. In configurations some combinations of functions are frequently used. To prevent the unnecessary adding of all those functions, convenience functions are introduced. Those functions are most of the time marked.
(S) Static version of the function. A direct parameter function is added to the functions so it can be provided directly.
(ITE) Those functions have already a if-then-else function included. If the outcome of the base version is true output 1 will be called and otherwise output 2.
The following example will give an example of simple functions and the more advanced convenience functions:
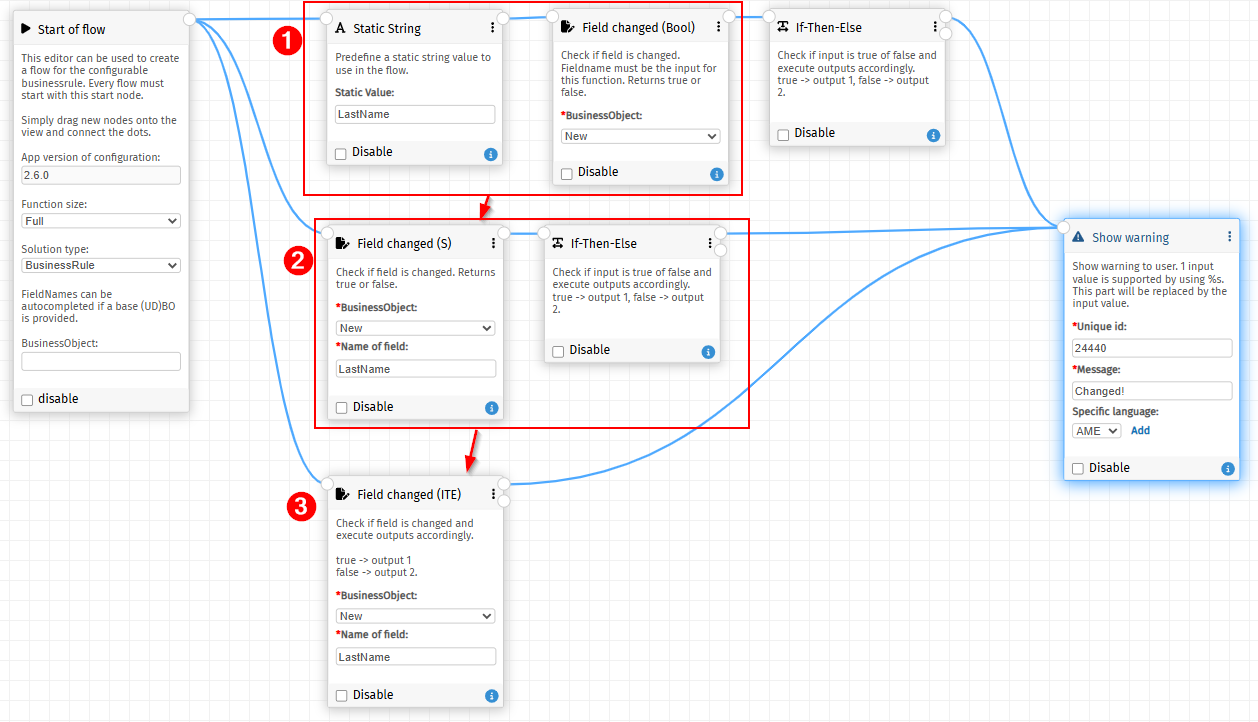
Flow 1 is basic. 3 functions are needed to check if LastName is changed and if that is the case show the warning.
Flow 2 has 2 functions (Static String & Field Changed) of flow 1 combined in 1 convenience function (Field changed (S)).
Flow 3 has only 1 function which has combined Field changed (S) and If-then-else.
Disabling functions
Functions can be easily disabled by checking the disable checkbox on a function or clicking Enable/Disable in the context menu of the function. When disabling a function all following functions will also be automatically disabled. Once disabled a function will be transparent in the editor.
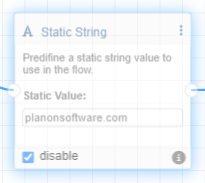
Note: Because of the regular automatic reload of the Planon framework the editor will also be reloaded. To fix this the configuration will automatically be saved in the browser storage on every save. After clicking the save button the configuration will be saved to the database. When clicking the reload button the configuration will be loaded from the database again.
Editor controls
- Delete key : Remove selected
- Esc : Deselect functions
- Ctrl + Wheel : Zoom
- Ctrl + S : Save configuration
- Ctrl + A : select all functions
- Ctrl + C : copy selected functions
- Ctrl + P : paste functions which are copied. This is also possible in another configuration.
- Ctrl + left mouse : Multi select functions
- Double left mouse on line : Add/remove shaping item
- **Doube right mouse on canvas : deselect functions.
Solution types
- BusinessRule: Create a business(logic) rule to perform automation within Planon. For more information goto BusinessRule
Advanced (level 3 only):
- ScheduledTask: Schedule a task on a specific moment in time.
- BusinessEvent: Create logic based on the decision model.
- Incoming webservice: Create logic on an incoming webservice event.
- Webservice response: In case a external webservice is called from the CBR this type can be used to process the response.
- TSI-Action: Create logic which will be trigger by a TSI-Action (button in action menu).
- SubConfiguration: A subconfiguration which can be called from the base configuration. This can be used when specific logics must be executed in different solutions.
- BusinessObject available which can be used to enable autocompletion on BO’s and fields. Once provided it also enables checks on fields, so it should not be possible to provide a non-existing field.
- Depending on the solution several functions can be added and connected with so called connections.
The flow execution of the functions is from left to right and top down.
Planon Configuration
This chapter explains the necessary steps to use optional free module based business rules. This is not needed if the decision is made to use standalone business rule.
Firstly we would need a free business object to use free module based business rules.
Once the free BO is chosen, create a UDBO with any name (preferably UsrConfigurableBusinessRules)
Set the below fields to In Use
| Description | System name | Field Type | Unique | Comments |
|---|---|---|---|---|
| Code | Code | Text | Yes | Unique code to identify the configuration. Ideally this field is auto provided by a codegen. |
| Name | Name | Text | No | Functional description of configuration |
| Visual Editor URL | Free String of length 255 | No | Auto-generated URL field which will contain the link to the visual editor. | |
| Configuration | StringExtended | No | Data field which will hold the configuration. |
Once the Business Object configuration is created, it needs to be added to a TSI. The required configuration steps can be found from here
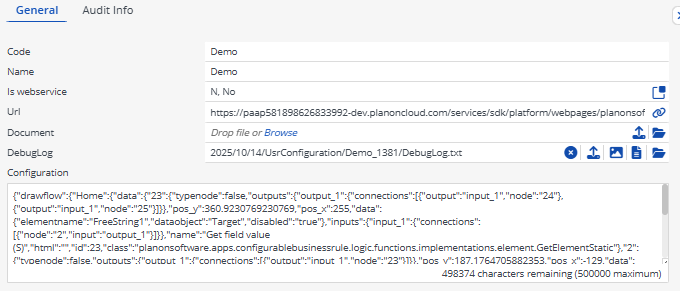
Example free module:
Installation
This chapter described the steps required in order to install this app on your Planon environment.
Installation Process
There are two ways to install the app;
Install the app by using the marketplace
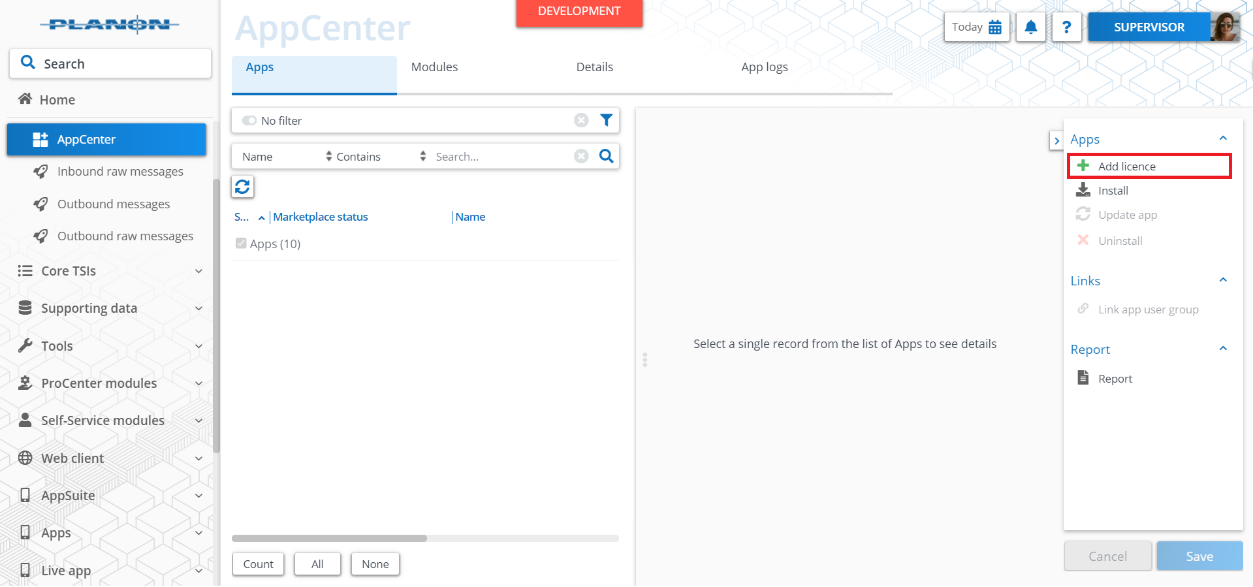
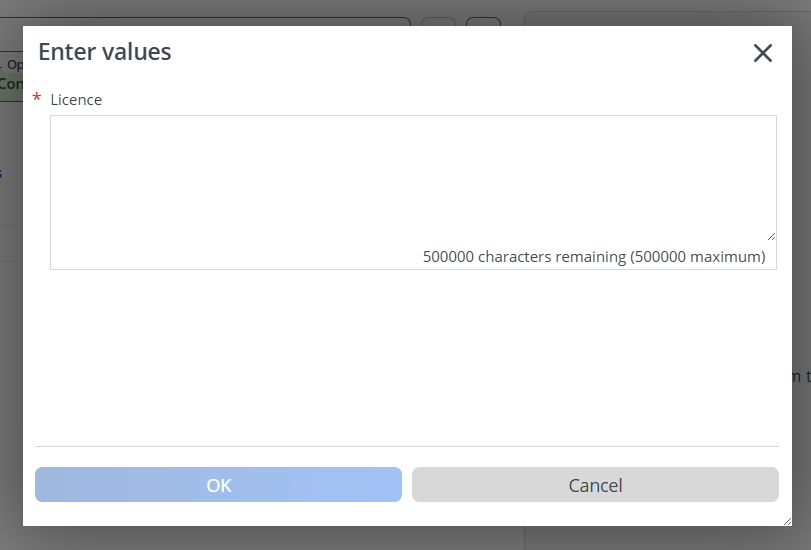
In case your environment is configured to use the Planon appstore the only thing required to install the app is to add the app license in the AppCenter TSI. Planon will automatically download and install the app.
Manual installation
In case you want to perform a manual installation follow the steps below.
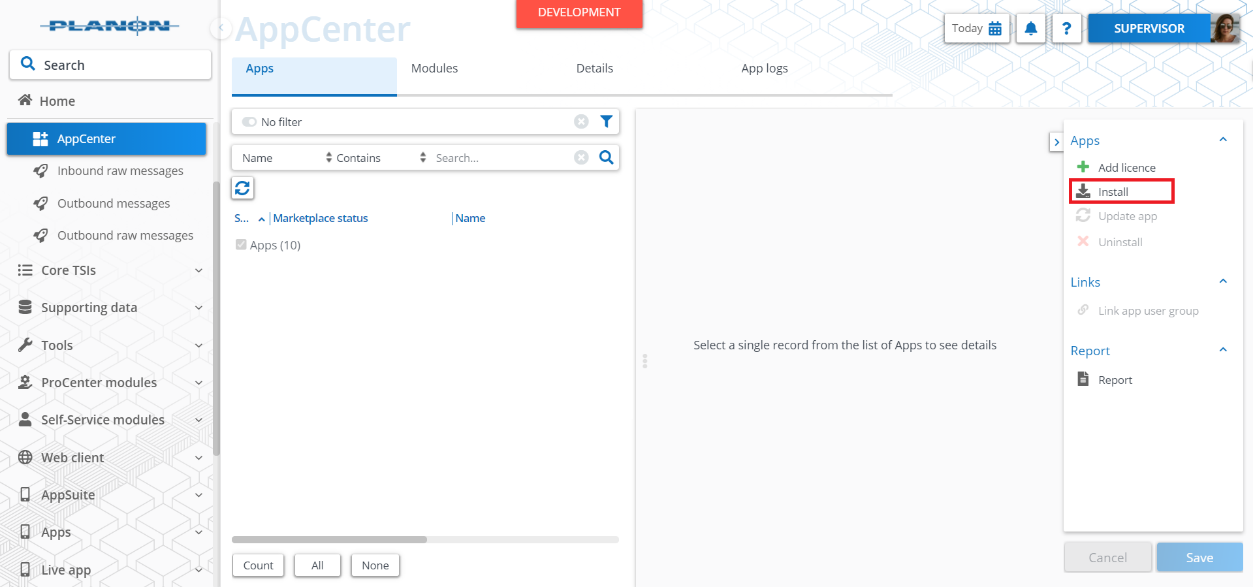
- Open AppCenter TSI from Planon webclient and click on install from action menu.
- Browse the .ppk file
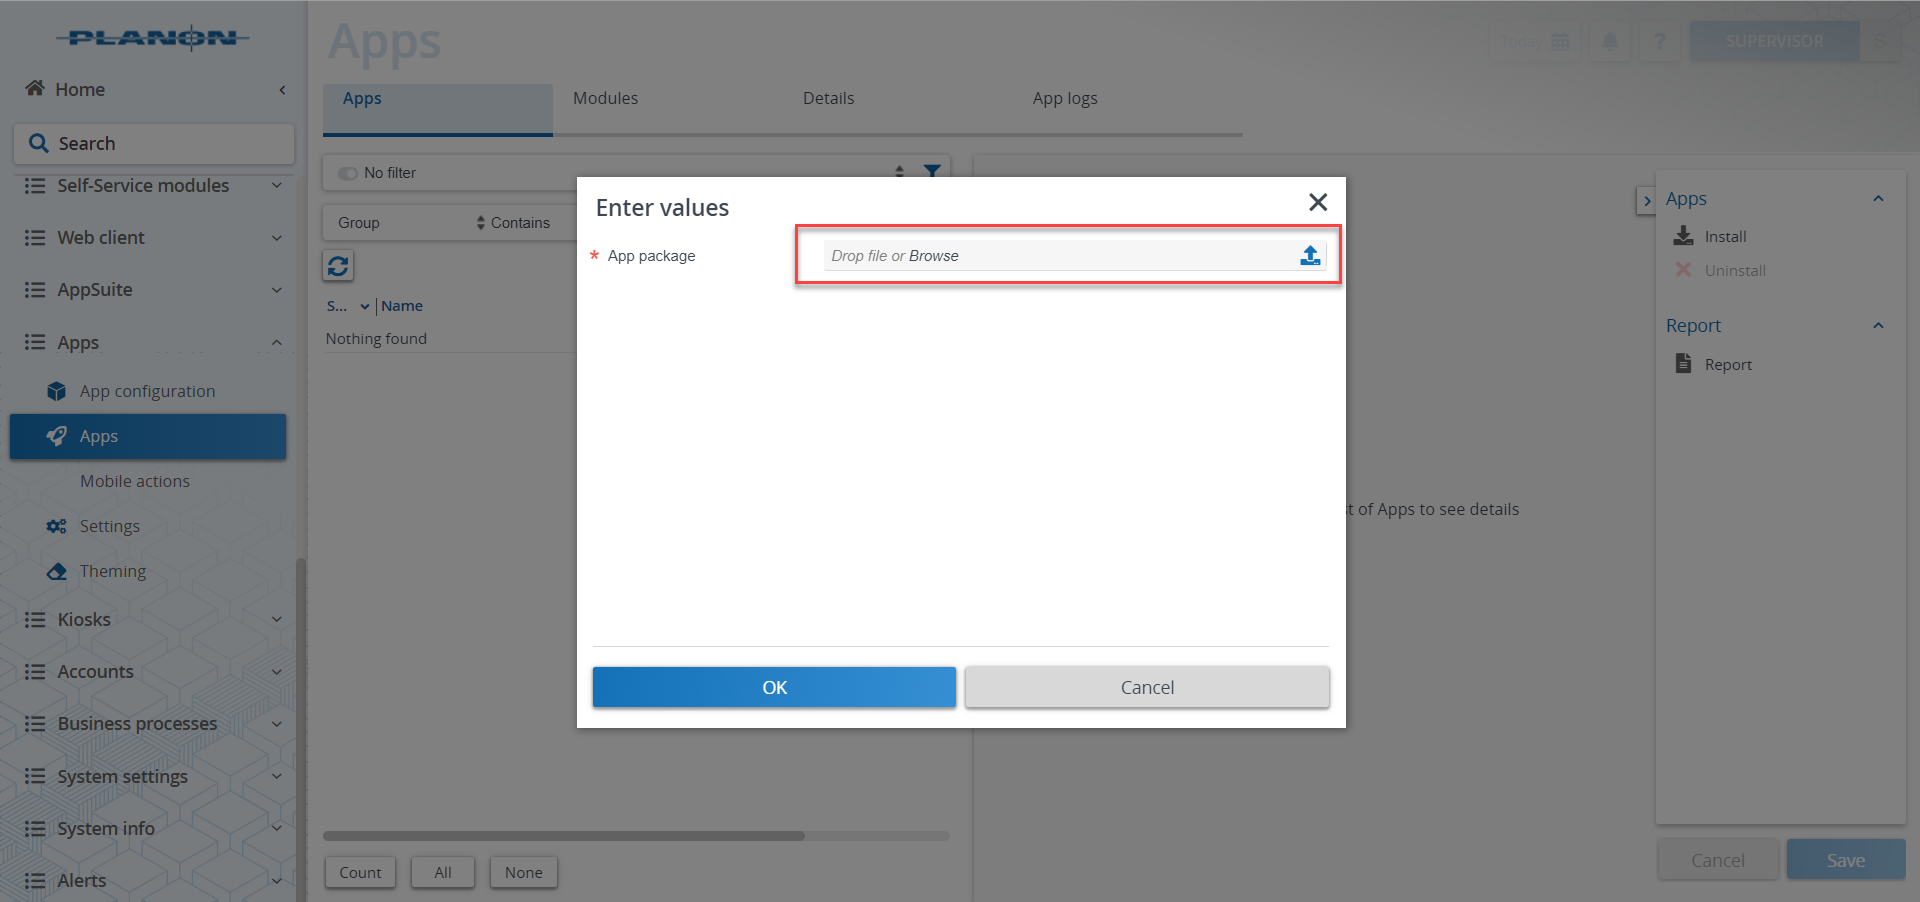
- Click OK to install the app and follow the installation process.
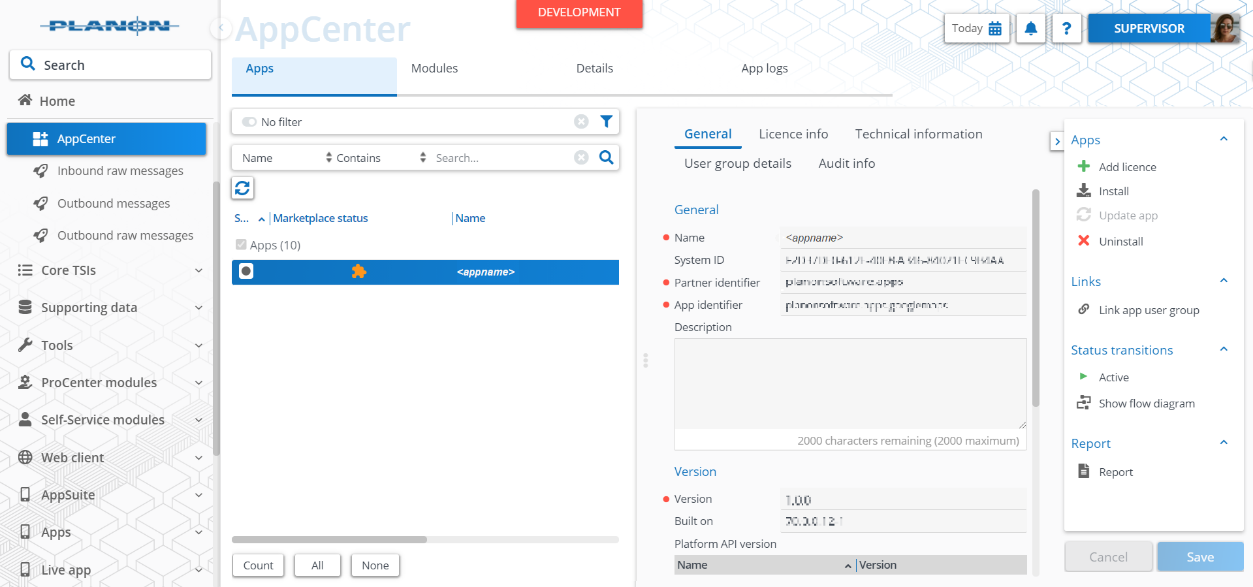
- When the app is successfully installed, the app will appear in the AppCenter.
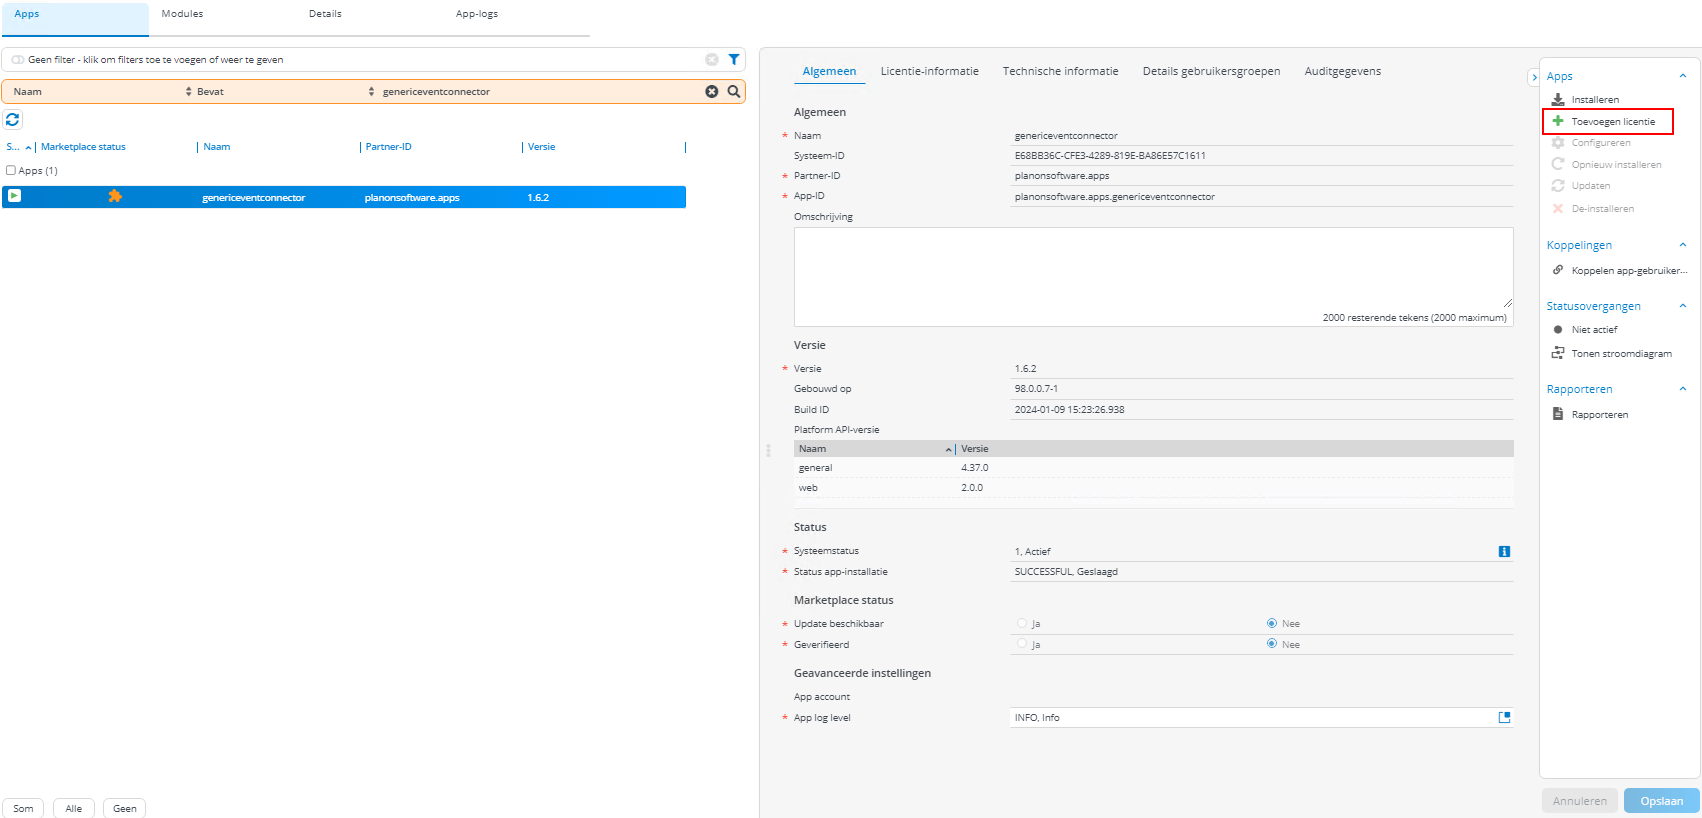
- Add the app license in Apps TSI
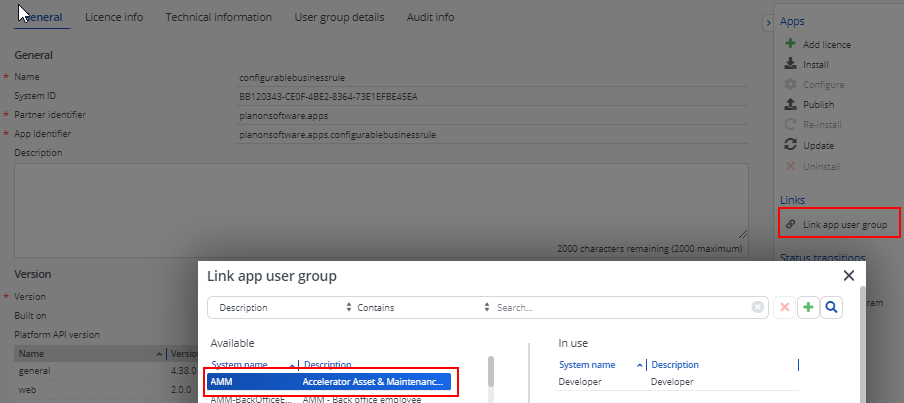
- Link App to usergroup
Activation
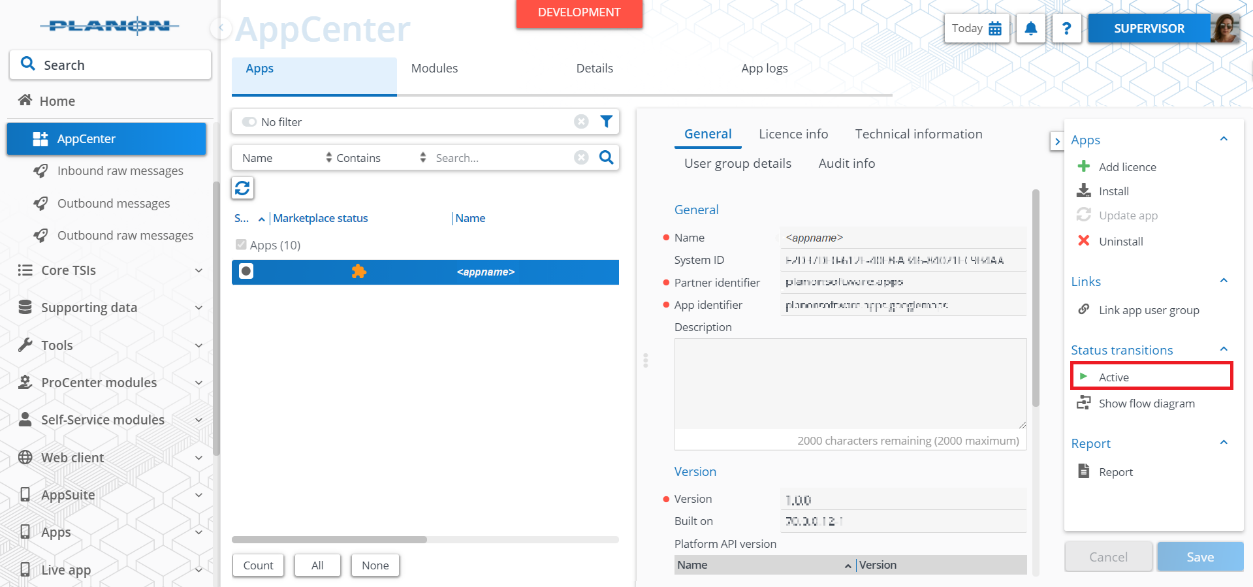
Once the app has been configured you can activate the app by pressing the ‘Active’ status transition from the action panel.
App settings
Module settings
This chapter describes and explains the settings that are available for this app.
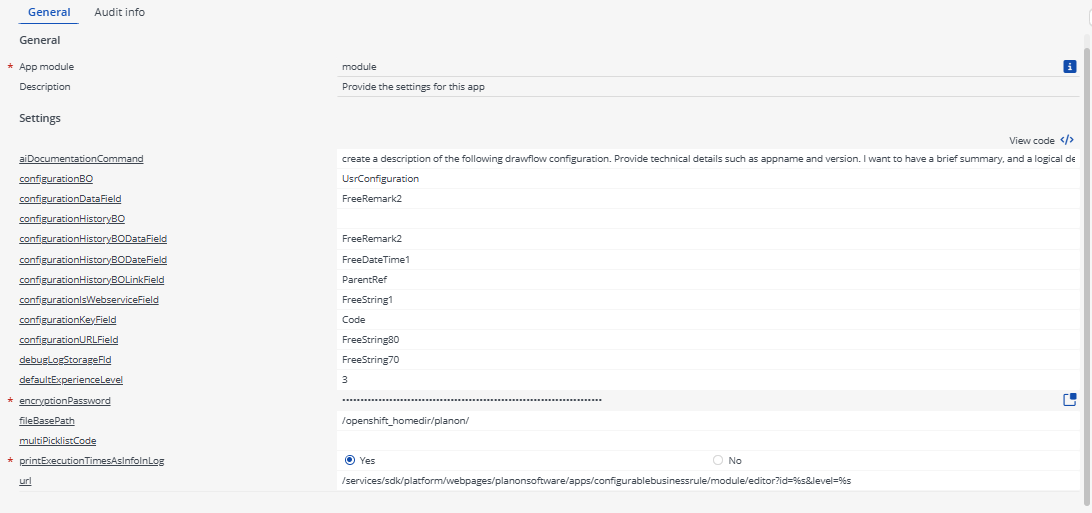
Now that the app is installed we can provide the app settings for each module in the ‘modules’ selection level. Provide the module settings (the app configuration) which is available in the **Details **section.
Click Save button after providing the module settings.
Description of settings
| Setting | Values | Description |
|---|---|---|
| aiDocumentationCommand | String | Text to generate AI command for creating documentation. |
| configurationBO | String | Systemname of used (free) module which will be used to store the configurations. |
| configurationDataField | String | Actual datafield in (free) module to store the configuration JSON from the visual editor. Recommended is to use a ExtendedString field here because the configurations can get large. |
| configurationHistoryBO | String | Systemname of (UD)BO which will be used to store each history version while saving. |
| configurationHistoryBODataField | String | Actual datafield in (free) module to store the history version configuration JSON from the visual editor. Recommended is to use a ExtendedString field here because the configurations can get large. |
| configurationHistoryBODateField | String | Datefield which will contain the timestamp of the history record. |
| configurationHistoryBOLinkField | String | Linkfield to the actual configuration. |
| configurationIsWebserviceField | String | Fieldname of yes/no picklist field to determine the configuration is used for an incoming webservice. |
| configurationKeyField | String | Keyfield of the (free) module. This field will hold the unique ID of the configuration which the businessrule configuration can use for execution. |
| configurationUrlField | String | Systemname of field which will hold the auto-generated url to the visual editor pointing to that specific configuration. |
| debugLogStorageField | String | Fieldname of document field which will hold the debug information. Once this setting is provided a debug button will be visible in the editor. After clicking the button the debug information of the last run will be showed in the editor. See chapter Debugging for more information. |
| defaultExperienceLevel | String | Default experiencelevel which will be part of the generated url. |
| encryptionPassword | String | Encryption password which will be used to encrypt/decrypt passwords in the configurations. |
| fileBasePath | String | Base filepath which will be used for references to files. |
| multiPicklistCode | String | Code configuration which will be executed after adding or deleting a multipicklist. In the configuration it is possible to check the action and multipicklist type. This is because it is not possible to register a businessrule on those (UD)BO’s in Planon. |
| printExecutionTimesAsInfoInLog | String | If this option is enabled the execution times will be showed in the Wildfly/Tomcat logs to monitor delays. |
| url | String | Default URL template which will be generated for each configuration. |
Example settings
Component settings
This app consists of 4 business rules each having its own very basic configuration.
planonsoftware.apps.configurablebusinessrule.ConfigurableStandaloneBusinessRule
Actual BusinessRule which will execute the logics created in the editor. This version will store the configuration in the field definer registration itself. (See chapter 9.1)
planonsoftware.apps.configurablebusinessrule.ConfigurableBusinessRule
Actual BusinessRule which will execute the logics created in the editor. This BusinessRule is dependent on the extra free module which must be configured in Planon once. (Free module] and chapter 9)
planonsoftware.apps.configurablebusinessrule.GenerateURL
This is a helper BusinessRule which can be configured on the new configuration BO (free module see chapter 9) to autogenerate the URL to the Visual Editor each time the configuration is saved.
planonsoftware.apps.configurablebusinessrule.CreateHistory
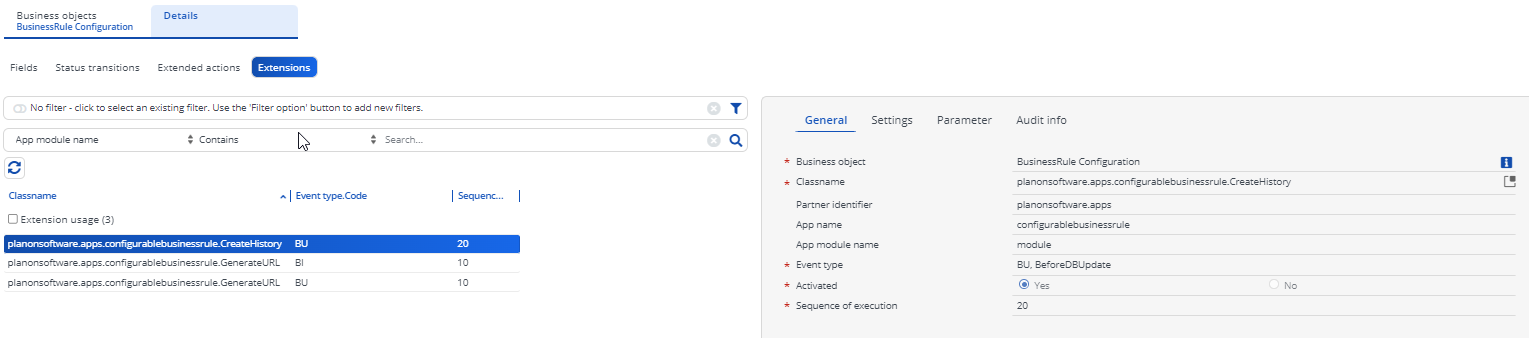
This is a helper BusinessRule which can be configured on the new configuration BO (free module see chapter 9) to automatically create a history record each time the configuration is saved (in the editor).
How to use
Creating the configuration
Once the app is activated, one can start using the app.
Using standalone version
The basic visual editor can be found on the following url:
This editor does not have all functionalities yet because of lacking the configuration BO. It can now only be used as a stand-alone version.

Using free module based version
Once the BO is configured as explained in the chapter 5, opening the editor with reference to this configuration displays extra buttons for saving or reloading the configuration of business logic.

To use with reference of the free BO, a free BO record needs to be created in the configured TSI. The url with reference to free BO record with code ORDER_INSERT will be as below
[https://[environment]/services/sdk/platform/webpages/planonsoftware/apps/configurablebusinessrule/module/editor?id=ORDER_INSERT]
The app also comes with a business rule to auto generate this URL when a free BO record is created. The details of the business rule configuration will be explained in chapter 9.
Register BusinessRules
Now all necessary steps are completed and a first configuration can be made. Depending on the choice whether to use a free module the next subchapters will give a brief description of how to start.
ConfigurableStandaloneBusinessRule
Visit the following link in your browser:
The following page will be showed:
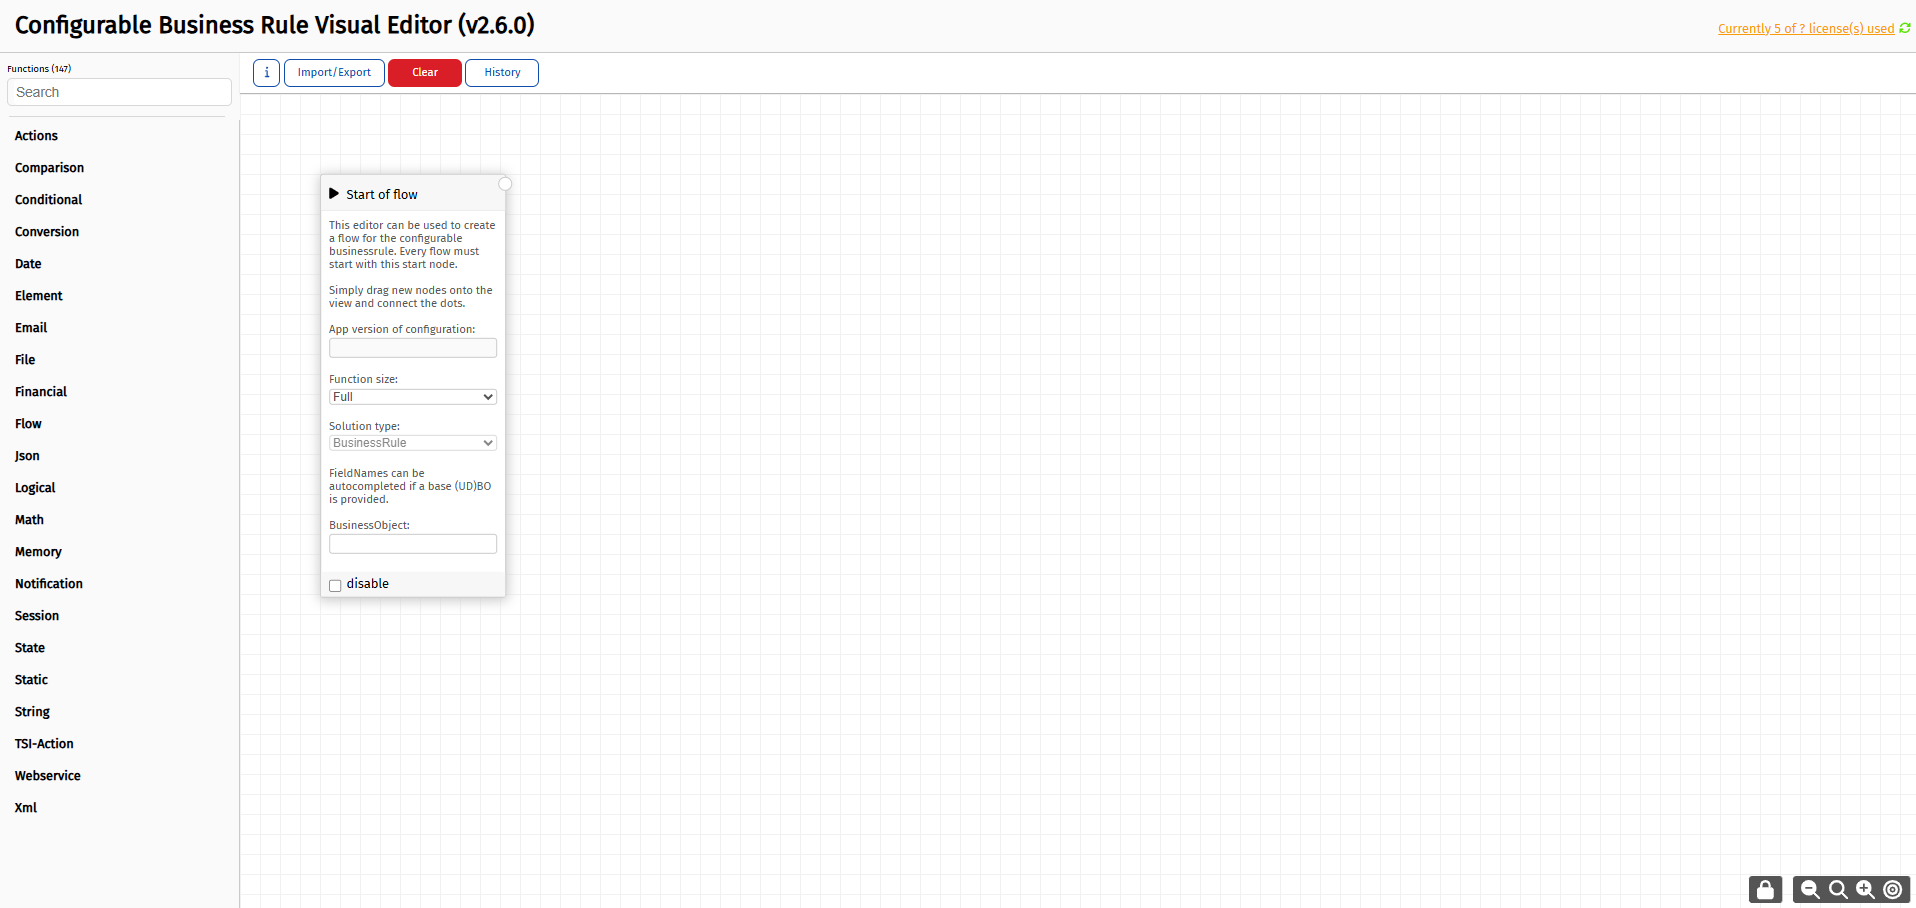
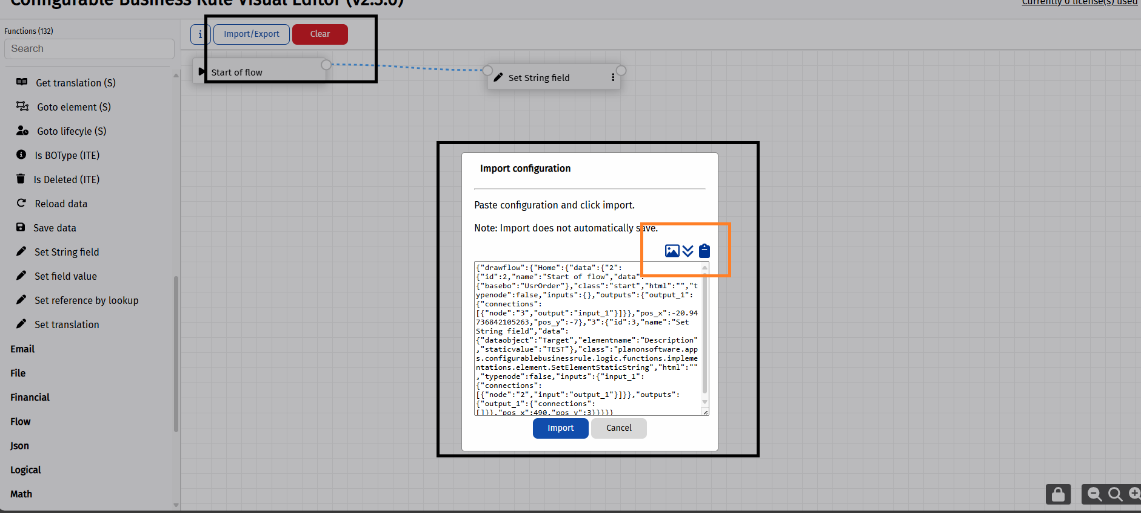
Once the configuration is created as per business logic, click on Import Export which shows the complete logic in the form of a json. This json needs to be configured on the Business Object on which the business logic needs to be executed. Also, one can download the configuration in a download using the download button.
- Go to the TSI Field Definer
- Select the Business Object on which the business logic needs to be performed.
- Set the BO to Under Construction
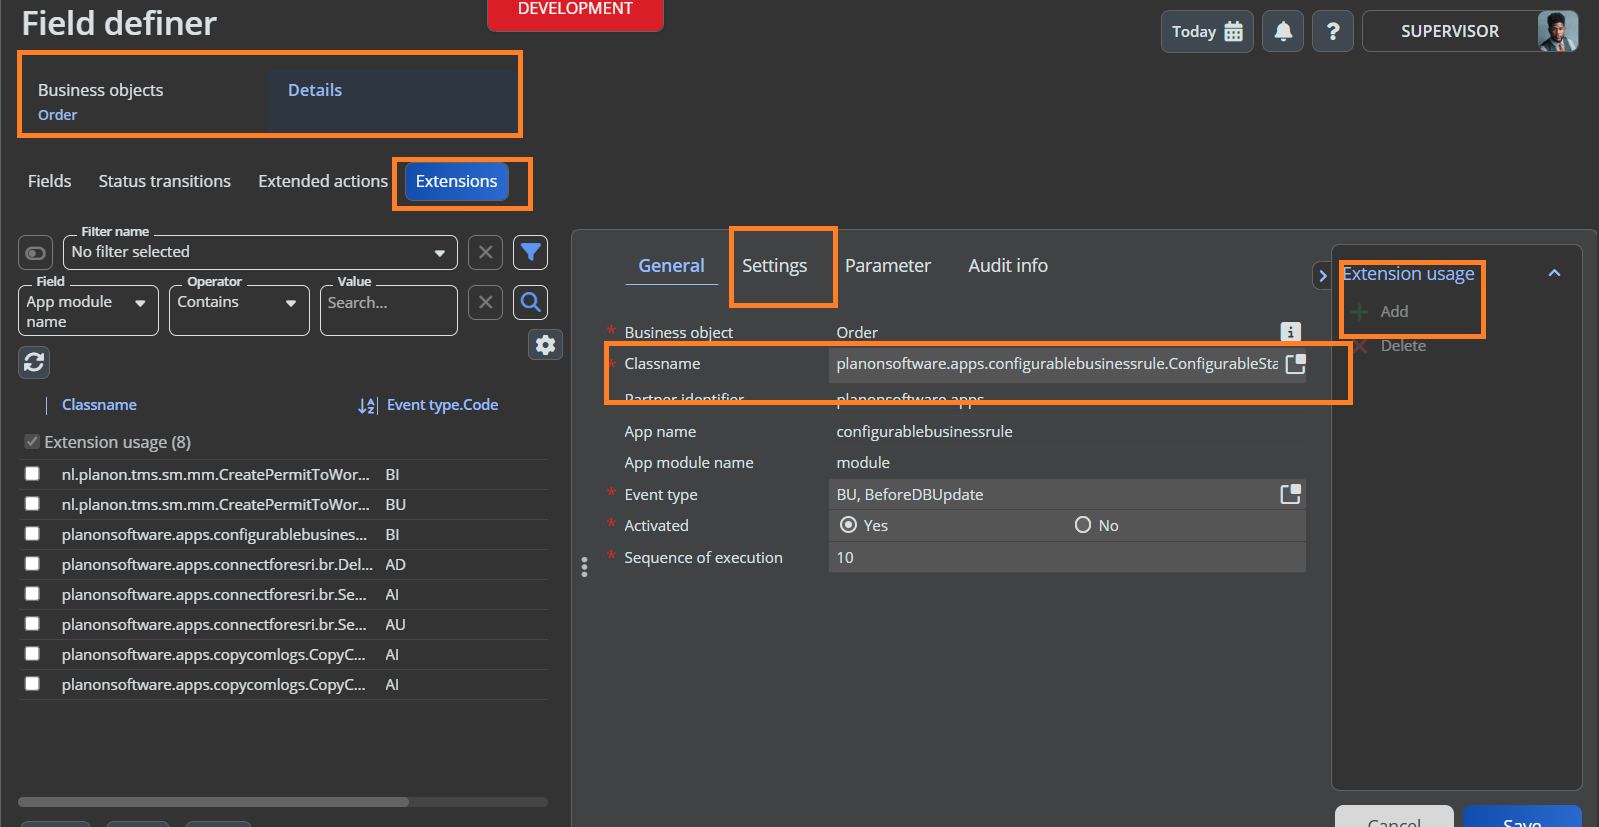
- Go to Details Level and Extension selection step
- Click on Add extension
  - Select the extension **ConfigurableStandaloneBusinessRule** from the Class Name reference popup
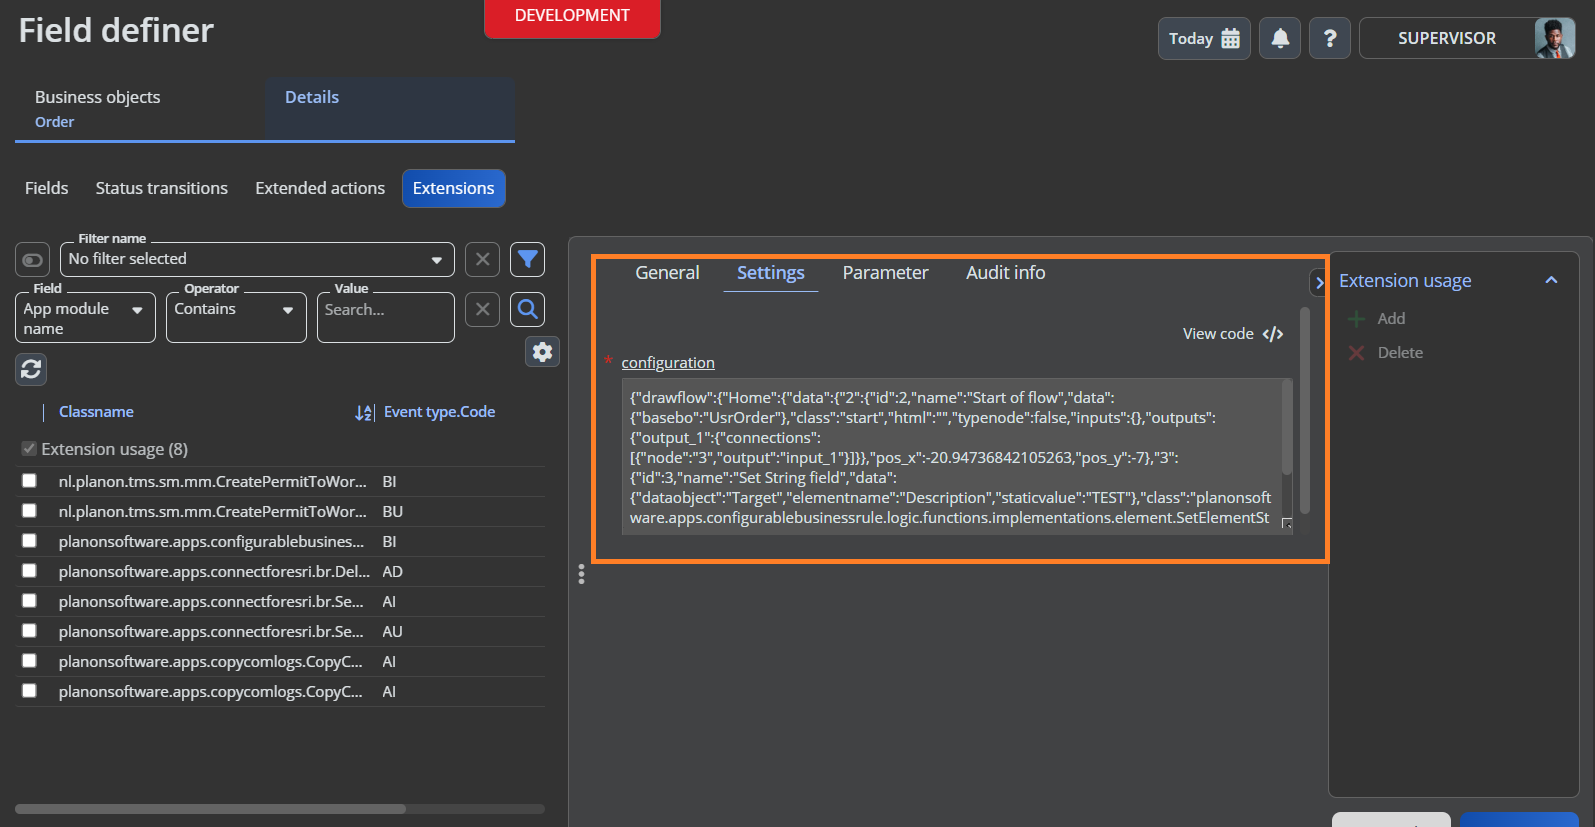
  - Go to settings tab and configure the json copied from Visual Editor
  - Provide other mandatory fields like Event, Sequence etc as per business needs
  - Save the changes
- Now set the BO back to Completed state.
GenerateURL
This is an optional business which can be configured on the free BO to auto-generate a url with reference to the free BO record.
Below steps shows the configuration details
- Go to the TSI Field Definer
- Select the Free Business Object configured
- Set the BO to Under Construction
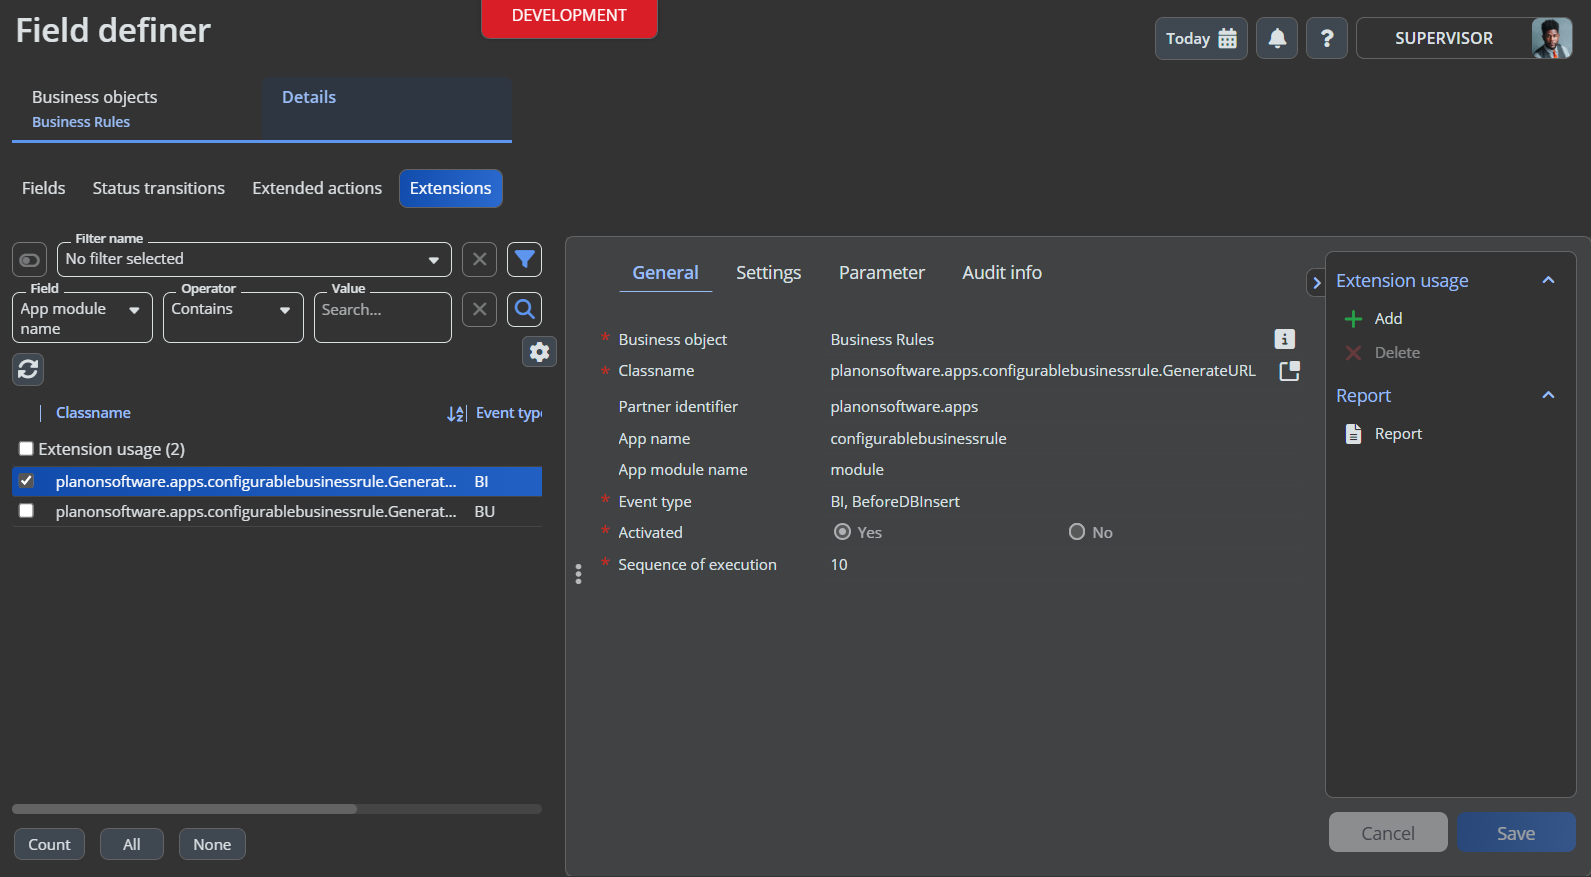
- Go to Details Level and Extension selection step
- Click on Add extension
  - Select the extension **GenerateURL** from the Class Name reference popup
  - Go to settings tab and configure the json copied from Visual Editor
  - Provide other mandatory fields like Event, Sequence etc as per business needs
  - Save the changes
ConfigurableBusinessRule
As explained in the previous chapters, this business rule is used only when free module is configured.
If the free module is configured and all convenience businessrules are in Planon a new configuration can be created:
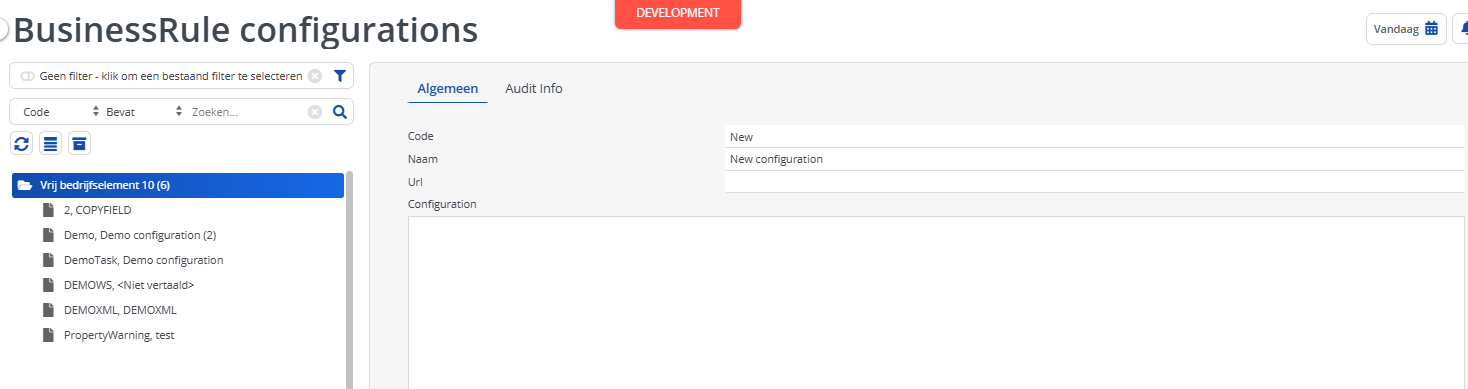
Provide a Code and a Name / Description and after saving the URL will be automatically populated.
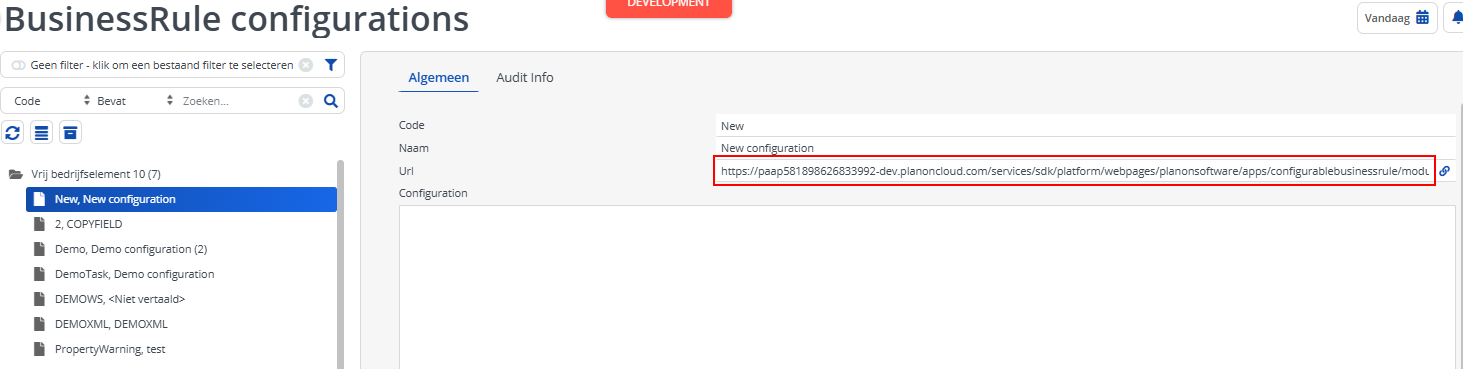
Clicking on the link button on the right of the URL will open the editor. This time it is automatically linked to the configuration itself and therefore can be saved and reloaded directly from the editor. 2 extra buttons will be available in the editor to do so.
The generated URL will look like this:
id=New is the actual link to the new free module.
History Business Rule
To automatically save a history record on each save of the configuration this BusinessRule (planonsoftware.apps.configurablebusinessrule.CreateHistory) can be configured on the configuration BO
Trigger type : BeforeDBUpdate
Tips & Tricks
This section will give some tips in easy working with this app.
Comments
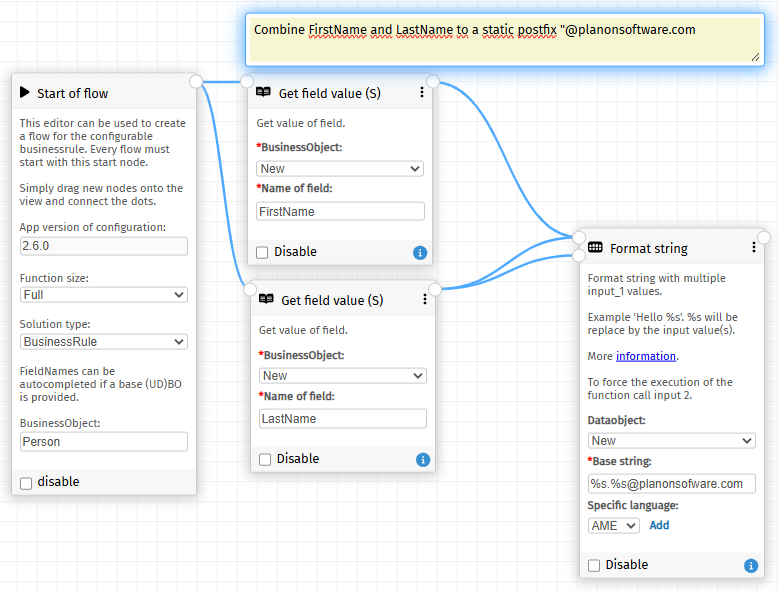
A special comments (post-it) function is created to make it possible to have some discriptive notes in a flow.
Warning
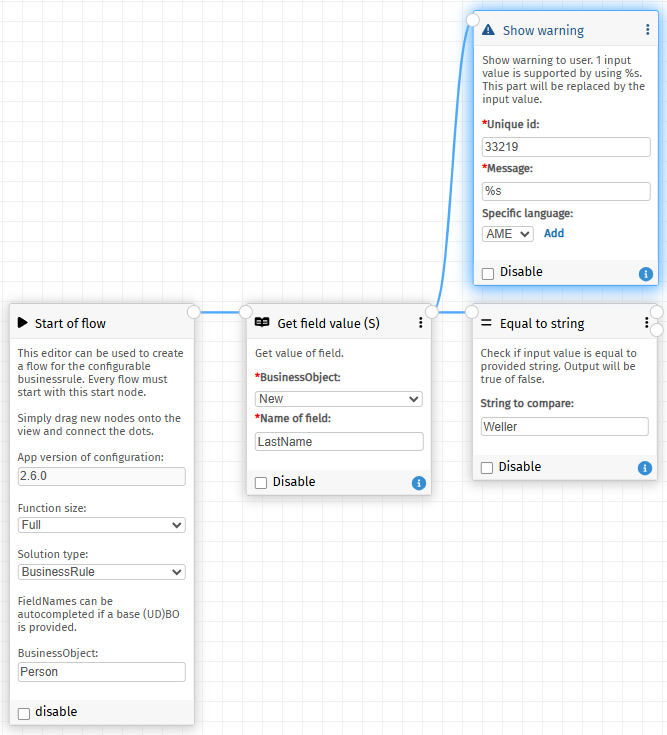
While creating a configuration in the editor a simple way of “debugging” can be used by adding a warning in strategic points in the flow. (Note: in version 2.8.0 a new way of debugging is introduced) In the following example the warning will check the actual value of the LastName field which is read. By adding the ‘%s’ in the Message field, the input will be showed as text.
When executing the businessrule (doing the actual action in Planon) the warning will be displayed.
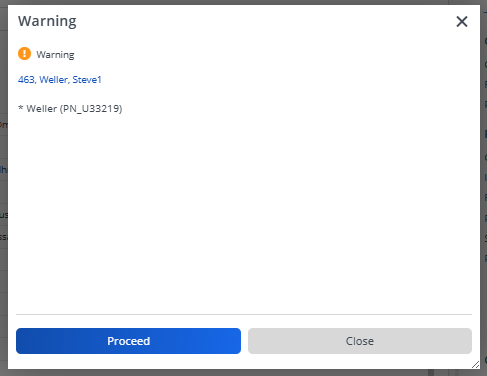
As long as Proceed is not clicked the logic will stop at this point. The process can be repeated as many times as necessary.
Troubleshooting
This chapter describes common things and known issues to check in case the app is not working as expected.
- Configuration has been tampered with -> This check is to prevent manual modification of the configuration. In some cases an update of the app can cause this message. This can be easily solved by opening de configuration in the editor and save it again. This way the new checksum will be calculated and inserted to the configuration.
Debugging
After configuring the debugLogStorageFld setting AND loglevel is set to DEBUG an extra button will be available in the editor.

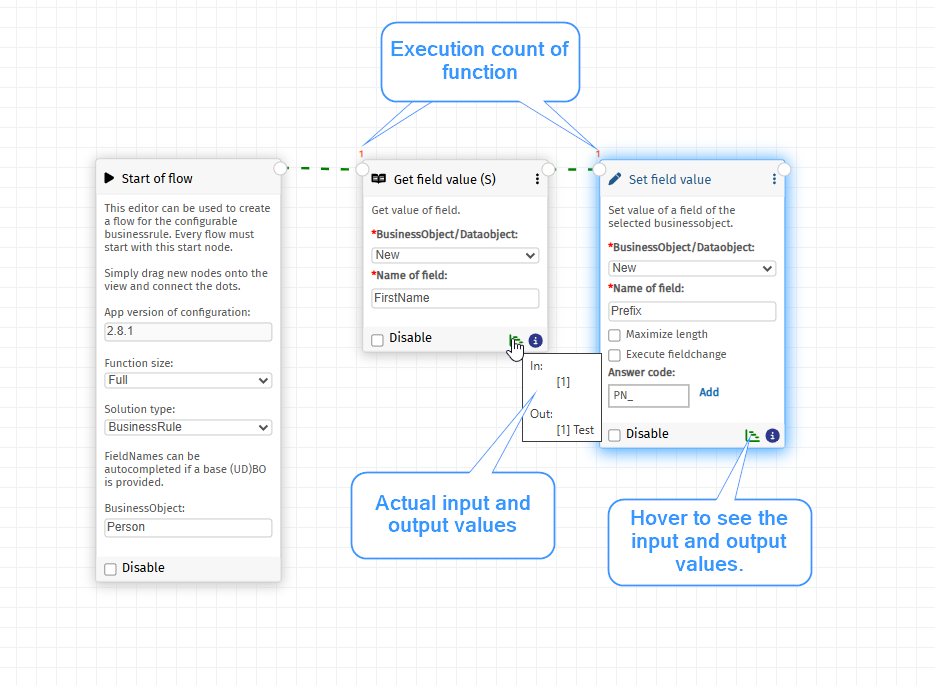
Each execution of the configuration will save the debug configuration in the configured field. After clicking the button the execution datetime will be showed in the button:
The last run path will be showed in the editor. Each line which has been executed will be marked green.
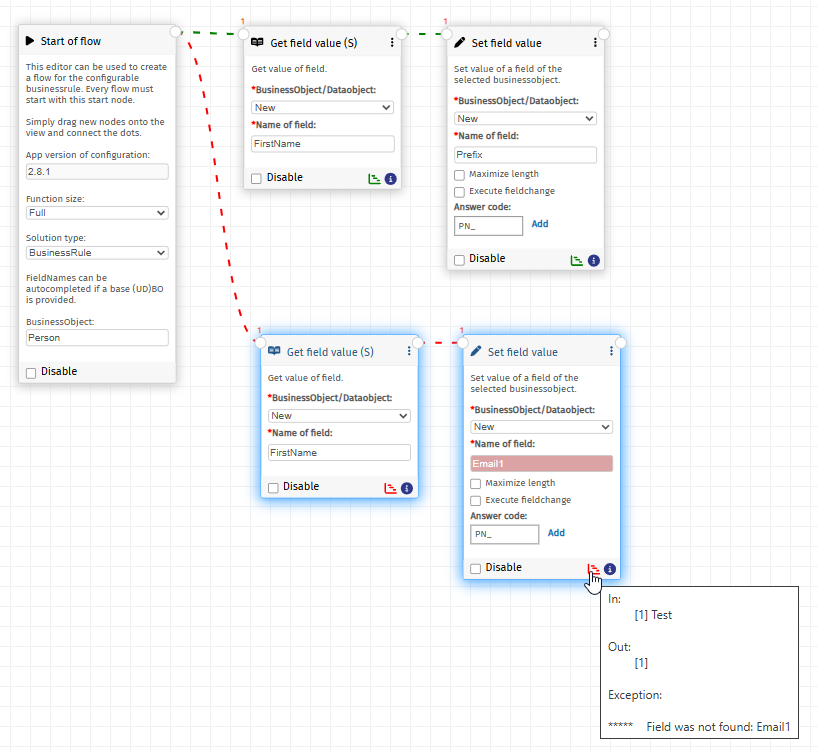
In case of an error the error error path will be showed with red lines. The debug icons on the functions will also turn red. When hovering the debug icons the error will be showed:
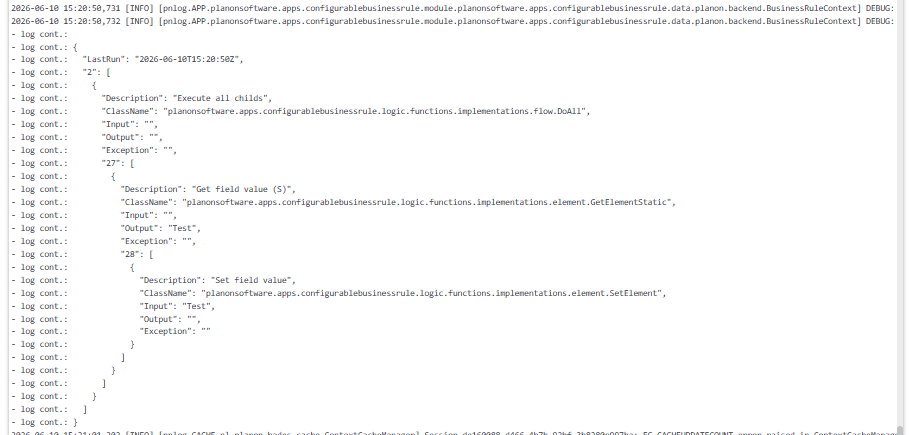
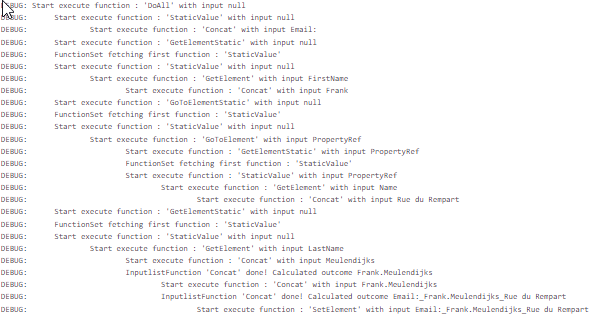
If no debugLogStorageFld is set the debug output will be showed in the wildfly/tomcat log:
Error handling
**Important note: **
In case of a problem/bug of the App the following steps must be considered:
- Make sure you use the latest version of the app. In AppCenter, after selecting the App, click update to automatically update the App.
- Re-test the issue in the new version.
- If the issue still occurs, communicate the following information to Planon:
- Version of the App
- Screenshot of the complete flow
- Copy of the configuration. This can be copied via import/export button in the editor. There are several error/logging options:
The visual editor will directly show error while configuring such as field, states or BOs which are not available.
Fields will turn red if something is wrong once leaving the field.

Popups will be shown if something is wrong while saving.
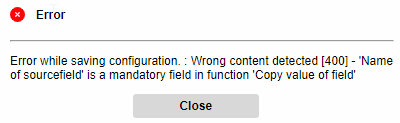
While executing the BusinessRule configuration in Planon regular message will be shown if something is wrong.
Wildfly log will contain errors. To have a debug output of the app change the App log level on the app in the AppCenter.When executing the BusinessRule in Planon a flow log will be added to the WildFly or Tomcat log to see the exact steps.

Examples
Check the following page for some examples