Planon Connect for OpenBIM
Introduction
Planon Connect for Open BIM is a platform app used to upload source BIM Models such as Autodesk Revit and IFC files to the CADAC Design Automation Service.
Cadac Design Automation, as a component of Planon Connect for Open BIM, is responsible for the conversion & translation of the source file using a mapping file and finally generates an XML, based on the COBieLite - xml schema.
Planon Connect for Open BIM fetches the COBieLite -xml generated from the Cadac Design Automation Service and places this in the Planon WebDAV location. This file is then used for BIM Import process, which is handled inside Planon as a background action. As a result, the imported data from the BIM files is now created inside Planon as property, floor, space and asset data.
As the Cadac Design Automation Services also generates Autodesk related viewables, in the SVF and SVF2-format, the locations of these viewables can be stored to create views in the Planon BIM Viewer. The combination of the imported data related to spaces and assets can then be shown and highlighted in the Planon BIM Viewer. This viewer is accessible in both the Planon Webclient (as part of Asset and Space Management) and in the Planon app.
When required, imported data in Planon can be changed as part of operational updates and exported back to a COBieLite-xml. This file could be imported back in the source BIM models.
For any questions related to processes of Cadac Design Automation Service, please contact Planon Support via your customer portal account.
For information on the supported IFC versions and restrictions, refer to the official documentation Model Derivative API | Autodesk Platform Services (APS).
Prerequisites
Environment
This solution is designed to work with Planon Live L110 and above.
Constraints
To use the app you need:\
Valid Autodesk credentials and tokens.
The Planon Connect for Open BIM license key.
This license will be uploaded into your environment (Saas) or can be downloaded via the customer portal (on-premise).The Planon Connect for Open BIM delivery document with environment key and CadacEndPoint URL.
Delivered by Partnering. For questions on this please contact: Partners@planonsoftware.com.
Assumptions
Have an updated Planon Best Practice Accelerator in place, with the latest updates in the BIM model TSI’s, see chapter 7 in this manual.
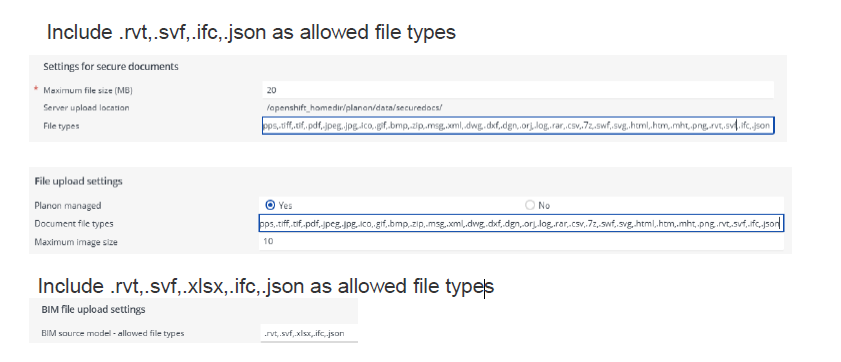
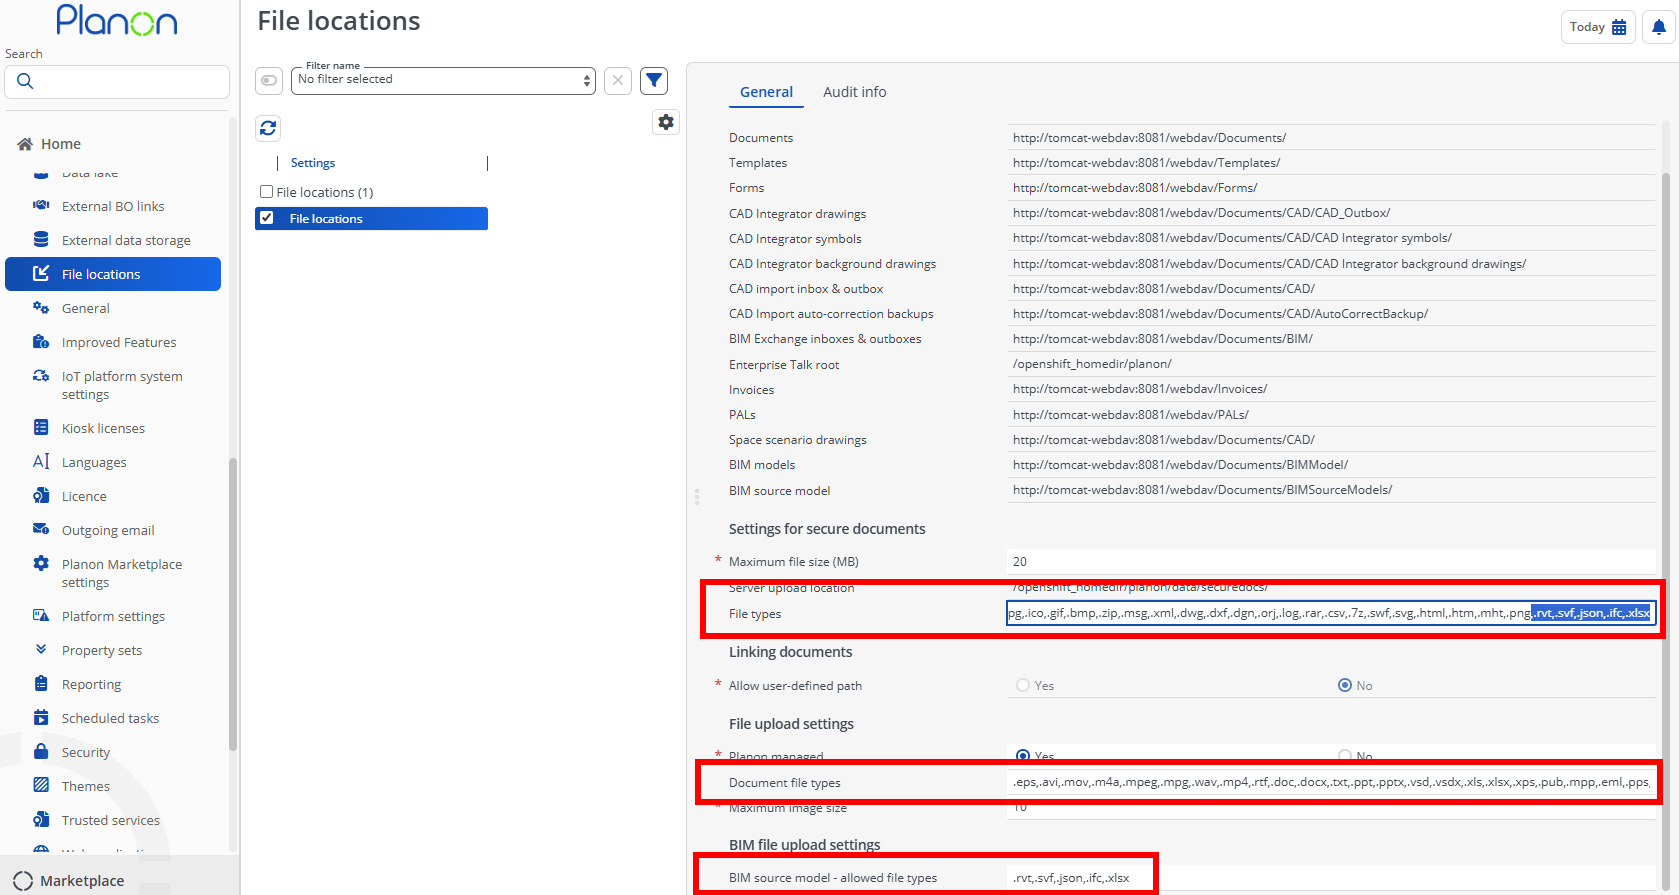
File location settings should be updated, see chapter 7 in this manual. Include the allowed file types as shown below:
User extensions enabled in General settings should be set to Yes.
An Autodesk Platform Services account must be in place, for more information see https://aps.autodesk.com/ .
Considered use-cases
Planon Connect for Open BIM supports a much wider application of BIM, that is dependent on required use-cases and data inside BIM or in Planon. First of all, it supports either an IFC or native Revit-based approach. 2nd, not all users require all of the available data of BIM inside Planon or they require them in an altered way. 3rd and lastly, the quality of the BIM models limits or extends the possible number of use-cases.
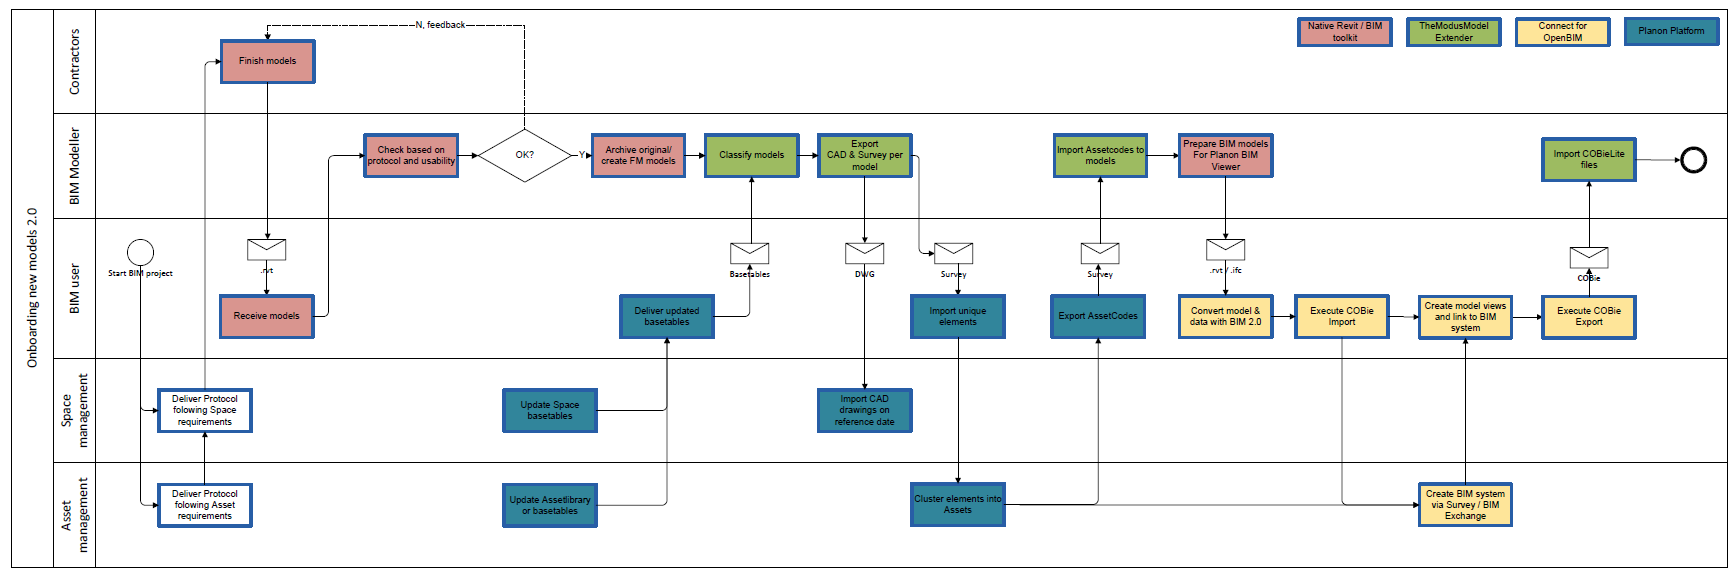
Highlighted in the described use-cases (yellow) are the steps of using Planon Connect for Open BIM, as part of an extended use-case.
IFC or Revit-based use-cases
Any BIM implementation starts with the question how end-users require to integrate BIM data and how they want to keep it up-to-date. In most cases, BIM is the end-result of a construction project, so it delivers all verified Building-related data in a structured way. It can serve as a one-time import into Planon, as from that day, all maintenance and changes to the Building are managed in Planon. In this situation, the verified IFC models that originate from very complex native BIM applications can be used as a starting point.
IFC-onboarding process
When the BIM model is intended to be maintained after the construction phase, typically in that case, the organization has invested in BIM skills and BIM applications either internally or via partners. The model needs to be updated during the lifecycle and for that, typically, an integration with native BIM applications would be considered. Planon has invested in this type of integration via our partner Cadac, who supports Autodesk Revit and Autodesk integration tools. An additional add-on might be required for the integration, TheModus Model Extender, to be installed inside Autodesk Revit. This process will not only have import functionality, but also has options to keep the model up to date, via a bi-directional update of the native BIM application.
Revit-based onboarding process
Domain or Planon product-based use-cases
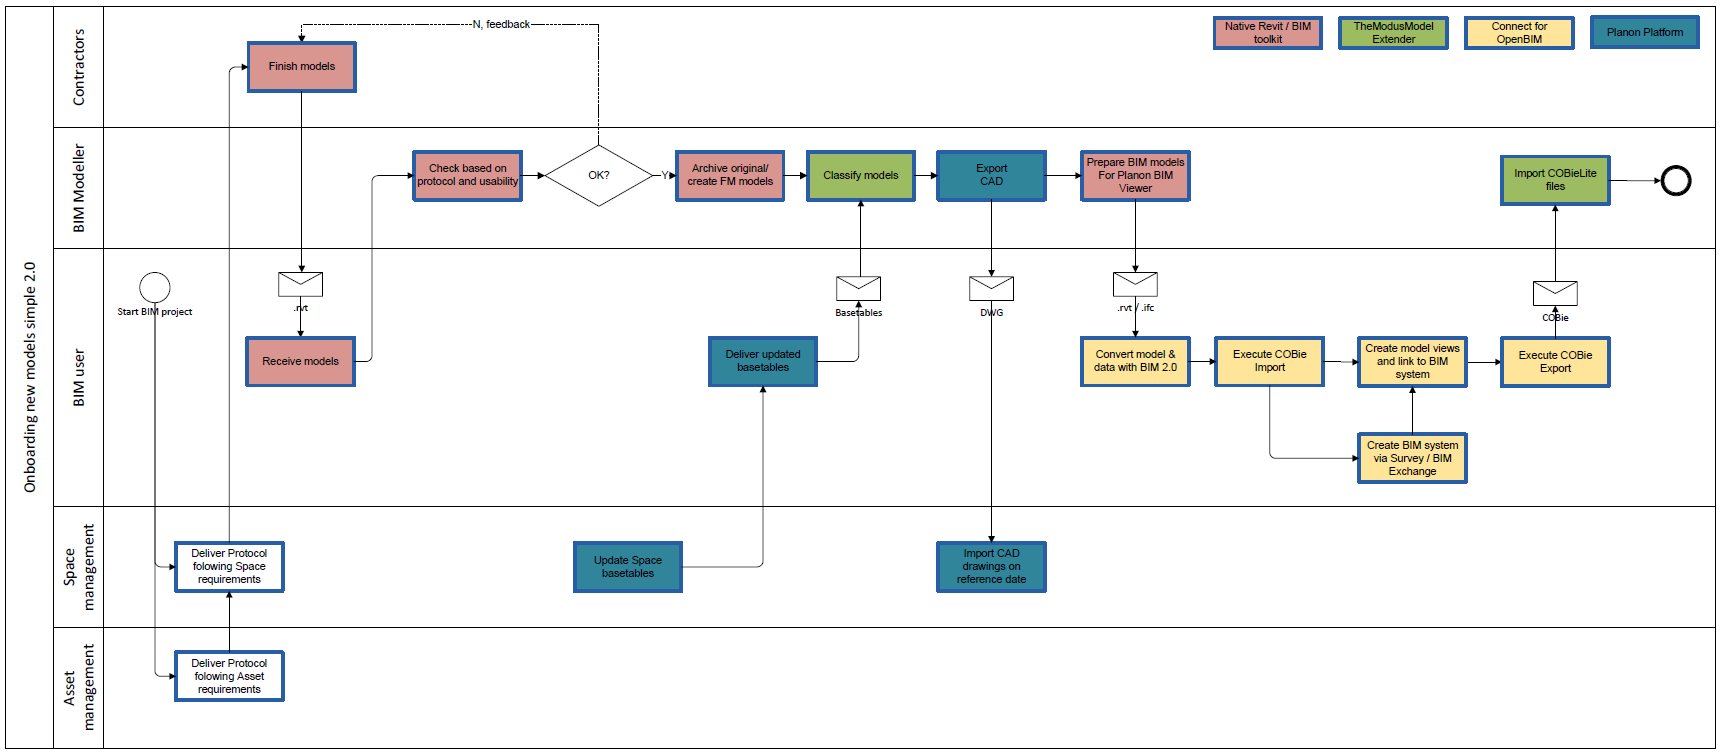
As users in Planon can choose to integrate BIM inside their domains or products, either because not all Buildings are already available in BIM or because not all relevant departments require this level of information, the use-cases might be different dependent on the domain or product. Most of the differences related to the domains Space & Workplace Management (SWM) or Asset & Maintenance Management (AMM). SWM is focused on the spaces, so for this use-case, assets are not relevant. Typically the use-case require the integation of CAD-based floorplans and the BIM viewer that visualizes the Spaces in 3D.
‘Simple’ onboarding of CAD and Space information from BIM
Within AMM, there are two relevant perspectives to be considered. When the Assets Library is relevant for the onboarding of Assets, they require some more mapping of individual BIM elements, so they can be either clustered or separated to be linked to multiple Standard Assets & Maintenance plans. When the BIM elements are just onboarded as 1:1 Assets, the ‘simple’ approach to onboard IFC models would be recommended (see 2.5.1).
Assets Library relevant
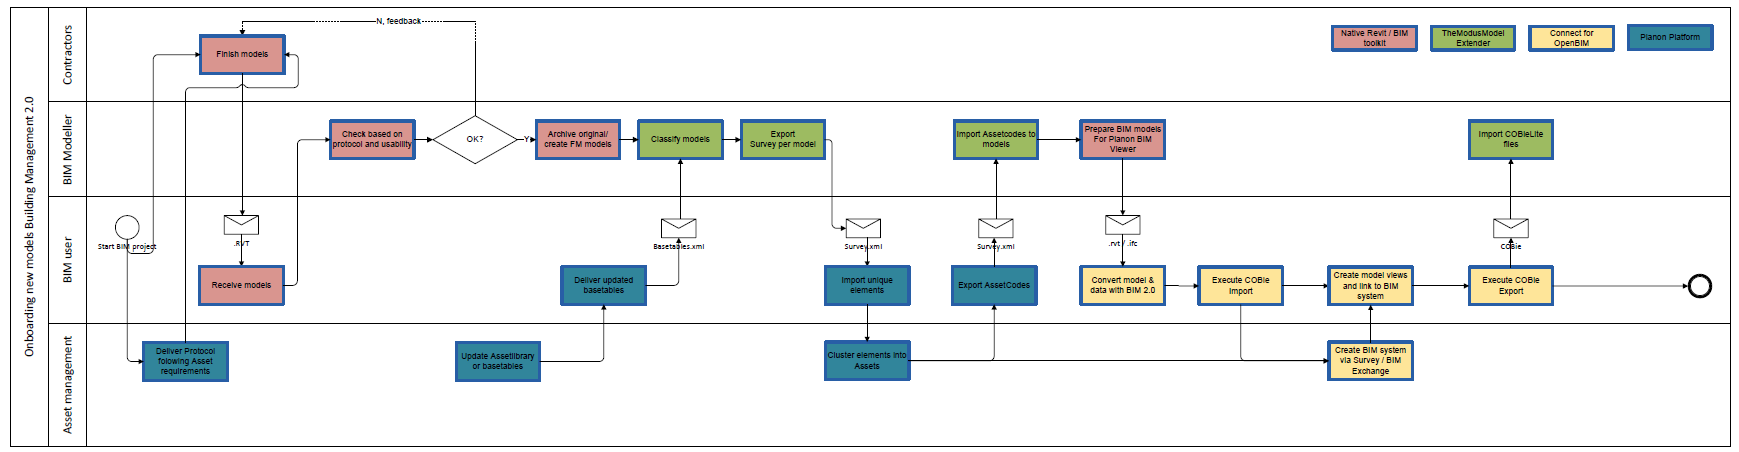
The processes are just presented as guidelines. Based on different requirements they can be combined, extended or simplified.
Usability based use-cases
Typically, BIM models are delivered to an end-user of Planon via external skilled tradespersons, a contractor or architect, part of the construction team, who followed project-based requirements to deliver the Building to the best of their skills. Based on the level of influence to the delivery of these models, they are either fit for a complete direct onboarding of all Building related data, or they are just fit for visualization. Planon would suggest to prescribe clear guidelines to the delivery/handover, also based on specific Planon guidelines. When these were not possible to be followed, we can advice the following use-cases:
Adjust the delivered models to a guaranteed quality level (either internally or externally) first.
Consume as minimum as possible to be derived (Typically the IFC-use-case would be sufficient) as starting point. Either choose in the Mapping-options to limit to import only Spaces or Assets.
Use the conversion into Viewables, to only benefit from the BIM Viewer, linked to the Building in AMM or SWM. Limit the import of Space- and Asset data. Linking manual registered data (or Excel-based) inside Planon to the BIM Viewer is also possible.
Features
The purpose of this app is to get the COBieLite.xml file from Autodesk which is obtained uploading the Revit or IFC BIM model file to Autodesk via the Cadac service.
Feature 1 – Upload Mapping file
The app comes with a feature to upload a Mapping file which contains the mapping to the Planon data and the Source Model file. Once the file is uploaded from Planon, the Cadac Design Automation Service creates a bucket at Autodesk and uploads this file to the created bucket. Refer to the best-practice guidelines in chapter 7 to get the default mapping files.
Feature 2 - Upload Source Model file
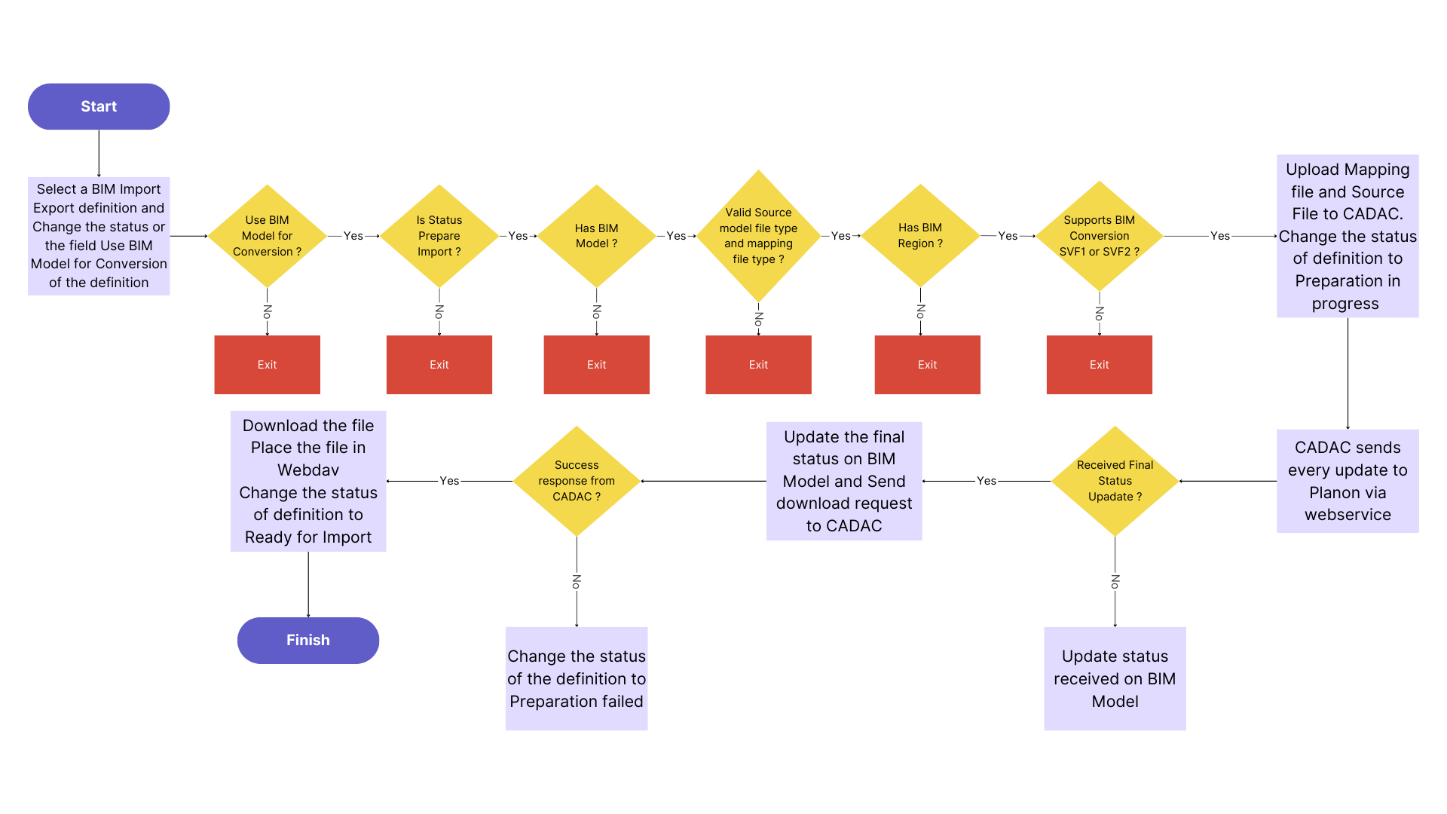
The app comes with a feature to upload the source model file from the BIM Model to the Cadac Design Automation Service. Cadac Design Automation Service uploads this model to the Autodesk bucket which is created when the mapping file is uploaded. Once the mapping file and the source model file are uploaded to the Autodesk bucket the conversion of the model starts. First of all an SVF file for viewables is created, then a metadata JSON file and an XML. Refer to the flow chart in section 4.4.4.
Feature 3 - Download XML file
The Cadac Design Automation Service downloads the xml file generated by Autodesk upon converting the uploaded source model file. The app places the downloaded xml file in the webdav under the import location of the BIM Import Export definition.
How does it work
This chapter contains the functional and technical description of the solution.
Triggering Conditions
The app comes with a trigger on the status change of the BIM Import Export Definition BO or if the field Use BIM Model for Conversion is changed and below conditions are met.
Conditions to Upload file
The field Use BIM Model for Conversion should be set to Yes
The field BIM Model on the import export definition should have a value
The BIM model selected on the definition should satisfy below conditions
Should have a source model file
Source model should be of a valid type
If there is a mapping file, it should be of a valid type
BIM conversion type field should be either SVF1 or SVF2. It is strongly advised to use SVF2.
BIM Region field should be either EMEA or US
If the Use BIM Model for Conversion field is set to Yes and rest of the conditions fail, the user receives an error message.
Mapping language The created mapping is always in the same language as the language of the used Revit application. The .rvt file does not contain an explicit language code. The .rvt file does not contain an explicit language code. The language is implicitly to be found via the system parameter- and category names. In APS the language can be extracted by converting the file and search the generated metadata.
Upload Mapping file
If the above conditions are met, a background action is created which takes care of uploading the mapping file on the BIM model linked to the BIM Import Export Definition to CADAC in chunks with the maximum chunk size of 8 MB. Also, the app updates the conversion history of the corresponding BIM Model and changes the status of the BIM definition BO to Upload in Progress.
Upload source model file
Once the mapping file is uploaded, then the background action created above uploads the source model file from the BIM model to the Cadac service in the form of chunks with the maximum chunk size of 8 MB.
It also updates the Conversion history field of the BIM model with the details like total size of the file, total number of chunks and the final upload status whether all the chunks are uploaded successfully or failed.
Mapping: request parameter for uploading
For uploading the source model file(s), the below request parameter must be set.
| Request Parameter | Planon Field | Value | Description |
|---|---|---|---|
| projectId | BIMImportExportDefinition.Code | Code | Code of the selected BIM Definition |
| region | BIMModel.BIMRegion.Code | BIMRegion.Code | Code of the region on the BIM Model. Supported regions are US or EMEA |
| formatType | BIMModel.BIMConversionType | svf2 or svf | svf2 if BIMConversionType is SVF2. svf if BIMConversionType is SVF1. Supported types are SVF1 & SVF2 |
| applicationType | BCI or FM or ALL | User can provide the type in the settings | |
| filename | File name of the BIM Source model without the extension | ||
| fileExtension | rvt or ifc | Type of the file. | |
| clientId | ID of the Autodesk account | ||
| clientSecret | Secret key of the Autodesk account | ||
| sessionId | Any random UUID (auto generated by the app) | Should be same for all the chunks of the file | |
| callbackUrl | Autogenerated by the app | This is the endpoint of the Planon webservice to receive updates from CADAC | |
| contentRange | 0 – 6666 / 6667 | This is the bytes range of the chunk. <Start byte of the chunk> – <End byte of the chunk> / <Total bytes of the file> | |
| files | Chunk of the file as a stream |
Once the files are uploaded, the Cadac Design Automation Service sends back the status of the conversion process via the call back URL, sent as part of the upload process.
During this process, the app updates the Bucket code on the BIM model.
Download XML file
Update of Conversion history
The app contains a webservice which is used as a call back url by the Cadac Design Automation Service. The URL details and the authentication details are sent along with upload request of each chunk to the Cadac Design Automation Service. The Cadac service sends the updates to the Planon system via this webservice.
The webservice creates the inbound raw messages with the message body coming from the Cadac Design Automation Service.
An inbound transformer is implemented which transforms the message body on the raw message and creates the inbound messages.
A processor is implemented which process the inbound messages created by the transformer and updates the status received on the conversion history of the corresponding BIM model.
This conversion history provides the details of file size, chunk uploads and conversion status. Referring to this field on BIM model provides us the insight of the status of the upload and the conversion.
Update of connection strings
Once the Cadac Design Automation Service sends the final status update, the received message body contains the connection strings which contain the URN (Uniform Resource Name - is a URI in a standard format, referring to a resource without specifying its location or whether it exists) details for the converted source model. These connection strings are updated in the Connection Strings field of the BIM Model BO.
Example FinalStatusUpdate
When the Planon Connect for Open BIM functionality starts, a Planon Autodesk bucket is created within the Autodesk Platform Services cloud.
{

"sessionId": "5085590c-3df0-4c8d-8d66-14edcd036f2a",

"bucketCode": "tst20-mkvhviapdcf1diaztd4x0ytkc2neisac-ww10cobielt",

"finalStatusUpdate": {

"statusUpdate": "Complete",

"projectId": "ww10cobielt",

"files": \[

"KasMEP_2021.rvt",

"KasMEP_2021.json",

"KasMEP_2021.zip"

\],

"metadata": {

"BucketKey": "tst20-mkvhviapdcf1diaztd4x0ytkc2neisac-ww10cobielt",

"ObjectKey": "KasMEP_2021.json",

"Urn": "dXJuOmFkc2sub2JqZWN0czpvcy5vYmplY3Q6dHN0MjAtbWt2aHZpYXBkY2YxZGlhenRkNHgweXRrYzJuZWlzYWMtd3cxMGNvYmllbHQvS2FzTUVQXzIwMjEucnZ0",

"ModelGuid": "786af5e9-c265-ede0-6613-5a24b254073f"

},

"viewables": {

"BucketCode": "tst20-mkvhviapdcf1diaztd4x0ytkc2neisac-ww10cobielt",

"connectionStrings": \[

{

"id": "786af5e9-c265-ede0-6613-5a24b254073f",

"name": "{3D}",

"urn": "dXJuOmFkc2sub2JqZWN0czpvcy5vYmplY3Q6dHN0MjAtbWt2aHZpYXBkY2YxZGlhenRkNHgweXRrYzJuZWlzYWMtd3cxMGNvYmllbHQvS2FzTUVQXzIwMjEucnZ0",

"outputType": "svf2",

"region": "US",

"submodel": "0"

},

{

"id": "dc5e9e3c-f626-f693-3a92-4c81f04d46a3",

"name": "Bestaand",

"urn": "dXJuOmFkc2sub2JqZWN0czpvcy5vYmplY3Q6dHN0MjAtbWt2aHZpYXBkY2YxZGlhenRkNHgweXRrYzJuZWlzYWMtd3cxMGNvYmllbHQvS2FzTUVQXzIwMjEucnZ0",

"outputType": "svf2",

"region": "US",

"submodel": "1"

},

{

"id": "66bfb2a8-b668-9c63-04ec-95275a62ed4a",

"name": "Nieuw",

"urn": "dXJuOmFkc2sub2JqZWN0czpvcy5vYmplY3Q6dHN0MjAtbWt2aHZpYXBkY2YxZGlhenRkNHgweXRrYzJuZWlzYWMtd3cxMGNvYmllbHQvS2FzTUVQXzIwMjEucnZ0",

"outputType": "svf2",

"region": "US",

"submodel": "2"

},

{

"id": "d81c9996-b435-abb3-db30-b66ee069fc62",

"name": "As Built",

"urn": "dXJuOmFkc2sub2JqZWN0czpvcy5vYmplY3Q6dHN0MjAtbWt2aHZpYXBkY2YxZGlhenRkNHgweXRrYzJuZWlzYWMtd3cxMGNvYmllbHQvS2FzTUVQXzIwMjEucnZ0",

"outputType": "svf2",

"region": "US",

"submodel": "3"

}

\]

}

}

}
Download of XML file from the Cadac Design Automation service
After receving the connection string, a download request is sent to the Cadac Design Automation Service via the outbound messages. The processor creates an outbound message with the required details to download the file from the Cadac Design Automation Service.
An outbound transformer transforms the details on the outbound message into the request body the Cadac Design Automation Service needs and creates an outbound raw message.
The transmitter then sends the download request using the request body to the Cadac Design Automation Service and gets the zip file which contains the XML file. This zip file is uploaded into Planon in a temporary location via the file transfer endpoint.
Mapping: request parameter for downloading\
For downloading the source model file(s), the below request parameter must be set.
| Request Parameter | Planon Field | Value | Description |
|---|---|---|---|
| projectId | BIMImportExportDefinition.Code | Code | Code of the selected BIM Definition |
| filename | Name of the file returned in the finalStatusUpdate | ||
| fileExtension | zip | Type of the file | |
| clientId | ID of the Autodesk account | ||
| clientSecret | Secret key of the Autodesk account |
Upload of XML file into Planon WebDAV
An inbound raw message is created by the transmitter with the details of the temporary location of the zip file placed via the file transfer endpoint.
A transformer is implemented to process the raw messages created by the transmitter which creates inbound raw messages. Another processor is implemented to pick up the inbound message created gets the zip file from the temporary location. The file is then extracted and XML file is placed in the import location of corresponding BIM Import Export definition.
Once the file is downloaded successfully, the app changes the status of the BIM Import Export definition to ReadyForBIMExchange state indicating users that the definition is ready for import.
In case of any failures during the upload of files or download of XML file, the BIM definition status will be set to Upload Failed. Users can restart the upload process by changing the status of the BIM definition to Upload Ready.
Flow diagram
Bim Systems
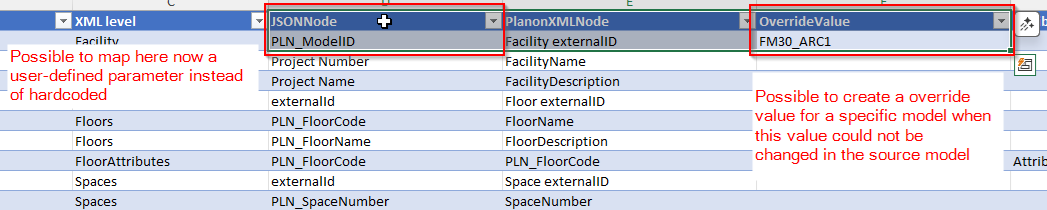
In Planon, relationships between Planon records and individual entities in a BIM model are stored in the BIM System (TSI).Each BIM model (Revit or IFC file) must have its own dedicated BIM System record. This ensures that references remain isolated and do not interfere with records originating from other models. To uniquely identify the correct BIM System during data onboarding via the BIM Exchange, the External ID is used. This External ID serves as the unique identifier that links the BIM model to its corresponding BIM System.
Previously, Autodesk automatically generated a unique External ID for every BIM model. This behavior is no longer guaranteed. As a result, it is now mandatory to explicitly define a unique External ID, which can be freely defined by the user as long as the value is unique and consistently applied throughout the lifecycle of the BIM model.
This is achieved by specifying an override value in the Mapping file. The OverrideValue must:
Be unique per BIM model
Remain stable over time
Example:
Installation
This chapter describes the steps required to install this app on your Planon environment.
Installation Process
There are two ways to install the app:
- Using the Marketplace
- Manual installation
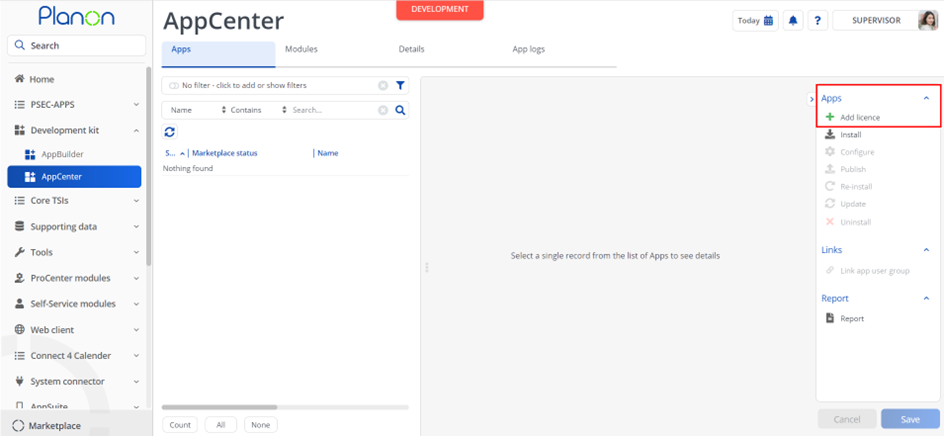
Install the app by using the marketplace
In case your environment is configured to use the Planon app store the only thing required to install the app is to add the app license in the AppCenter TSI. Planon will automatically download and install the app.
Manual installation
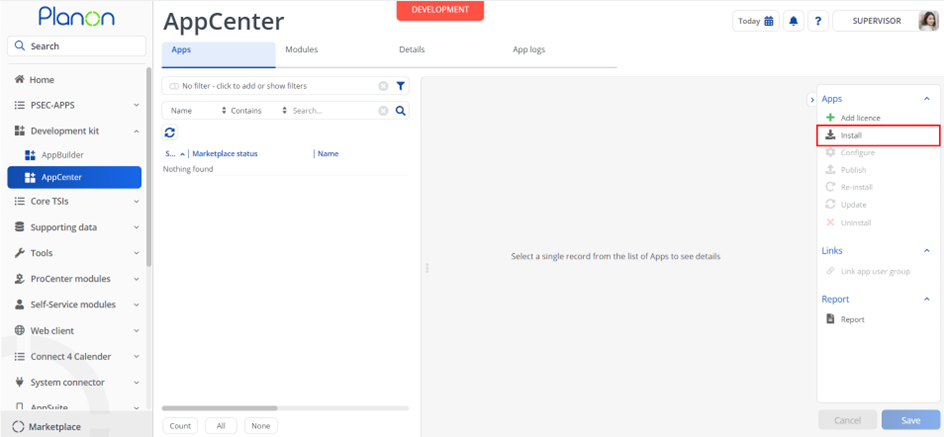
In case you want to perform a manual installation follow the steps below.
- Open AppCenter TSI from Planon webclient and click on install from action menu
- Browse to the .ppk file
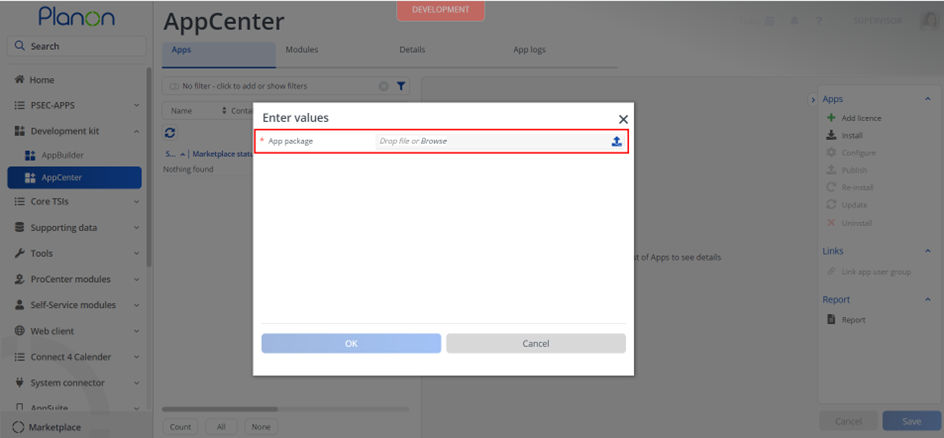
- Click OK to install the app and follow the installation process
- When the app is successfully installed, the app will appear in the AppCenter
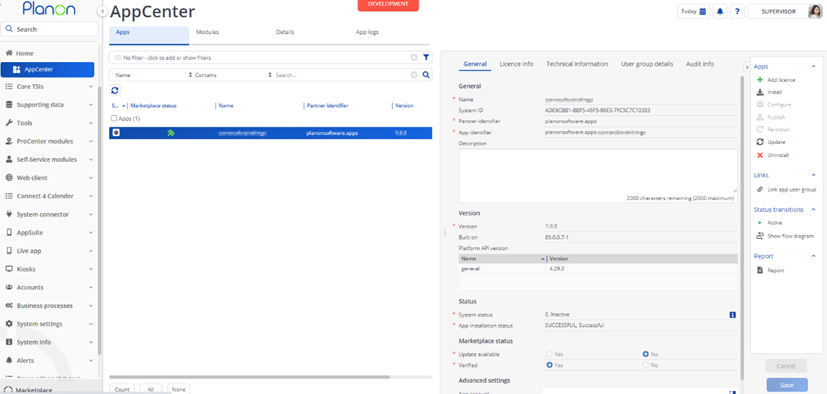
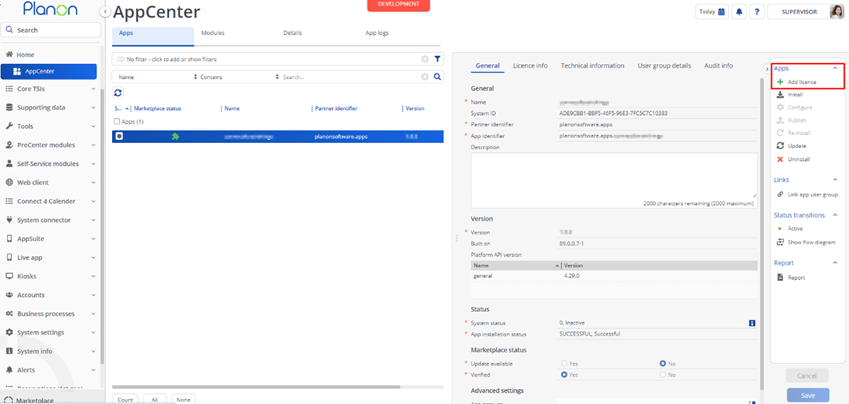
- Add the app license in Apps TSI
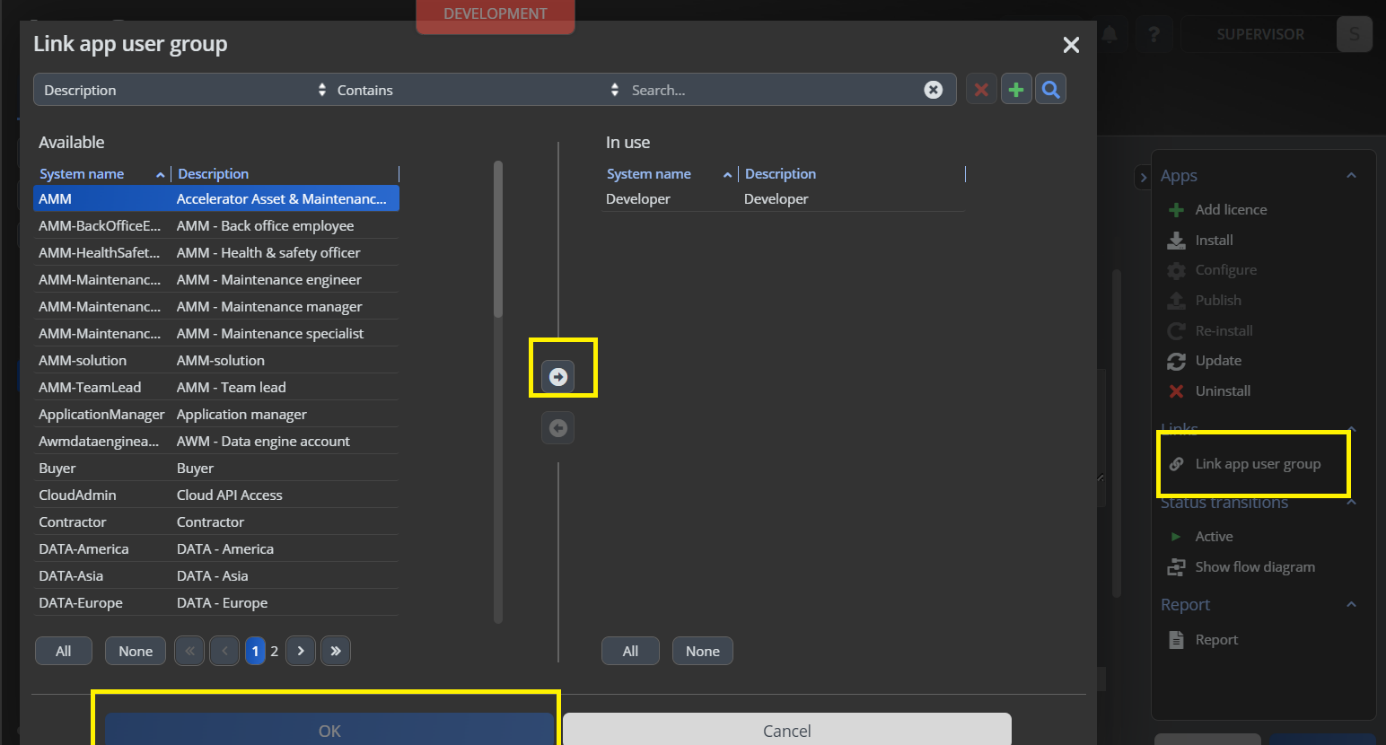
Link user group
Click on the link Link app user group.
Select the user group that has the product definitions Enterprise Service API, Event Connector.
Move them to the In Use section.
Click OK.
Add module settings
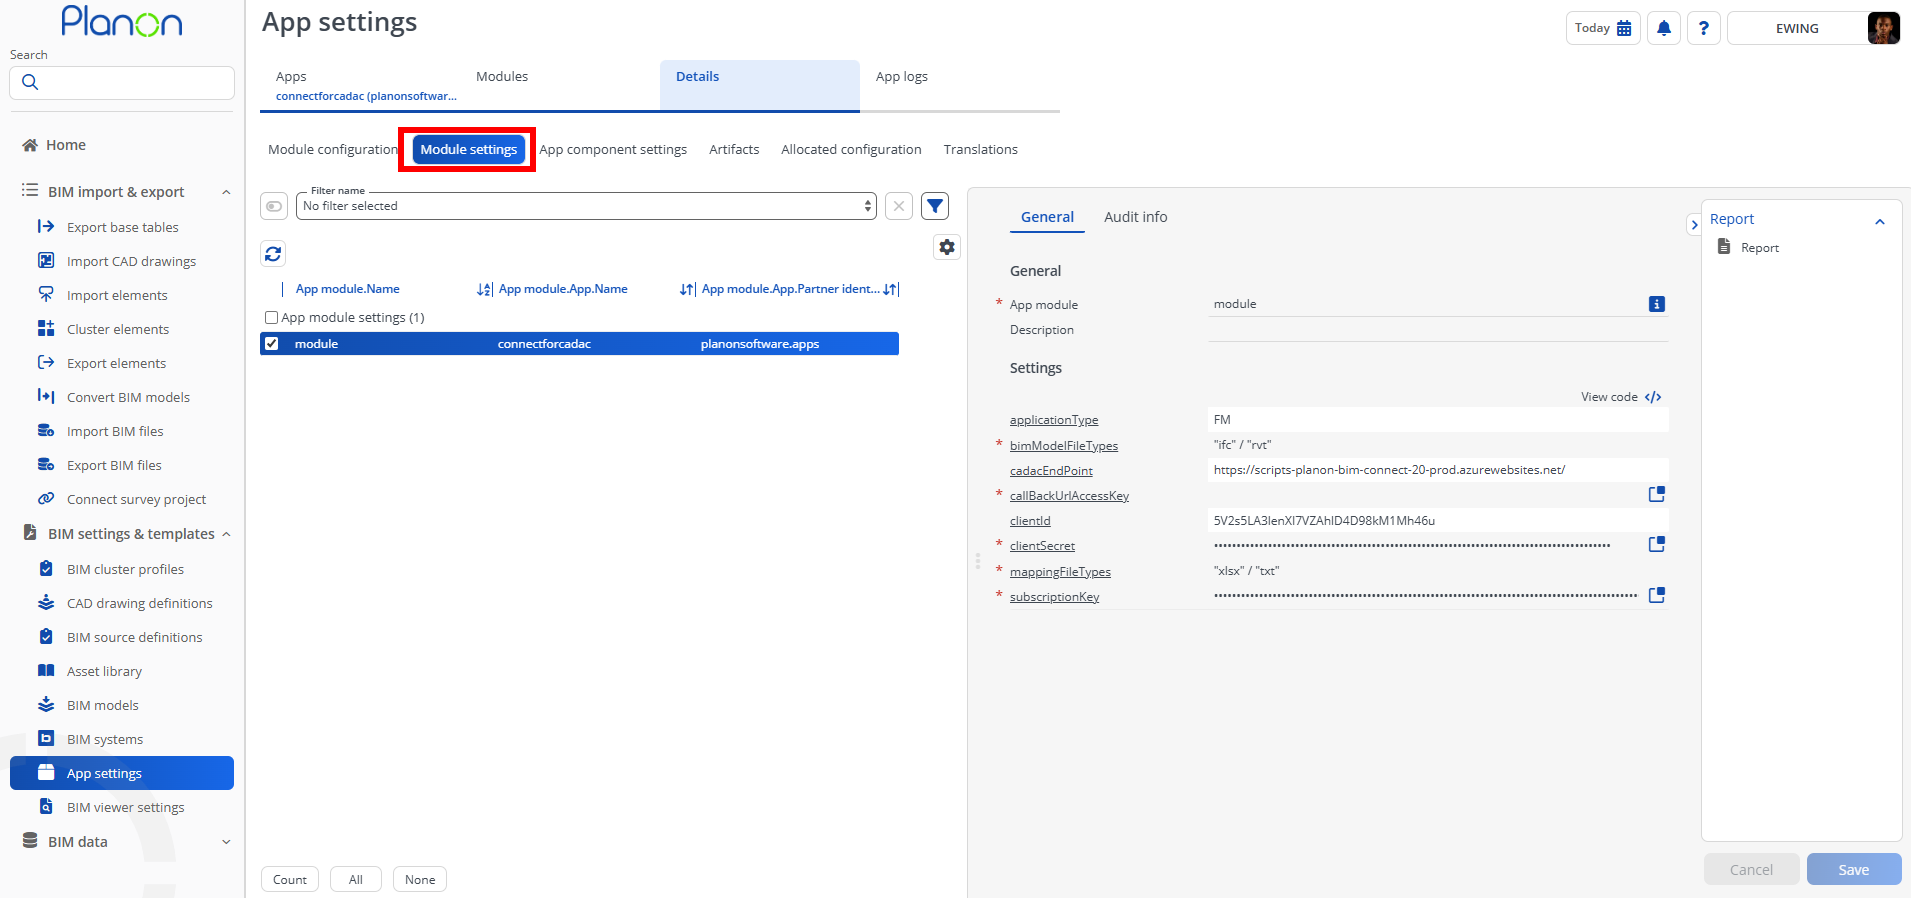
- Enter the applicable module settings on the Module settings tab.
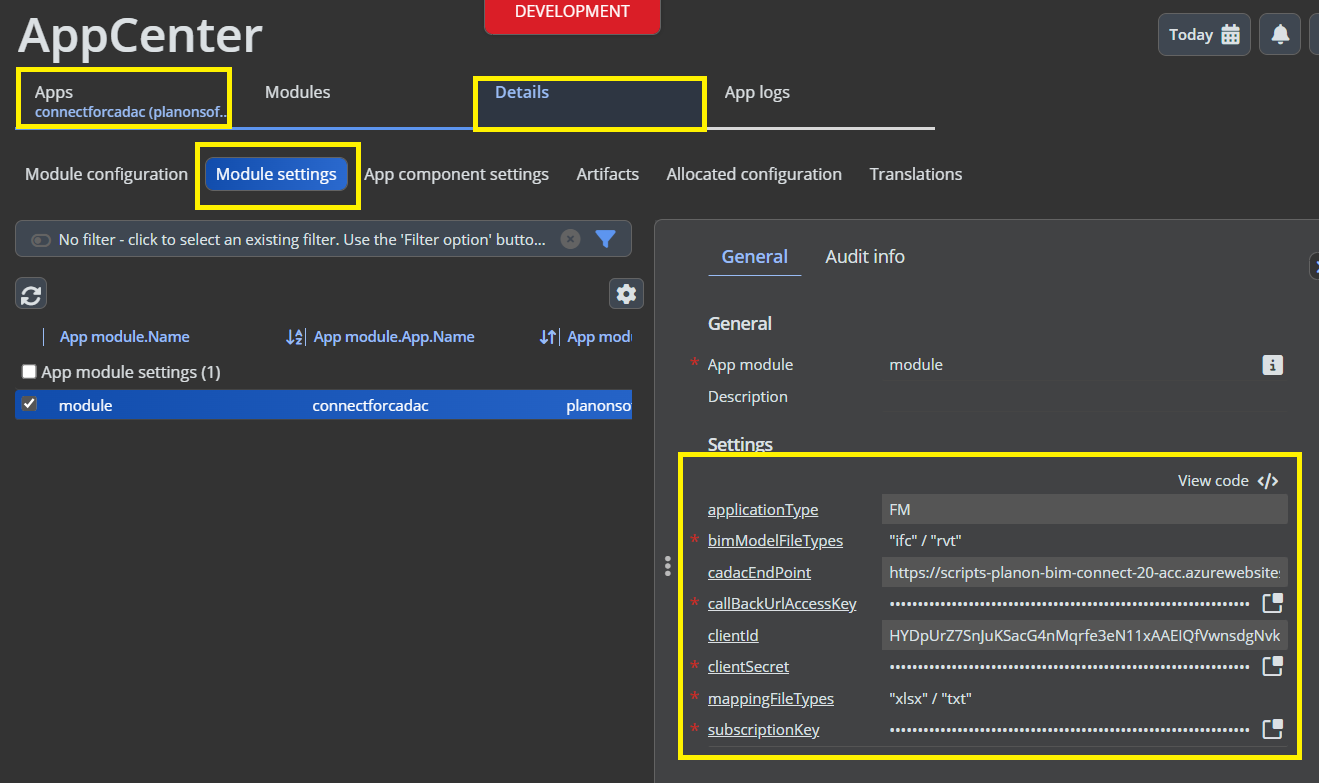
- Click Save after entering the module settings values.
Activation
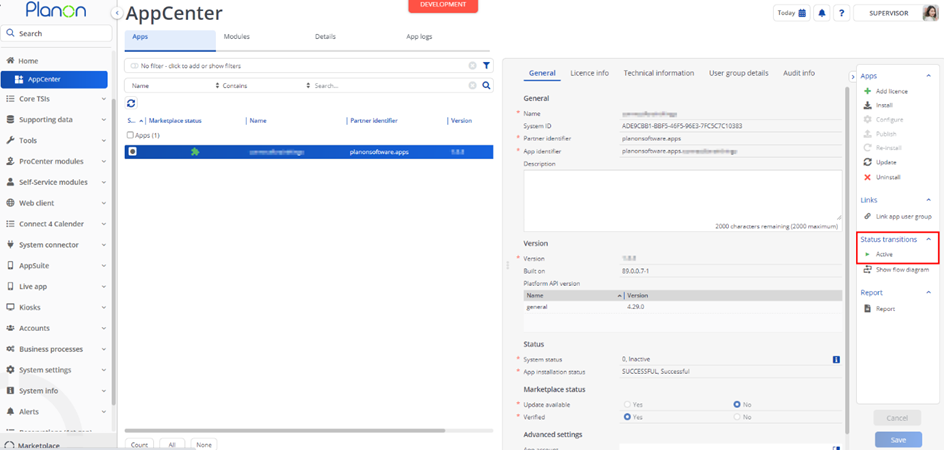
Once the app has been configured, you can activate the app by pressing the Active status transition from the action panel. Always make sure that the required User groups are linked correctly and the Configure action is executed before activating the App.
Module settings details
| Parameter Key | Example Value | Description |
|---|---|---|
| applicationType | FM | Application type of Cadac that triggers specific rules for model converison. Allowed values FM or ALL |
| cadacEndPoint | https://scripts-planon-bim-connect-20-prod.azurewebsites.net/ | Base url of CADAC system (depending on tst, acc, prod) |
| callBackUrlAccessKey | Access key for Call back end point | This must be generated and then copied to this field in the module settings. A user must be linked to the user group which is linked to the app. |
| clientId | Autodesk account ID | ID of the Autodesk account for Autodesk Platform Services. |
| clientSecret | Secret Key for the Autodesk account | Secret Key for the Autodesk account, to be obtained from the Autodesk vendor applicable |
| subscriptionKey | Auth key for the Cadac service | Authentication key for the Cadac Design Automation Service. |
| mappingFileTypes | xlsx | Valid types of the mapping file |
| bimModelFileTypes | rvt,ifc | Valid types of the Model file |
Troubleshooting
Error handling
For all server side components the errors will be written in the logs.
Transformer and processor logging is written down in the Inbound/Outbound messages TSI.
If there are no status updates of the conversion history of the BIM model, make sure below configurations are in place.
The app is linked to a user group.
The linked user group has the product definitions Enterprise Service API & Event Connector linked to it. This can be verified in the Account Groups TSI or User Groups TSI.
The accesskey used in the app module settings is linked to the above linked user group.
In case the BIM definition is stuck in the status In Progress for a long time and no updates are being received on the BIM model, please contact Planon Support via the Planon customer site.
In case of any error response in the conversion history of the BIM model, please contact Planon Support via the Planon customer site, they will lead the issue further to the vendor.
In case the BIM definition has the status Failed, please follow below steps:
Any errors updated in the inbound messages, please contact Planon Support.
Any error updates in the BIM model, please contact Planon Support, they will lead the issue further to the vendor.
Planon Accelerator Configuration
The following chapter provides configuration information to support the Services implementation process of Connect for Open BIM.
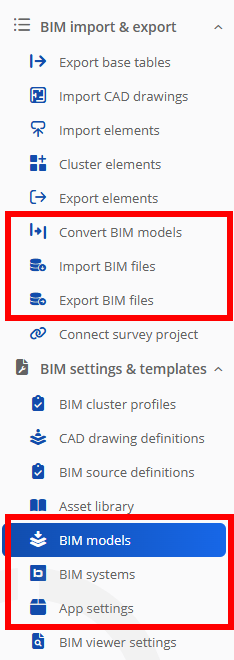
TSI Configuration
Find below the explanation of TSI configuration for Planon Connect for Open BIM.
| Navigation Panel | Existing TSI Name | New TSI Name | Changes |
|---|---|---|---|
| BIM Import & Export | Import COBie files | Import BIM files | Change TSI name from ‘Import COBie files’ to ‘Import BIM files’ |
| BIM Import & Export | Import COBie files | Import BIM files | Change layout to show new status fields and include a selection step filter |
| BIM Import & Export | Export COBie files | Export BIM files | Change name from ‘Export COBie files’ to ‘Export BIM files’ |
| BIM Import & Export | Export COBie files | Export BIM files | Include a selection step filter on filter |
| BIM Import & Export | N/A | Convert BIM models | Specific TSI with specific layout as copy from Import BIM files |
| BIM settings & templates | BIM models | N/A | Change layout to show Conversion steps and results in better screens |
| BIM settings & templates | COBie source definition | BIM source definition | Change name from ‘COBie source definition’ to ‘BIM source definition’ |
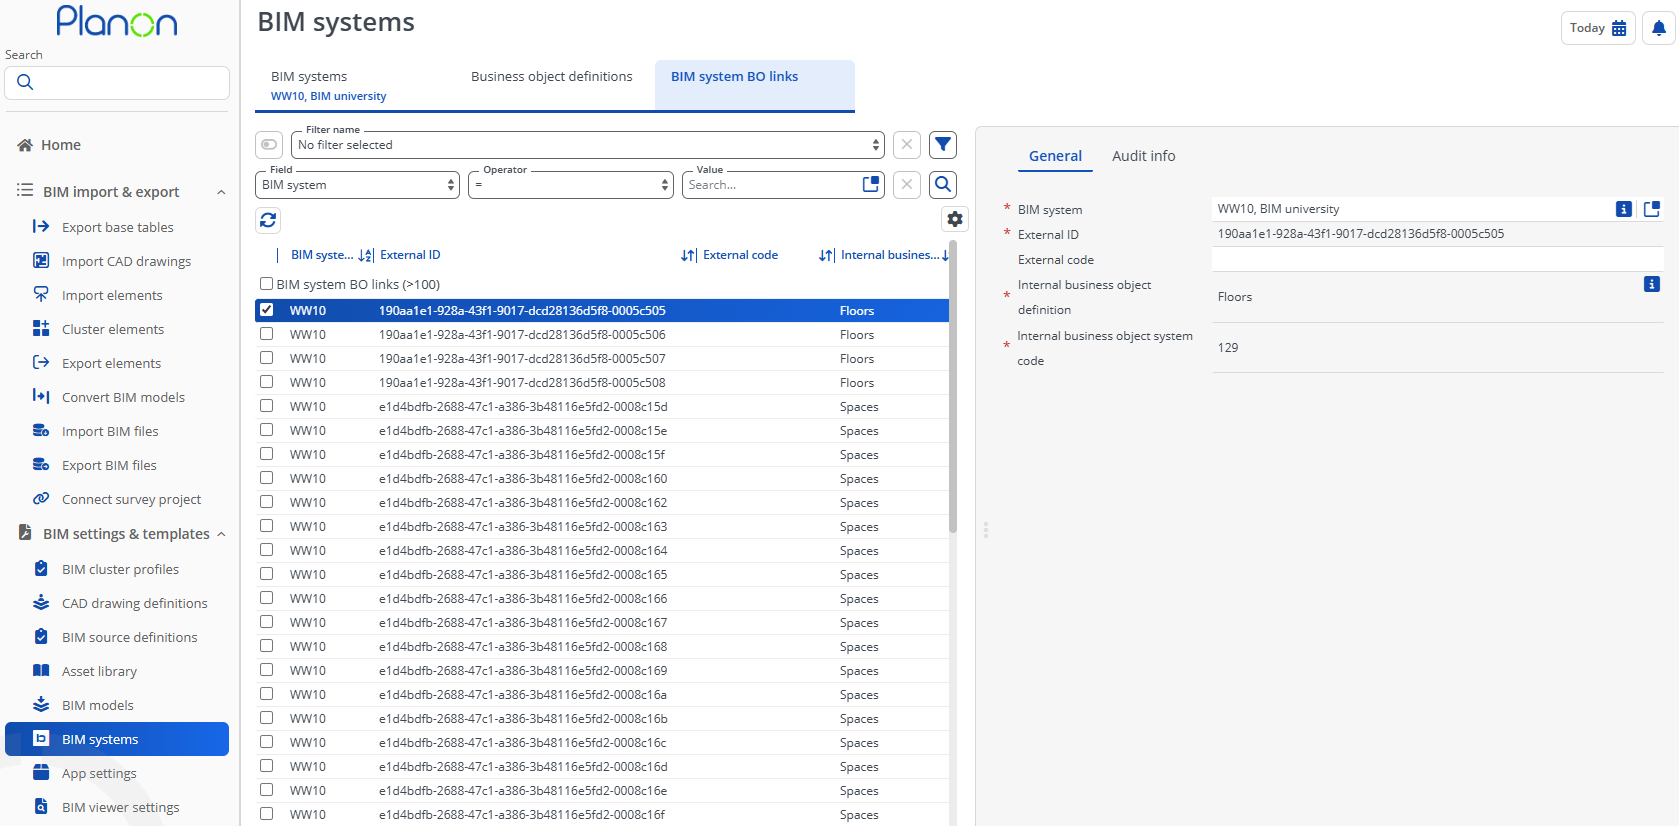
| BIM settings & templates | BIM systemBOLinks | BIM systems | Change name from ‘BIM systemBOLinks’ to ‘BIM systems’. Add this system TSI to the navigation panel. It is required to check imported files, view the linked GUID’s of the imported assets/spaces and required for the BIM model linking to the BIM system |
| BIM settings & templates | App settings | N/A | Add this TSI for App-settings as Connect for Open BIM requires an app and credentials to be added here able to activate it, check logs, check credentials etc. |
TSI amendments
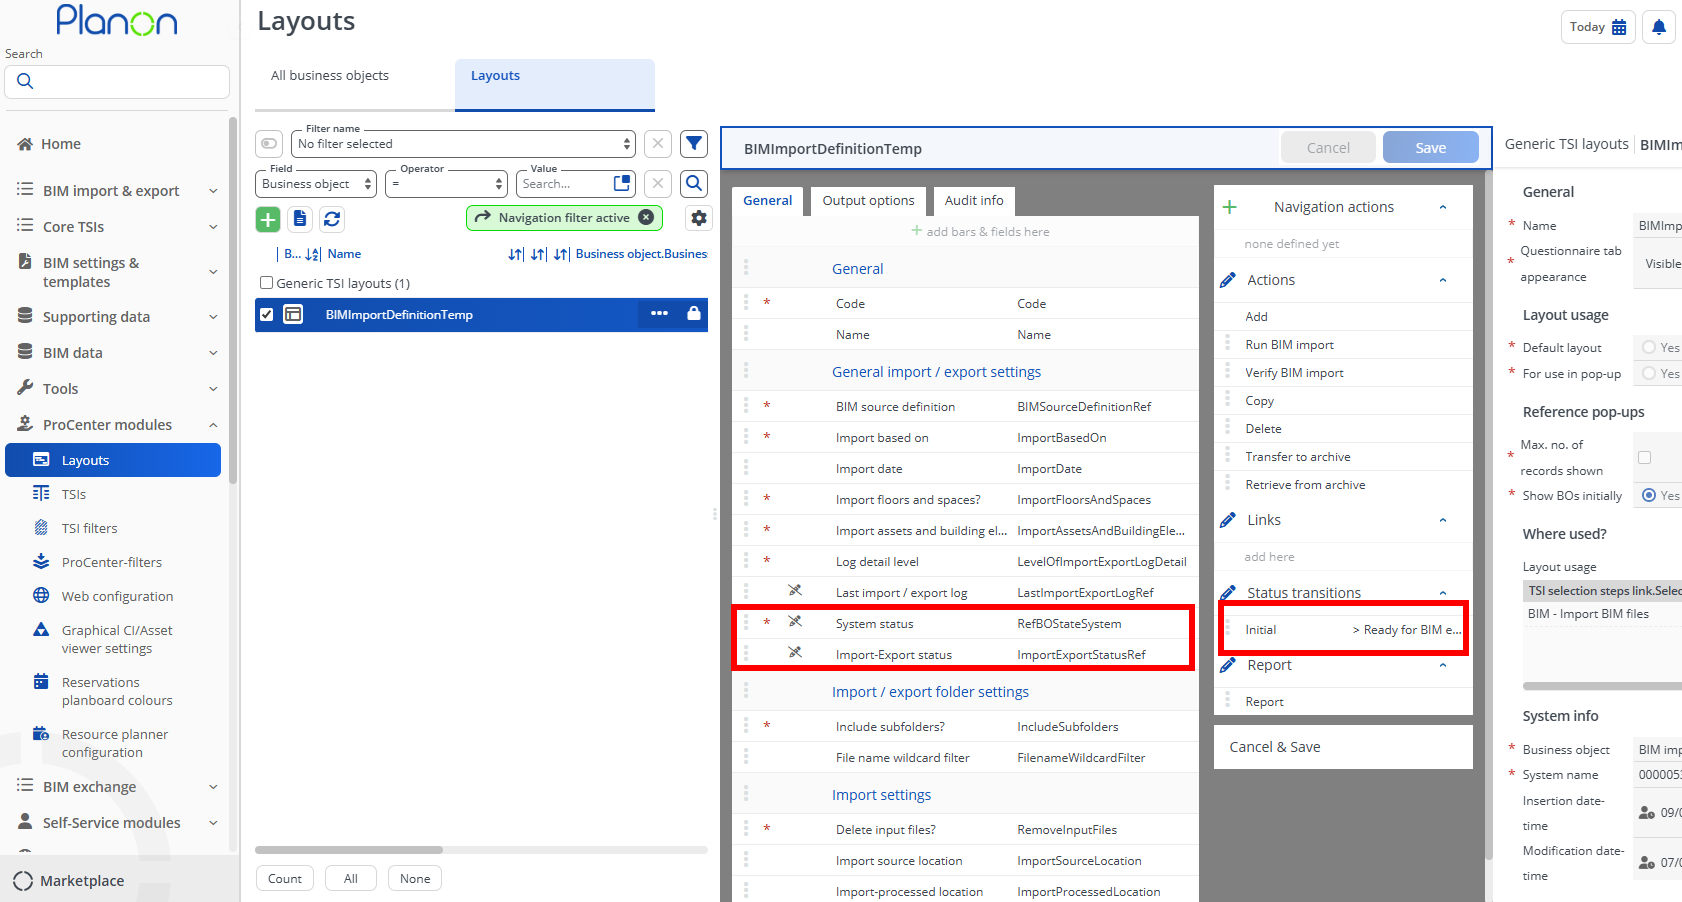
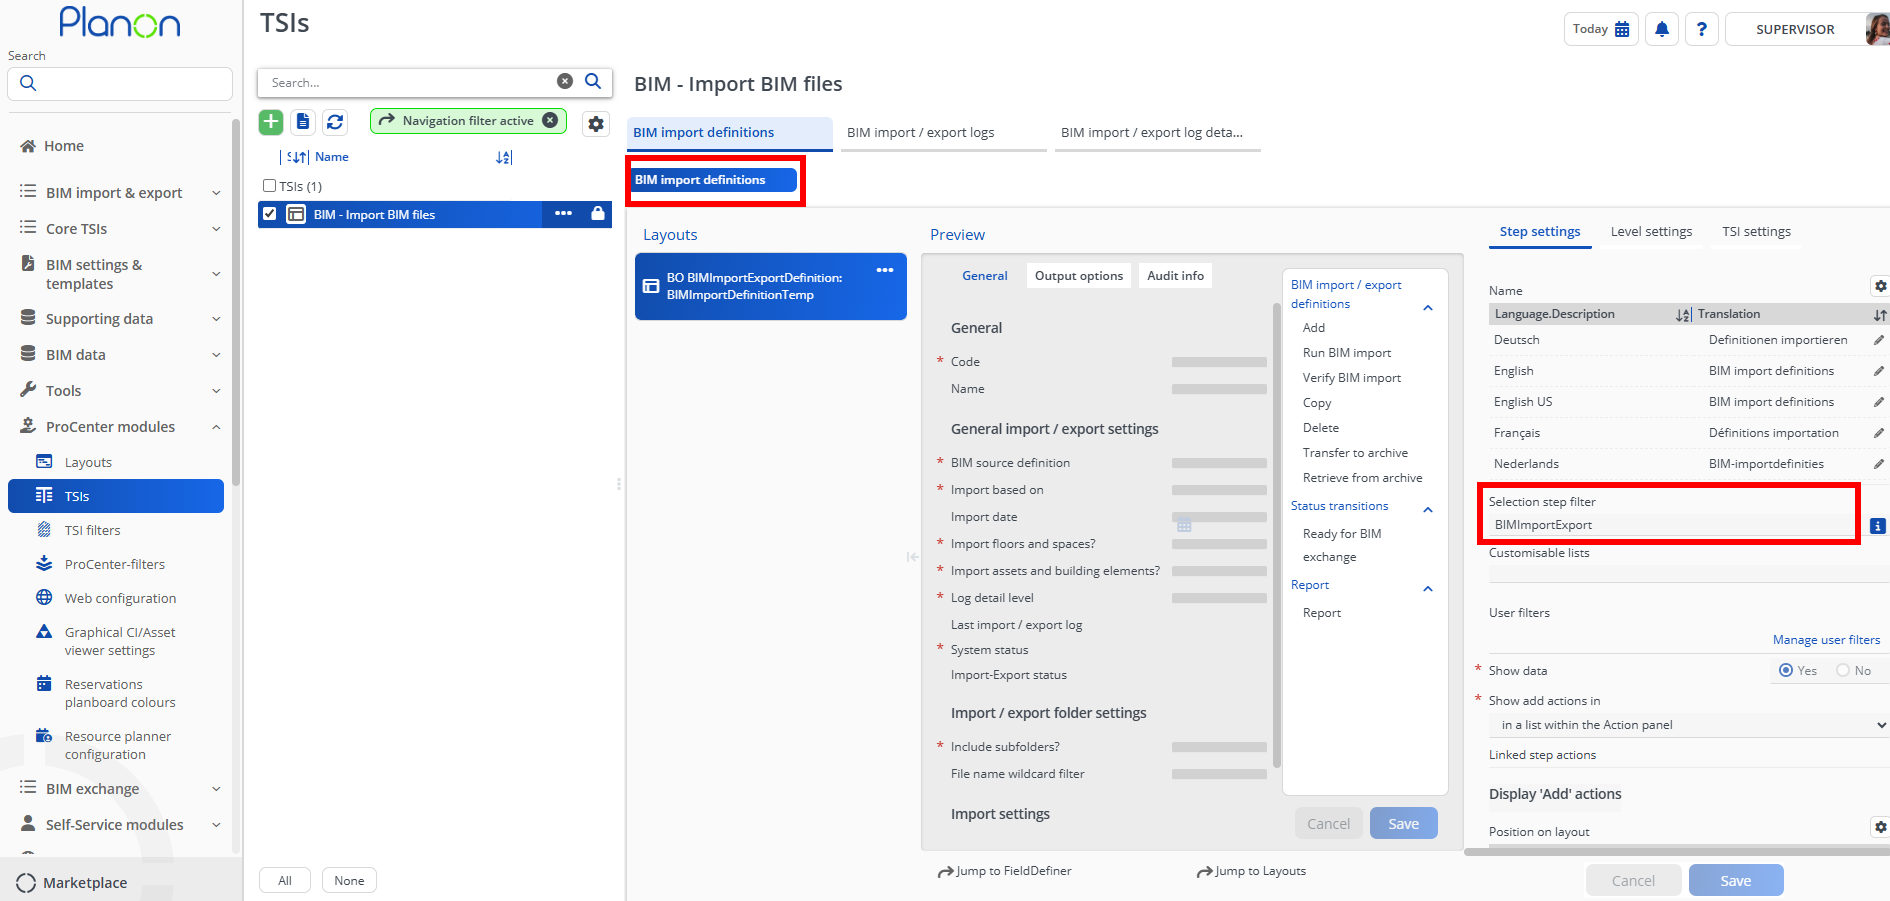
Import BIM files – Layout and TSI amendments
Business object: BIMImportExportDefinition Layout name: BIMImportDefinitionTemp
TSI: BIM - Import COBie files Selection step: BIM import definitions
Note: The following selection step filter needs adding. For the filter to be created, ensure that the field ‘System status’’ is added to the BIMImportExportDefinition BO layout ‘BIMImportExportDefinition’.
Business object: BIMImportExportDefinition Code: BIMImportExport Filter: System Status > In > 1, Initial / 4, Ready for BIM Exchange
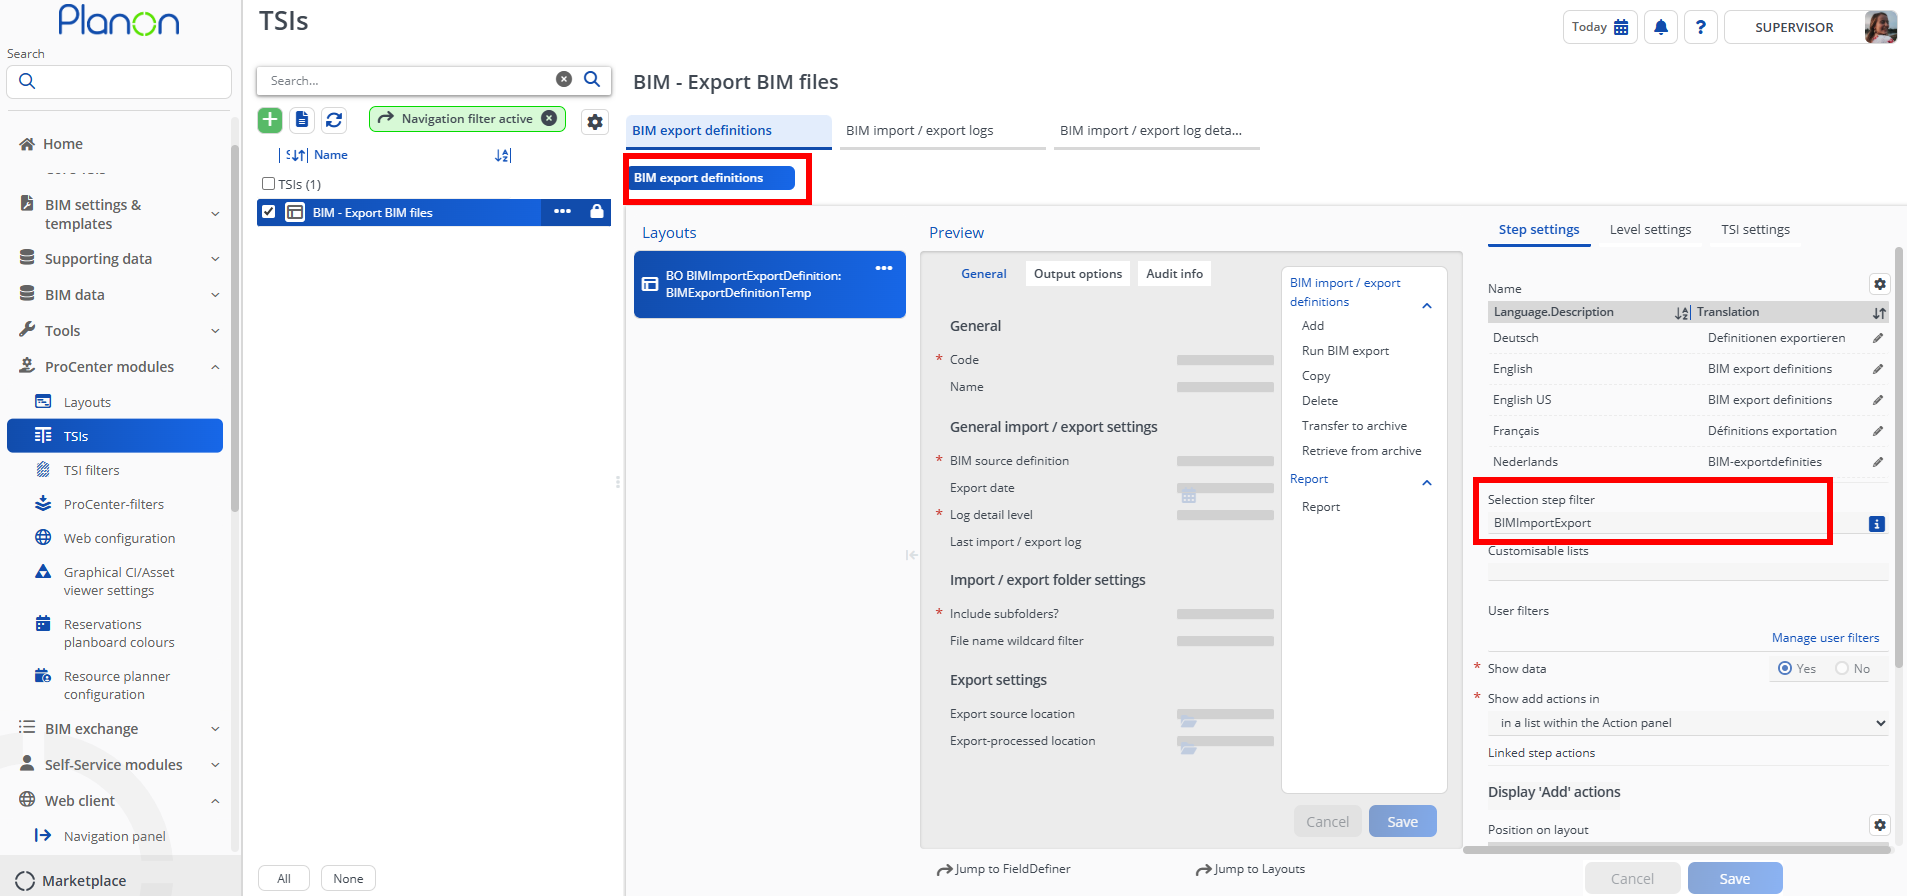
Export BIM files – TSI amendments
TSI: BIM - Export COBie files Selection step: BIM import definitions
Note:** The following selection step filter needs adding. For the filter to be created, ensure that the field ‘System status’’ is added to the BIMImportExportDefinition BO layout ‘BIMImportExportDefinition’.
Business object:** BIMImportExportDefinition Code: BIMImportExport Filter: System Status > In > 1, Initial / 4, Ready for BIM Exchange
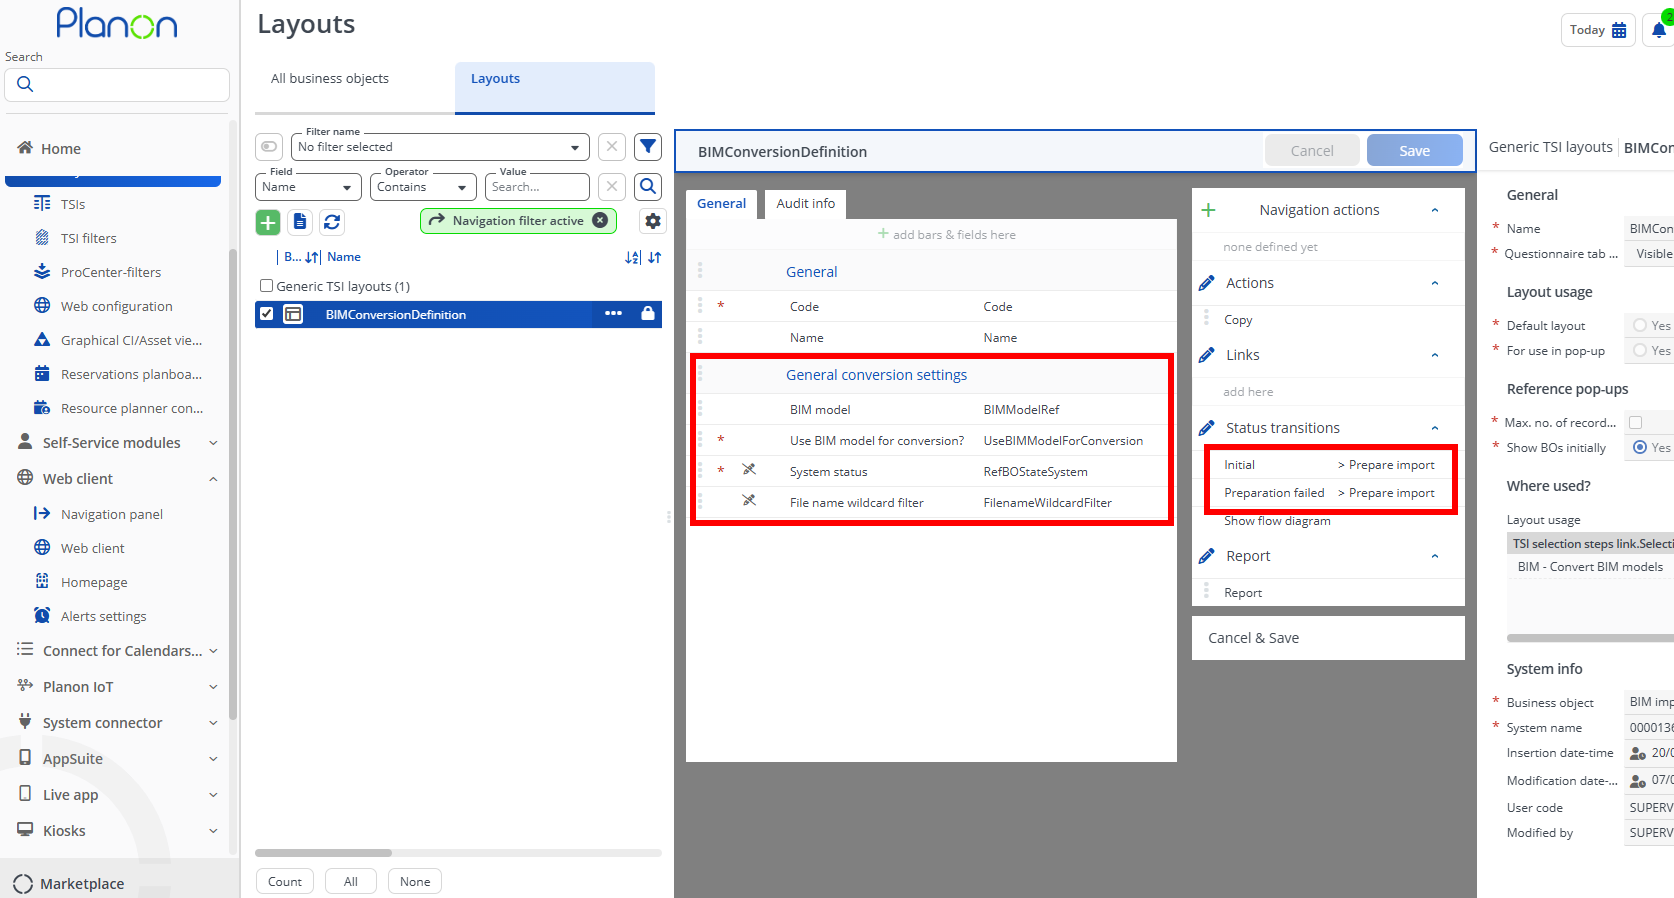
Convert BIM models – Layout amendment
Business object: BIMImportExportDefinition Layout name: BIMImportDefinitionTemp
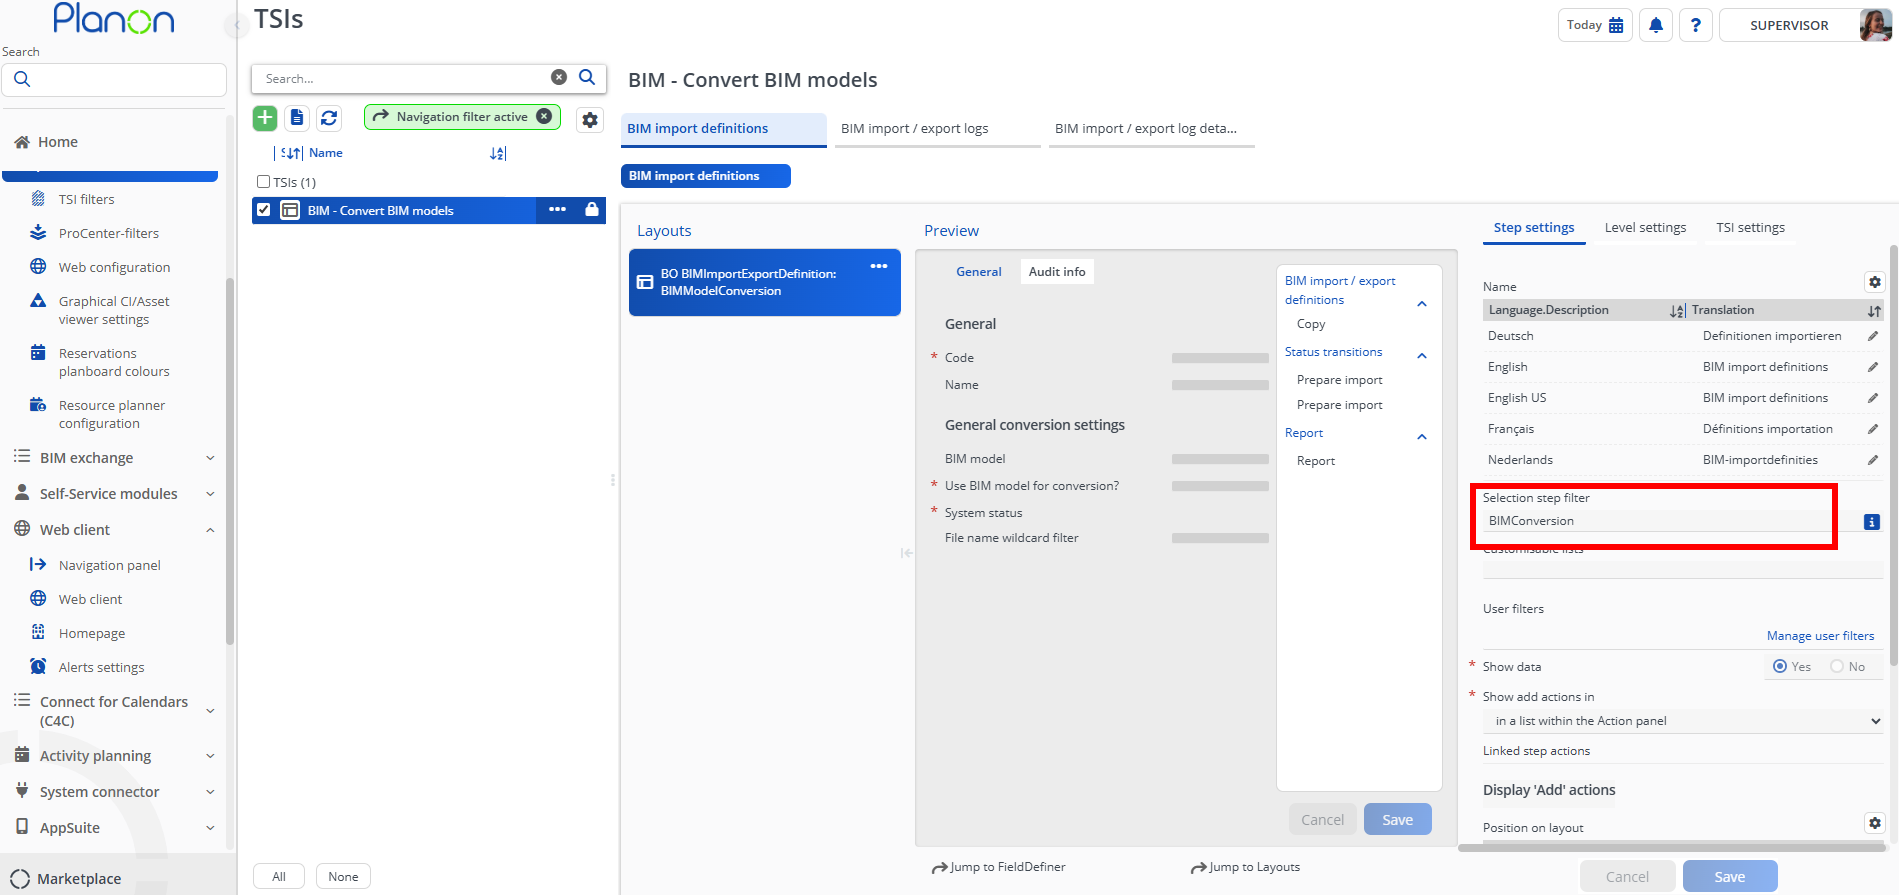
TSI: BIM - Import COBie files Selection step: BIM import definitions
Note: The following selection step filter needs adding. For the filter to be created, ensure that the fields ‘System status’ and ‘Use BIM model for conversion?’ are added to the BIMImportExportDefinition BO layout ‘BIMImportExportDefinition’.
Business object: BIMImportExportDefinition Code: BIMConversion
Filter: System Status > In > All statuses AND Use BIM model for conversion? > = > Yes
BIM models – Layout amendments
Business object: BIMModelGroup Layout name: BIMModelGroup
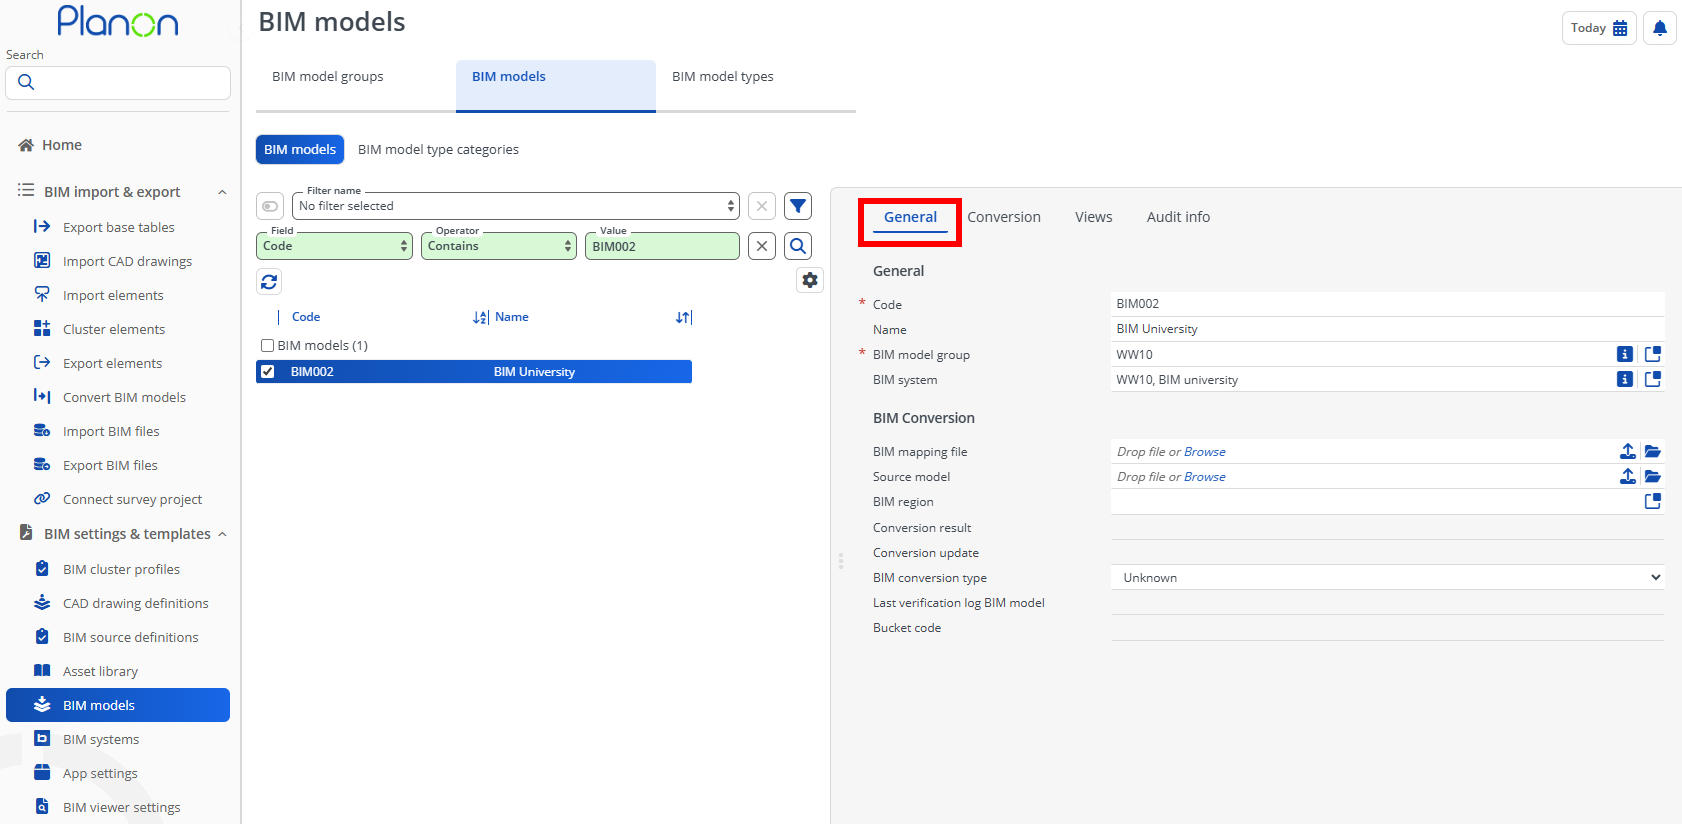
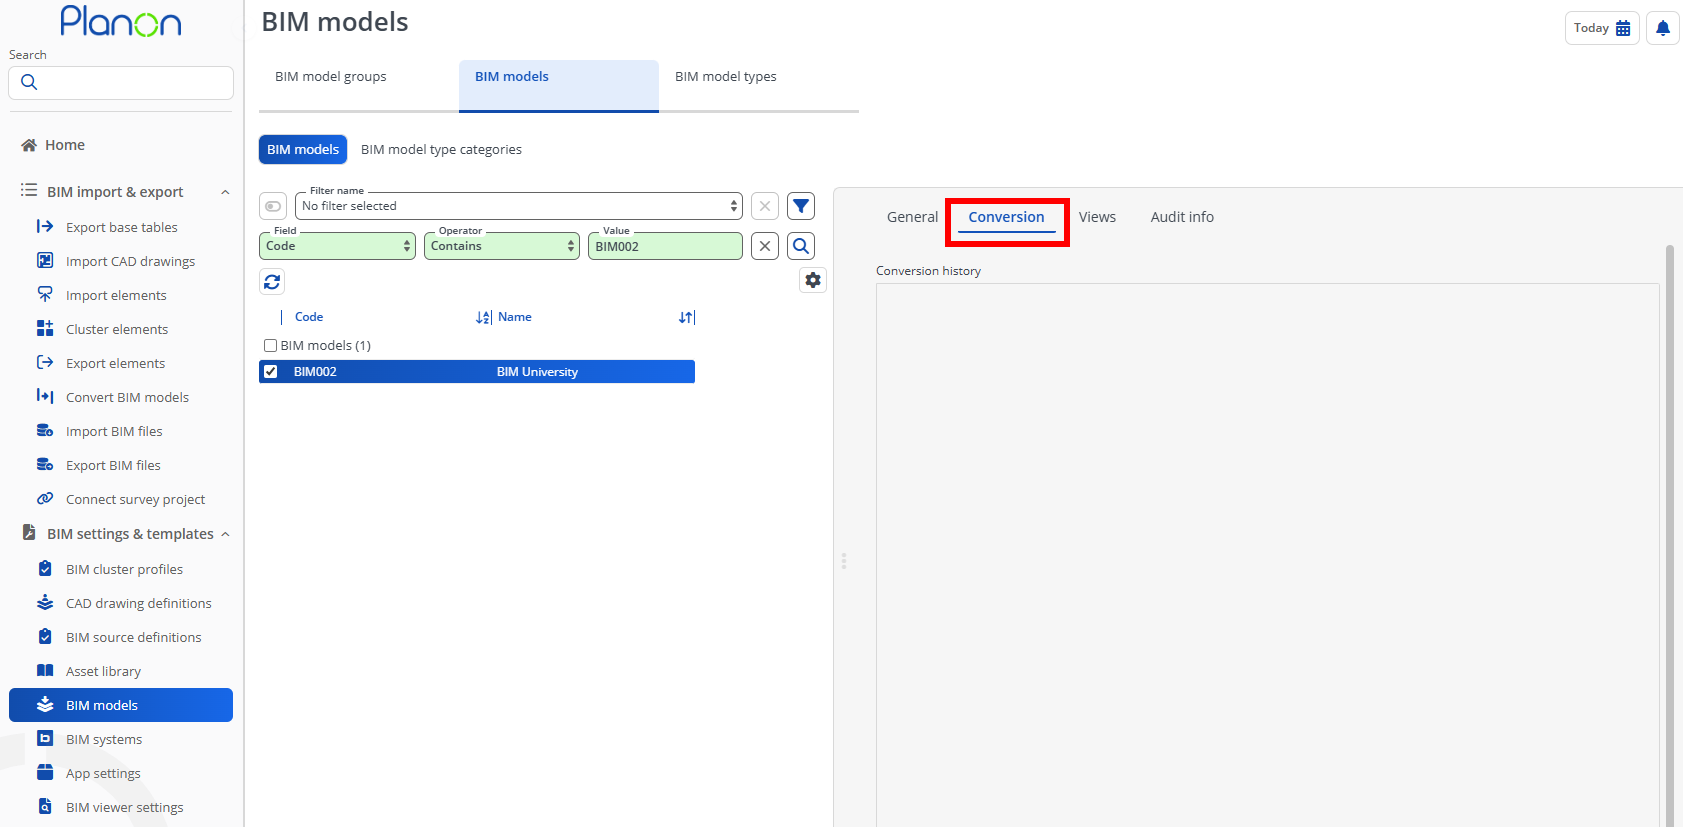
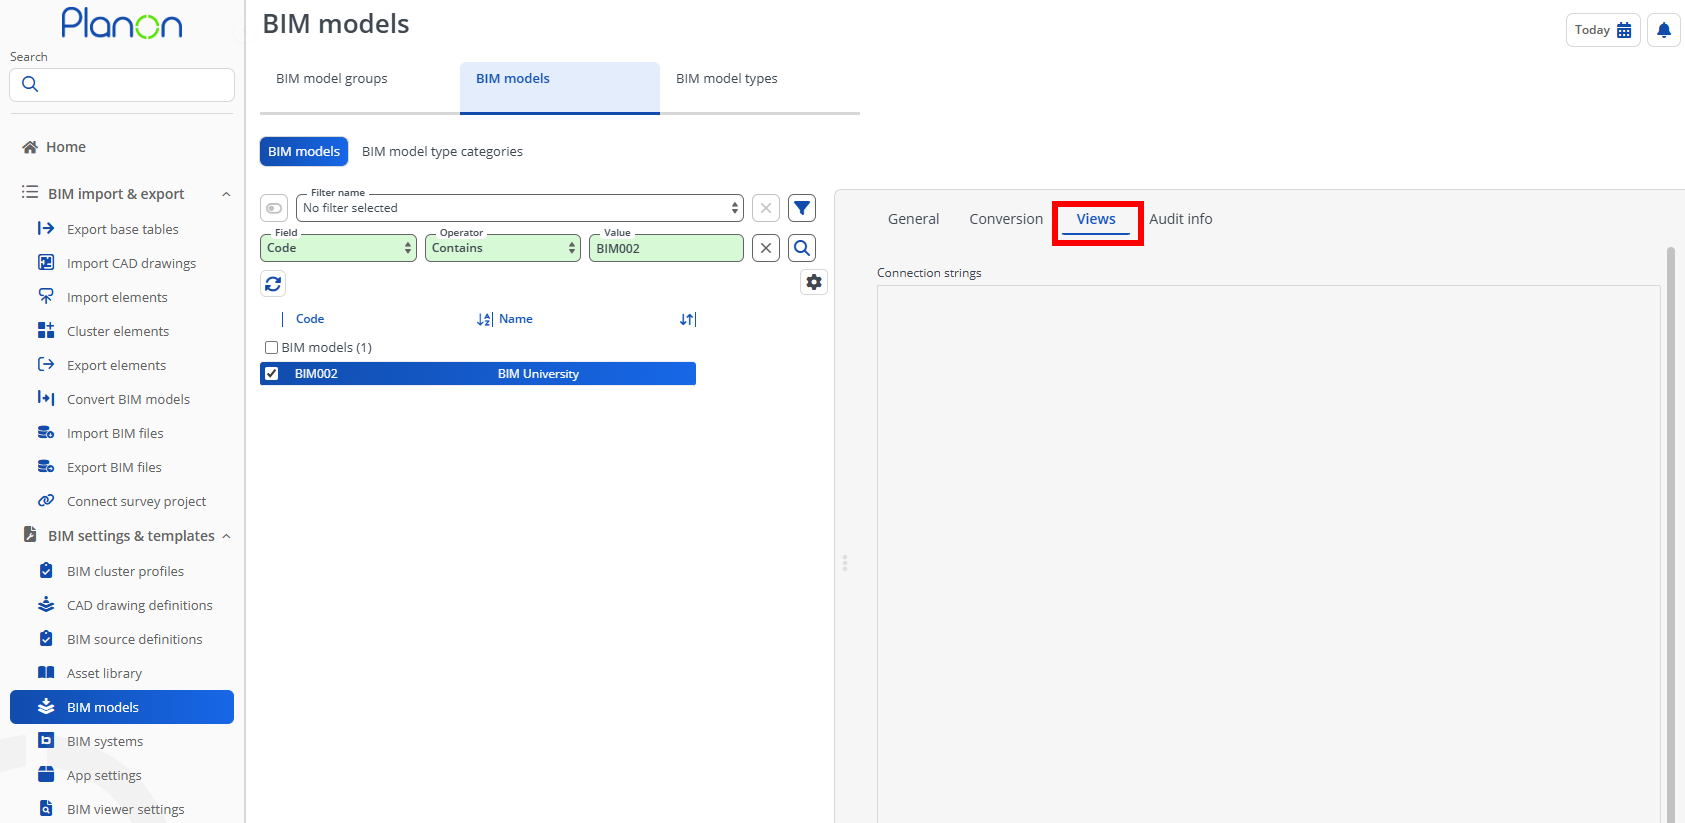
BIM systems – Example
App Settings – Example
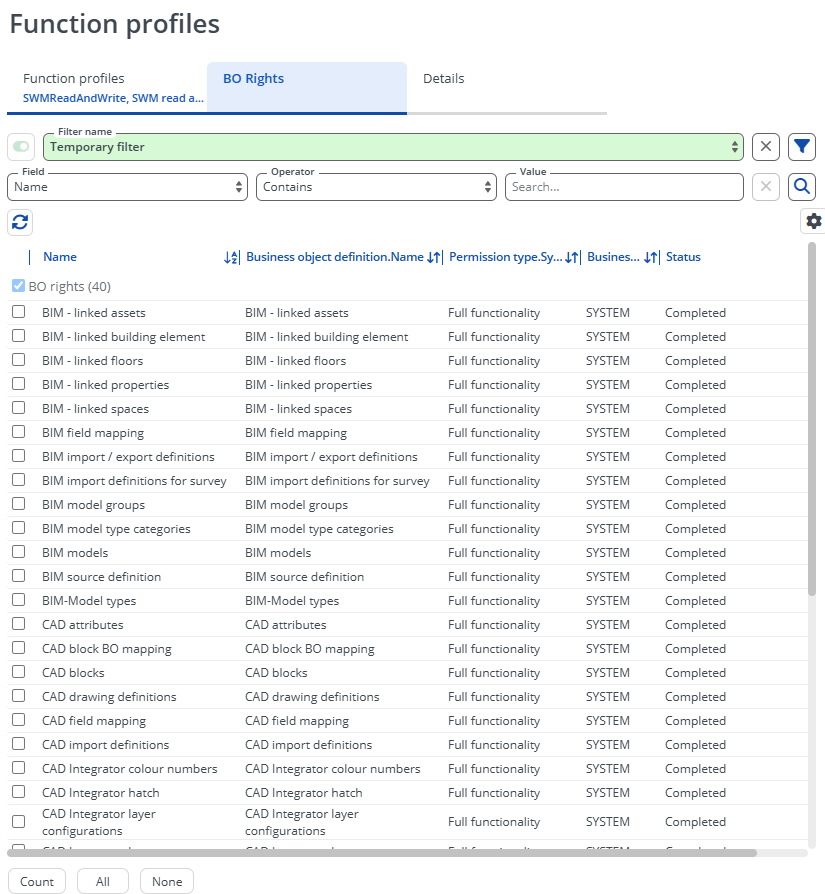
User Group Authorisation
‘SWMReadAndWrite’, the default function profile linked to Accelerator’s BIM user Group ‘SWM-BIMSpecialist’ should be amended if being used.
Currently, all BIM and CAD related business objects in Accelerator environments are not ‘authorised’, meaning they are not available to update the BO rights in a function profile.
In order to make them available, the following steps are required.
Navigate to Business processes > Field Definer
Apply a simple search for ‘Name Starts with CAD’

In the filtered view, change the status of the following BO’s to ‘Under construction’ and change the setting ‘Is authorised?’ to ‘Yes’
| System Name | Table Name | English translation |
|---|---|---|
| CADAttribute | PLN_CAD_ATTRIBUTE | CAD attributes |
| CADBlock | PLN_CAD_BLOCK | CAD blocks |
| CADBlockBusinessObjectMapping | PLN_CADBOMAPPING | CAD block BO mapping |
| CADPolylineBusinessObjectMapping | PLN_CADBOMAPPING | CAD polyline BO mapping |
| CADSinglePolylineBusinessObjectMapping | PLN_CADBOMAPPING | CAD single polyline BO mapping |
| CADLinkedAsset | PLN_CADLINKEDBO | CAD linked assets |
| CADLinkedConstructionData | PLN_CADLINKEDBO | CAD linked construction data |
| CADLinkedFlexibleWorkplace | PLN_CADLINKEDBO | CAD linked flexible workspace |
| CADLinkedFloor | PLN_CADLINKEDBO | CAD linked floors |
| CADLinkedPerson | PLN_CADLINKEDBO | CAD linked persons |
| CADLinkedLettableUnit | PLN_CADLINKEDBO | CAD linked ‘Rent from’ units |
| CADLinkedRentableUnit | PLN_CADLINKEDBO | CAD linked ‘Rent to’ units |
| CADLinkedSpace | PLN_CADLINKEDBO | CAD linked spaces |
| CADLinkedWorkSpace | PLN_CADLINKEDBO | CAD linked workspaces |
| CADDrawingDefinition | PLN_CADDRAWINGDEF | CAD drawing definitions |
| CADFieldMapping | PLN_CADFIELDMAPPING | CAD field mapping |
| CADImportDefinition | PLN_CADIMPORTDEF | CAD import definitions |
| CADViewerColour | PLN_DRAWINGVIEWERCOLOR | CAD Integrator colour numbers |
| CADViewerHatch | PLN_HATCHDEFINITION | CAD Integrator hatch |
| DrawingLayerSet | PLN_DRAWINGLAYERSET | CAD Integrator layer configurations |
| DrawingLayer | PLN_DRAWINGLAYERPROPERTY | CAD Integrator layers |
| CADViewerSettings | PLN_CADSETTING | CAD Integrator settings |
| CADViewerTextField | PLN_CADTEXTFIELD | CAD Integrator text fields |
| CADViewerText | PLN_CADTEXT | CAD Integrator texts |
| CADLayer | PLN_CAD_LAYER | CAD layers |
| SpaceCADMappingSettings | PLN_CAD_MAPPING | CAD mapping settings - space |
| WorkspaceCADMappingSettings | PLN_CAD_MAPPING | CAD mapping settings - workspace |
Once completed put the BO’s back to a ‘Completed’ status
Change the simple search to ‘Name Starts with BIM’

In the filtered view, change the status of the following BO’s to ‘Under construction’ and change the setting ‘Is authorised?’ to ‘Yes’
| System Name | Table Name | English translation |
|---|---|---|
| BIMLinkedAsset | PLN_BIMLINKEDBO | BIM - linked assets |
| BIMLinkedBuildingElement | PLN_BIMLINKEDBO | BIM - linked building element |
| BIMLinkedFloor | PLN_BIMLINKEDBO | BIM - linked floors |
| BIMLinkedProperty | PLN_BIMLINKEDBO | BIM - linked properties |
| BIMLinkedSpace | PLN_BIMLINKEDBO | BIM - linked spaces |
| BIMPMFSModelType | PLN_BIMMODELTYPE | BIM-Model types |
| BIMFieldMapping | PLN_BIMFIELDMAPPING | BIM field mapping |
| BIMImportExportDefinition | PLN_BIMIMPORTDEFINITION | BIM import / export definitions |
| BIMImportDefinitionForSurvey | PLN_BIMIMPORT_SURVEY | BIM import definitions for survey |
| BIMModelGroup | PLN_BIMMODELGRP | BIM model groups |
| BIMModelTypeCategory | PLN_BIMMODELTYPECATEGORY | BIM model type categories |
| BIMModel | PLN_BIMMODEL | BIM models |
| BIMSourceDefinition | PLN_BIMSOURCEDEF | BIM source definition |
Once completed put the BO’s back to a ‘Completed’ status
Log out and back into Planon to activate your changes
Navigate to Accounts > Function profiles
Apply a simple search for ‘System name Contains SWMReadAndWrite’

Navigate to the ‘BO Rights’ selection level and update the ‘Permission type’ of all the previously authorised BO’s to ‘Full Functionality’.
Note: This can be updated in bulk using the ‘Modify within Selection’ action
Default file location settings
Navigate to the TSI ‘File locations’ and adjust the ‘Settings for secure documents’, ‘File upload settings’ and the ‘BIM file upload settngs’ to include the file types:
.rvt
.svf
.ifc
.xlsx
.json
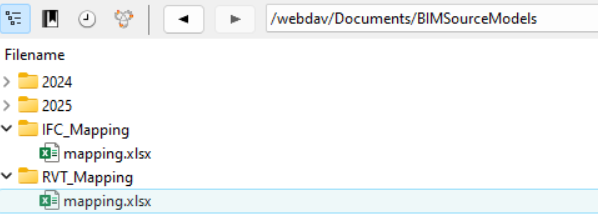
Template files on WebDAV
Add as part of Template settings, the following folders and files are recommended in the following WebdAV locations:
webdav/Documents/BIMSourceModels/
Add Folder ‘IFC mapping’
- Add file ifc_mapping.xlsx (ifc based)
Add folder ‘RVT mapping’
- Add file rvt_mapping.xslx (rvt based)
Example set-up :
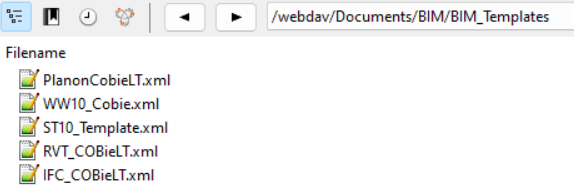
Webdav/Documents/BIM/BIM_Templates/
Add file IFC_COBieLT.xml
Add file RVT_COBieLT.xml
Example set-up:
BIM Source definitions
When applying the BIM_Templates for setting-up the BIM Source definitions, add the following BIM business objects and BIM field mappings:
RVT_COBieLT.xml BIM business objects:
| Name | BIM XML node | Asset type node / value/ user-defined type |
|---|---|---|
| Properties | Facility | N/A |
| Floors | Facility.Floors | N/A |
| Spaces | Facility.Floors.Floor.Spaces | N/A |
| Inventory Assets | Facility.AssetTypes | Facility.AssetTypes.AssetType.Assets.Asset.AssetAttributes.PLN_AssetType/ UsrMEAsset/ UsrMEAsset |
BIM field mappings:
| BIM business object | Import/export type | Planon Field | BIM XML node / Default value |
|---|---|---|---|
| Properties | 0, Import and export | Code | Facility.FacilityName |
| Floors | 0, Import and export | Code | Facility.Floors.Floor.FloorName |
| Spaces | 0, Import and export | Code | Facility.Floors.Floor.Spaces.Space.SpaceName |
| Inventory Assets | 0, Import and export | Code | Facility.AssetTypes.AssetType.Assets.Asset.AssetName |
| Inventory Assets | 0, Import and export | Name | Facility.AssetTypes.AssetType.Assets.Asset.AssetDescription |
| Inventory Assets | 1, Import only | DimensionRef | 01 (Pieces) |
| Inventory Assets | 1, Import only | ItemGroupRef | 00 (To be determined) |
IFC_COBieLT.xml BIM business objects:
| Name | BIM XML node | Asset type node / value/ user-defined type |
|---|---|---|
| Properties | Facility | N/A |
| Floors | Facility.Floors | N/A |
| Spaces | Facility.Floors.Floor.Spaces | N/A |
| Inventory Assets | Facility.AssetTypes | / /UsrMEAsset |
BIM field mappings:
| BIM business object | Import/export type | Planon Field | BIM XML node / Default value |
|---|---|---|---|
| Properties | 1, Import only | Code | Facility.FacilityName |
| Floors | 1, Import only | Code | Facility.Floors.Floor.FloorName |
| Spaces | 1, Import only | Code | Facility.Floors.Floor.Spaces.Space.SpaceName |
| Inventory Assets | 1, Import only | Code | Facility.AssetTypes.AssetType.Assets.Asset.AssetName |
| Inventory Assets | 1, Import only | Name | Facility.AssetTypes.AssetType.Assets.Asset.AssetDescription |
| Inventory Assets | 1, Import only | DimensionRef | 01 (Pieces) |