Planon Connect for DIS
1. Introduction
DIS is an abbreviation for Digital Interchange of Services and is a protocol-based approach to provide interoperability between Facility Management information systems of all types and makes. It enables interoperability by standardizing the interaction specifications between parties.
This document describes the installation and technical configuration of the app, that is required to start working with the DIS-protocol.
For a functional reference and a functional configuration, please use the document “Functional specification - DIS for SR”. This document contains a functional description of the DIS-protocol and the related processes.
For more information on the “Digital Interchange of Service” principles, see the whitepaper Digital Interchange of Services – Towards lean service outsourcing using system-to-system protocols.
2. Prerequisites
2.1 Environment
This solution will be designed to work with Planon Live L129 and above.
2.2 Constraints
The design of this app is based on the following constraints:
- A free-BO is needed to allocate the DIS-message queue.
- The ConnectForDIS app is only to be used in conjunction with the Configurable BusinessRule app (CBR).
2.3 Assumptions
This design and functionality of the solution is based on the following assumptions:
- The CBR-app is installed and activated, or will be installed during the setup of this app.
- The provided set of CBR-configurations is used and are not changed by a user.
- The functional configuration of the Planon environment is present.
3. Features
This chapter describes the features that this app contains. This app only works in conjunction with the CBR-app and its CBR-configurations developed for this purpose.
The ConnectForDIS app is responsible for handling inbound- and outbound messages to and from one or multiple external systems. As a result, a DIS-message queue is created. The functionalities can be roughly divided into three features: receiving, sending and handling DIS-messages.
The CBR-configurations are responsible for processing each DIS-message. Execution of a configuration is based on the message type and its corresponding protocol type.
3.1 Feature 1 – Receive inbound messages
The app exposes an endpoint that can receive JSON-calls from an external system. Each call must follow one of the DIS-protocol JSON-schemas.
Each call may result in an inbound DIS-message in the message queue. Upon receiving a call, a basic check is done whether the call:
- Contains a valid protocol type enum
- Contains a valid message type enum
- If the message received is part of the chosen protocol
If this is the case, an inbound DIS-message is created in the DIS-message queue. As the request is handled asynchronously, a HTTP 200 OK is sent when successfully handled.
Inbound flow:
Webservice endpoint receives call → Inbound DIS-message is created by ConnectForDIS app → DIS-message handled by corresponding CBR-configuration.
3.2 Feature 2 – Send outbound messages
Outbound DIS-messages are added by one of the CBR-configurations. Using the external system ID provided on the DIS-message, the external endpoint is retrieved together with the access key that is used for authentication.
When a system is found, a call is made to that endpoint. Based on the response, the DIS-message is updated accordingly. The external system may or may not be a Planon instance. Messages may or may not be handled asynchronously depending on the external system.
Outbound flow:
Business event triggers CBR-configuration → Outbound message is created by CBR-configuration → DIS-message handled by ConnectForDIS app → Message is sent.
3.3 Feature 3 – Handling DIS-messages in the queue
Next to receiving and sending data to an external system, the main feature of the app is to handle the DIS-messages in the queue. They may either be inserted by the app itself (when an inbound message is received) or inserted by a CBR-configuration (when an outbound message needs to be sent).
To make sure the protocol stages are followed, the protocol stage is stored on the conversation. Each conversation must strictly follow the protocol flow.
In both cases, the following checks are executed:
Protocol check
- Checks if the message body adheres to the JSON-schema of the given message type.
- Checks if the message is successive to the conversation state.
Content check
The protocol uses UUIDs stored on each system. The content check will replace data based on the inbound or outbound flow.
Inbound flow:
- Check whether an external link (and linked business object) exists for the received UUID.
- If no external link is found, it means that the received UUID is not (yet) stored in this system.
- As a result, the master data (MD) process is started in the same conversation.
- When the MD is received, a link is created and the process continues.
Outbound flow:
- Replaces a string value created by a CBR-config to a valid UUID.
- Follows a fixed format.
- Creates an external-bo link if not yet present.
- The receiving system may not have registered this UUID in their system. They may start an MD-process.
3.4 Feature 4 – Master Data process
The DIS-protocol uses UUIDs to identify certain data-objects in the DIS-messages. This reduces the amount of data in a DIS-message and allows each system to store the UUID as a reference to the actual data-object.
The Master Data (MD) process is responsible for registering the data in the system and to provide the data to an external system. In Planon context, this means that there is an “external bo-link” for a given businessobject. A businessobject may have multiple bo-links, but they are unique per external system.
Master data is exchanged when an external system is linked to a businessobject. Please see section 5.5 to learn more about setting up an external system and how to link a system to a businessobject.
Example:
- External system “A” sends us a UUID that belongs to a Property-type.
- We do not have this UUID in our reference list for system “A”. We execute a MD-request to system “A” and ask for more information.
- The external system “A” responds with additional data for this property, for example a name and address.
- We create a business object of type “Property” and register this business object in our reference list, together with the UUID that we received earlier for system “A”.
4. Installation
This chapter describes the steps required in order to install this app on your Planon environment. As the ConnectForDIS app works in conjunction with the Configurable Business Rule app, the following applies to both apps.
4.1 Installation Process
There are two ways to install the app.
4.1.1 Install the app by using the marketplace
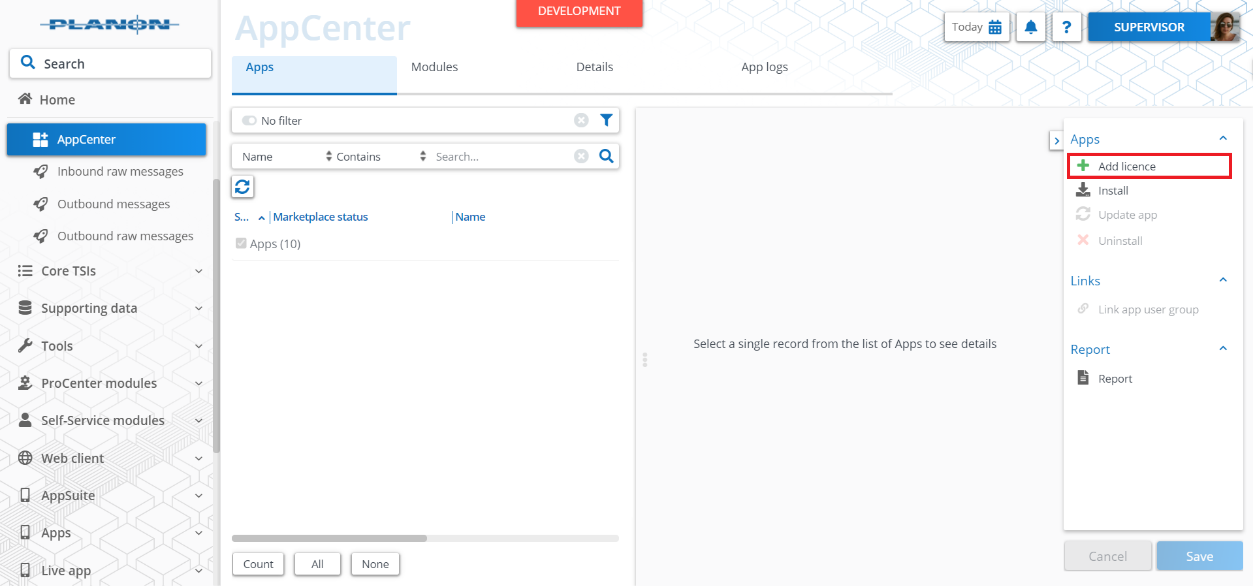
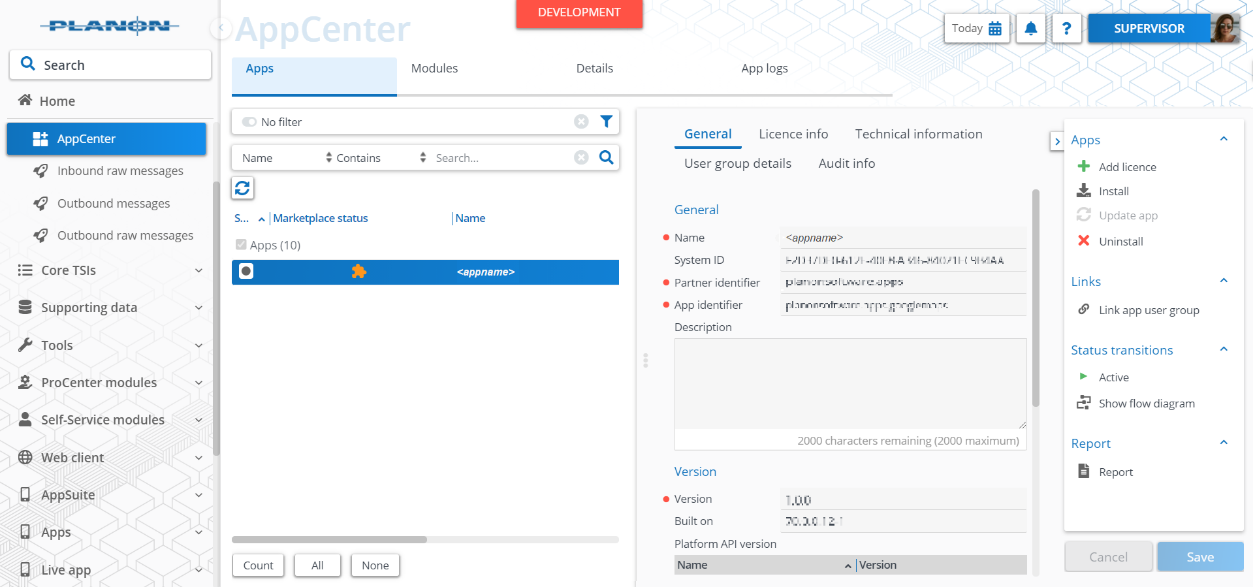
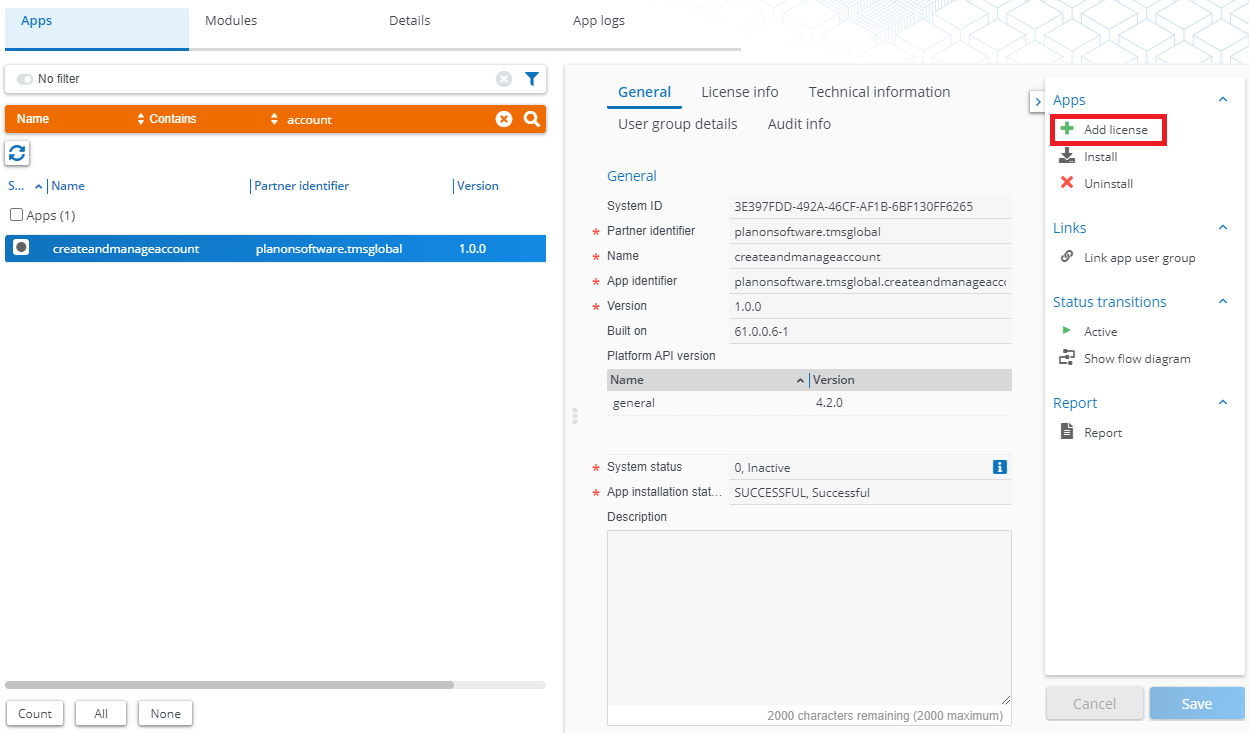
In case your environment is configured to use the Planon appstore, the only thing required to install the app is to add the app license in the AppCenter TSI. Planon will automatically download and install the app.
4.1.2 Manual installation
In case you want to perform a manual installation, follow the steps below:
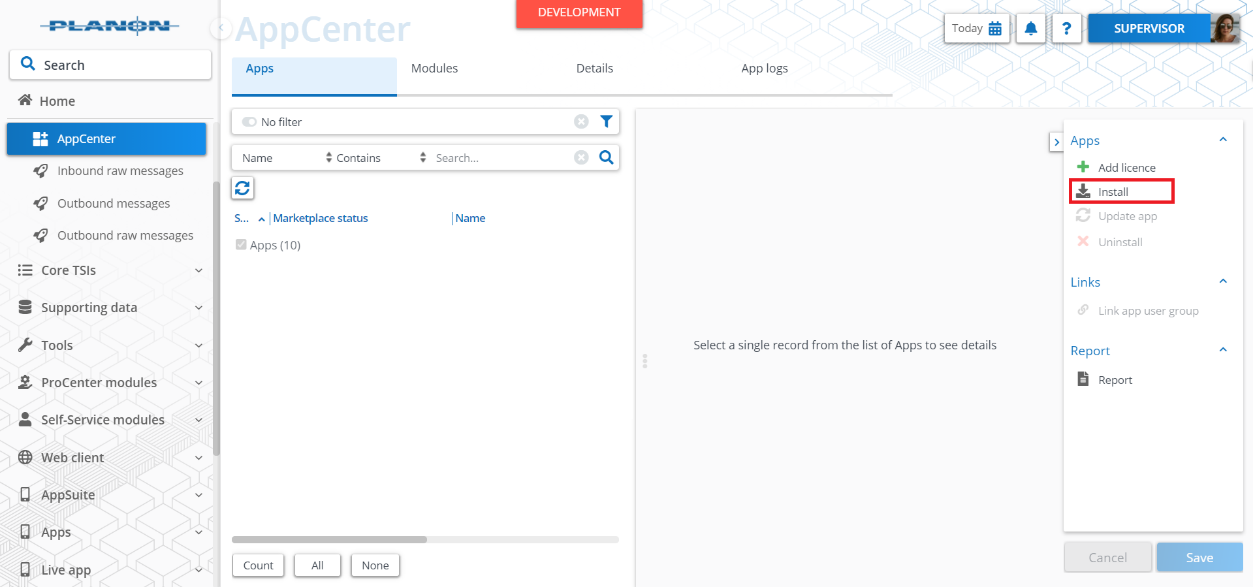
- Open AppCenter TSI from Planon webclient and click on Install from the action menu.
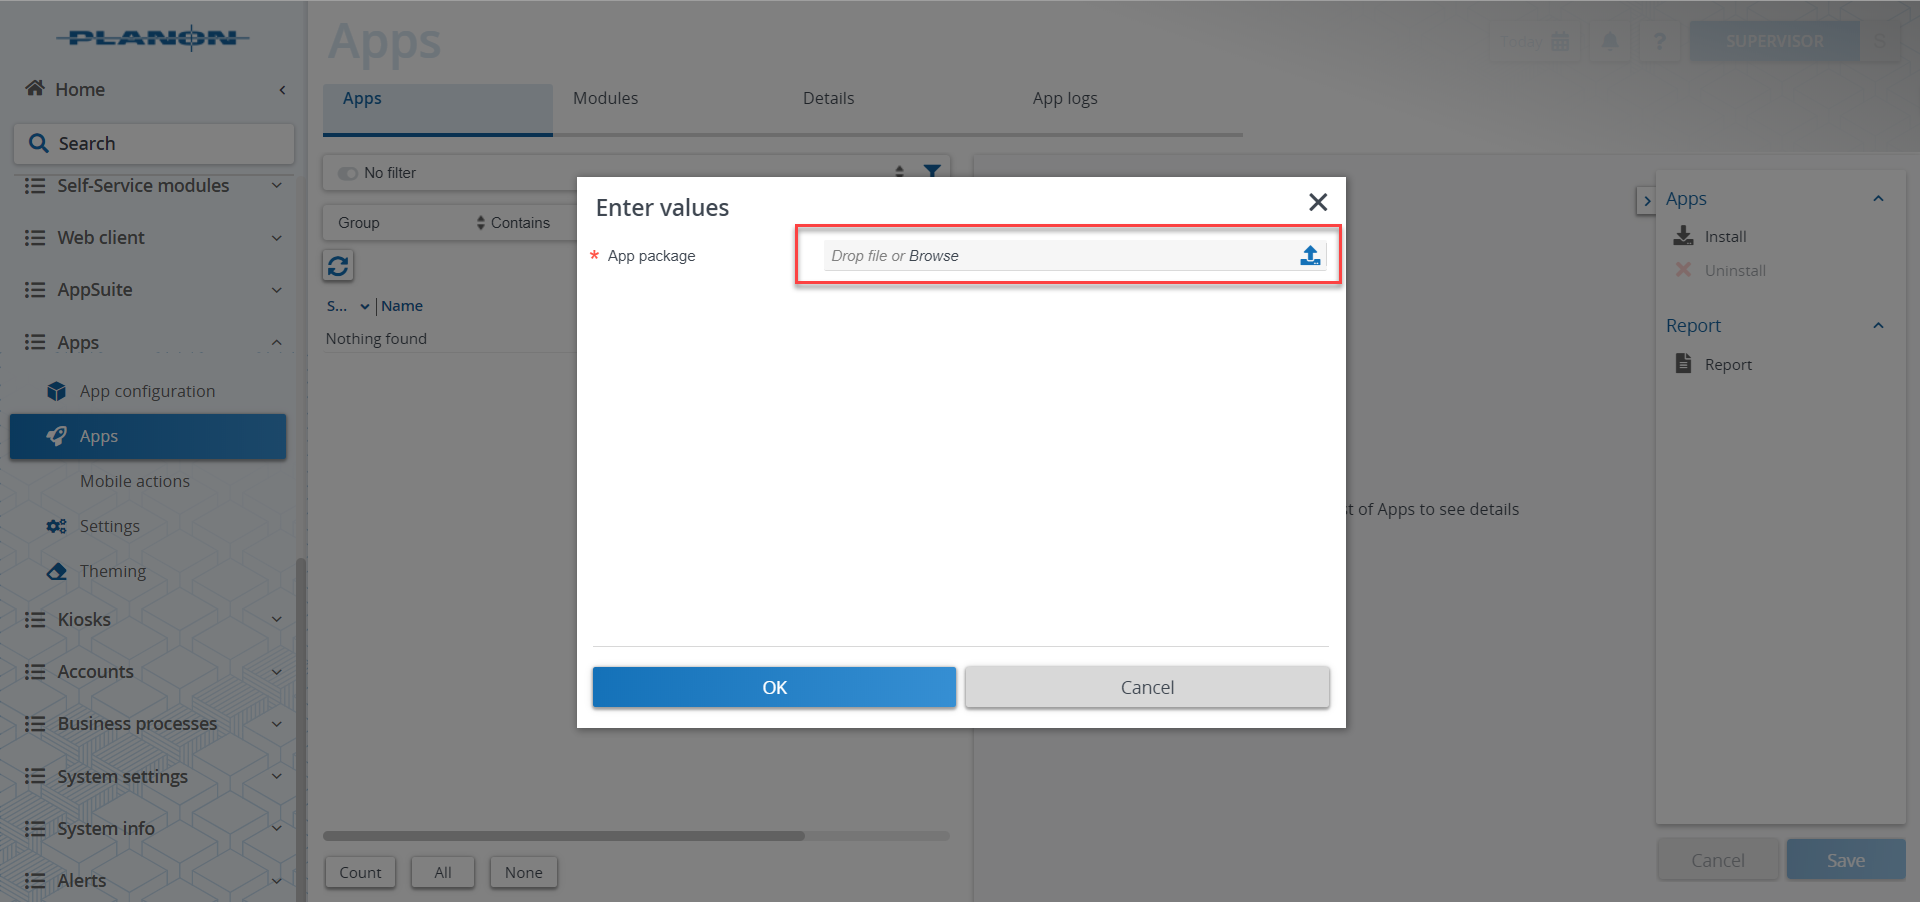
- Browse to the
.ppkfile.
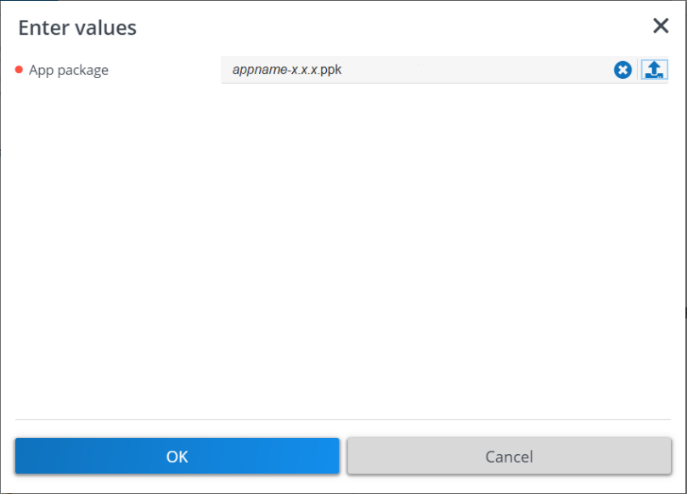
- Click OK to install the app and follow the installation process.
- When the app is successfully installed, the app will appear in the AppCenter.
- Add the app license in Apps TSI.
4.2 App settings
Now that the app is installed, provide the app settings for each module in the Modules selection level. The app configuration is available in the Details section.
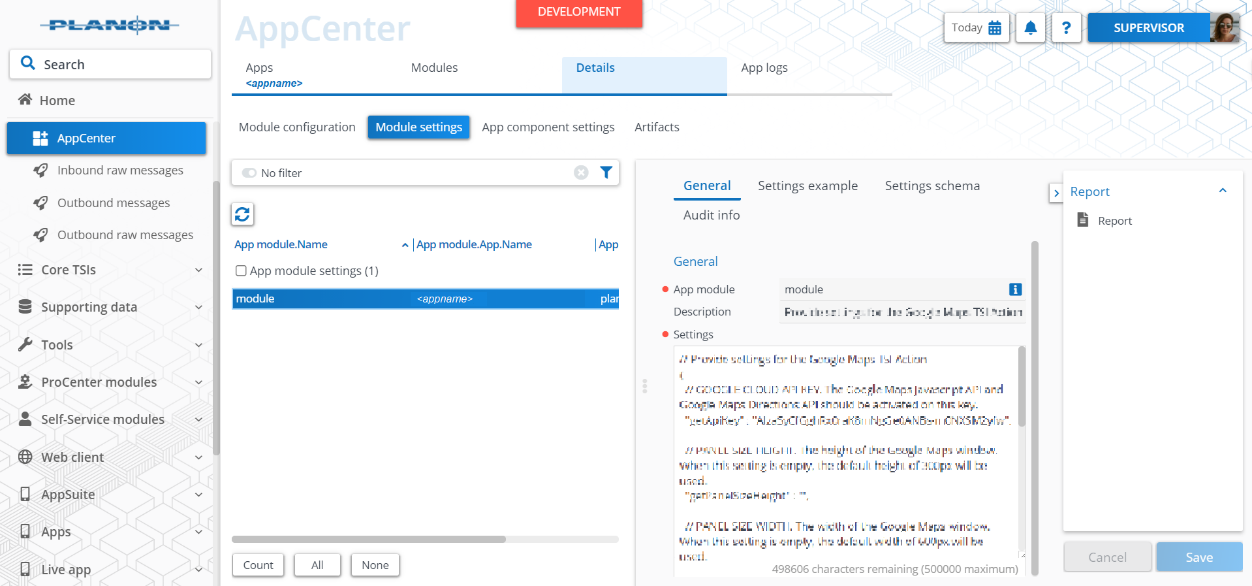
- For more details regarding the settings see the next chapter.
- Click the Save button after providing the module settings.
4.2.1 Module settings
The ConnectForDIS app uses module and component settings.
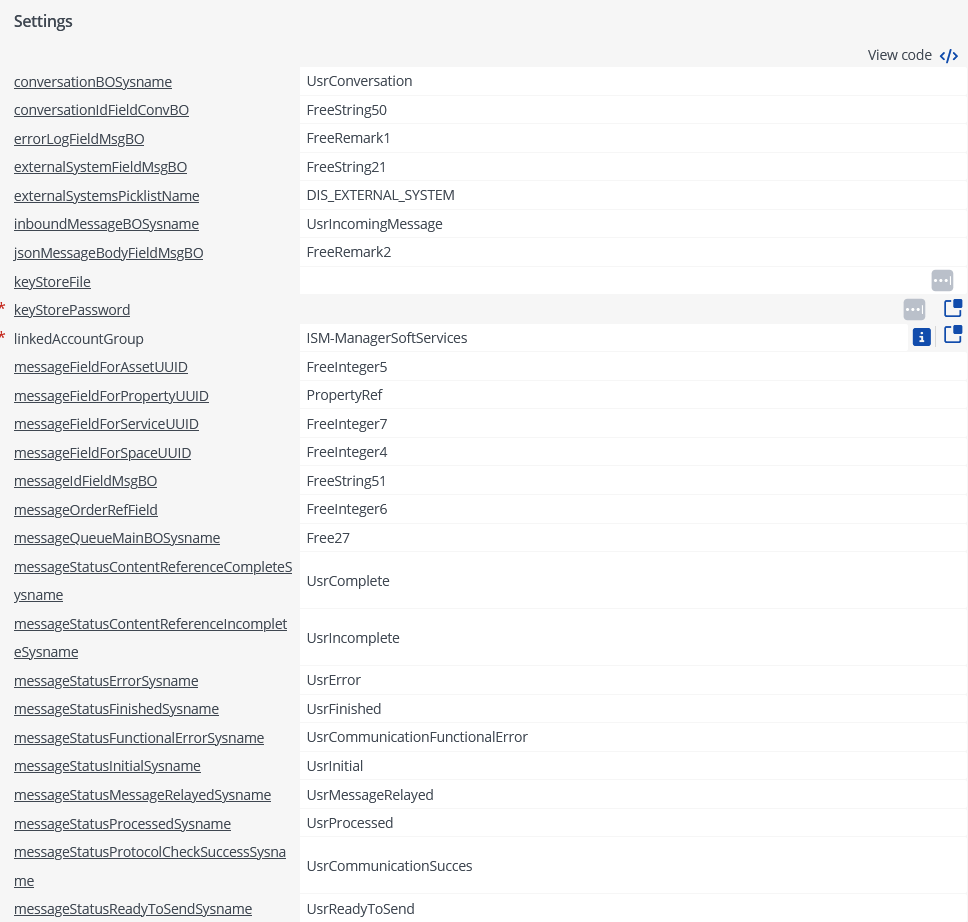
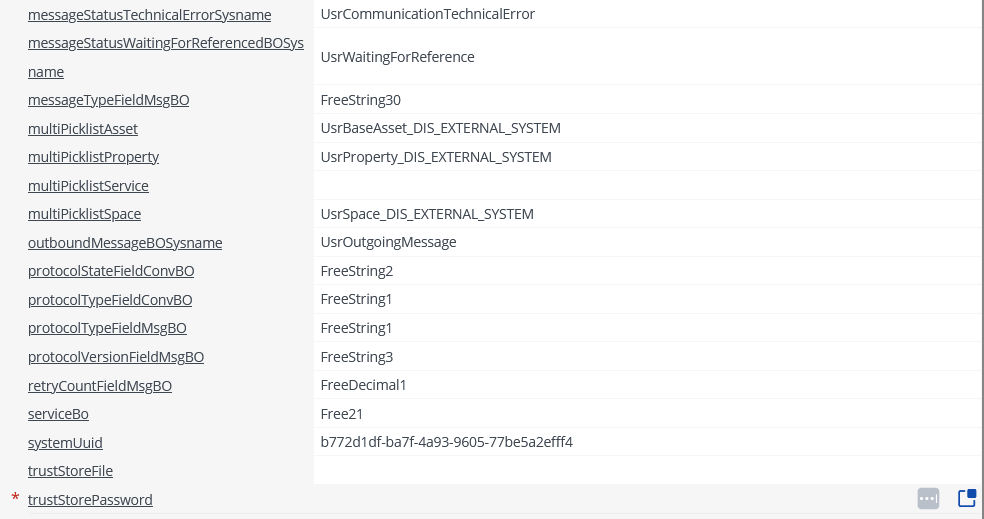
The table below displays the module settings:
| Setting | Default | Description | Mandatory |
|---|---|---|---|
| conversationBOSysname | UsrConversation | System name of Free BO that is configured as Conversation BO. | Yes |
| conversationIdFieldConvBO | FreeString50 | Conversation ID String field (systemname) on Conversation BO | Yes |
| errorLogFieldMsgBO | FreeRemark1 | Error log String field (systemname) on Message BO | Yes |
| externalSystemFieldMsgBO | FreeString21 | External system picklist field (systemname) on Message BO | Yes |
| externalSystemsPicklistName | DIS_EXTERNAL_SYSTEM | Name of external systems picklist that can be set on the Message BO. | Yes |
| inboundMessageBOSysname | UsrIncomingMessage | System name of Free BO that is configured as InboundMessage (queue) BO. | Yes |
| jsonMessageBodyFieldMsgBO | FreeRemark2 | JSON message body String field (systemname) on Message BO | Yes |
| keyStoreFile | Filepath of KeyStore file on Planon webdav | No | |
| keyStorePassword | KeyStore password | No | |
| linkedAccountGroup | |||
| messageFieldForAssetUUID | FreeInteger5 | Reference field (systemname) on Message BO where to save the linked BO for the Asset UUID | Yes |
| messageFieldForPropertyUUID | PropertyRef | Reference field (systemname) on Message BO where to save the linked BO for the Building UUID. | Yes |
| messageFieldForServiceUUID | FreeInteger7 | Reference field (systemname) on Message BO where to save the linked BO for the Service UUID. | Yes |
| messageFieldForSpaceUUID | FreeInteger4 | Reference field (systemname) on Message BO where to save the linked BO for the Space UUID | Yes |
| messageIdFieldMsgBO | FreeString51 | Message ID String field (systemname) on Message BO | Yes |
| messageOrderRefField | FreeInteger6 | Order Reference field (systemname) on Message BO | Yes |
| messageQueueMainBOSysname | Free27 | System name of Free BO that is configured as top of message queue BO’s | Yes |
| messageStatusContentReferenceCompleteSysname | UsrComplete | Message BO ‘Complete’ status system name. | Yes |
| messageStatusContentReferenceIncompleteSysname | UsrIncomplete | Message BO ‘Incomplete’ status system name. | Yes |
| messageStatusErrorSysname | UsrError | Message BO ‘Error’ status system name. | Yes |
| messageStatusFinishedSysname | UsrFinished | Message BO ‘Finished’ status system name. | Yes |
| messageStatusFunctionalErrorSysname | UsrCommunicationFunctionalError | Message BO ‘FunctionalError’ status system name. | Yes |
| messageStatusInitialSysname | UsrInitial | Message BO ‘Initial’ status system name. | Yes |
| messageStatusMessageRelayedSysname | UsrMessageRelayed | Message BO ‘MessageRelayed’ status system name. | Yes |
| messageStatusProcessedSysname | UsrProcessed | Message BO ‘Processed’ status system name. | Yes |
| messageStatusProtocolCheckSuccessSysname | UsrCommunicationSucces | Message BO ‘BaseCheckSuccess’ status system name. | Yes |
| messageStatusReadyToSendSysname | UsrReadyToSend | Message BO ‘ReadyToSend’ status system name. | Yes |
| messageStatusTechnicalErrorSysname | UsrCommunicationTechnicalError | Message BO ‘TechnicalError’ status system name. | Yes |
| messageStatusWaitingForReferencedBOSysname | UsrWaitingForReference | Message BO ‘Waiting for Reference’ status system name. | Yes |
| messageTypeFieldMsgBO | FreeString30 | Message type String field (systemname) on Message BO | Yes |
| multiPicklistAsset | UsrBaseAsset_DIS_EXTERNAL_SYSTEM | Multipicklist asset | No |
| multiPicklistProperty | UsrProperty_DIS_EXTERNAL_SYSTEM | Multipicklist property | No |
| multiPicklistService | Multipicklist service | No | |
| multiPicklistSpace | UsrSpace_DIS_EXTERNAL_SYSTEM | Multipicklist space | No |
| outboundMessageBOSysname | UsrOutgoingMessage | System name of Free BO that is configured as OutboundMessage (queue) BO. | Yes |
| protocolStateFieldConvBO | FreeString2 | Protocol state String field (systemname) on Conversation BO | Yes |
| protocolTypeFieldConvBO | FreeString1 | Protocol type String field (systemname) on Conversation BO | Yes |
| protocolTypeFieldMsgBO | FreeString1 | Protocol type String field (systemname) on Message BO. | Yes |
| protocolVersionFieldMsgBO | FreeString3 | Protocol version String field (systemname) on Message BO. | Yes |
| retryCountFieldMsgBO | FreeDecimal1 | Retry count (Decimal) field (systemname) on Message BO | Yes |
| serviceBo | Free21 | BO (systemname) of linked Service UUID. | Yes |
| systemUuid | UUID of this Planon system. This will be used as ‘sender’ for outgoing messages. | Yes | |
| trustStoreFile | Filepath of TrustStore file on Planon webdav. | No | |
| trustStorePassword | TrustStore password | No |
4.3 Component settings
Businessrule: planonsoftware.apps.dis.br.NotifyMDChanges
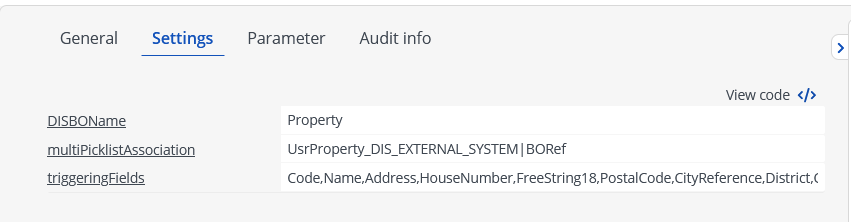
| Setting | Example | Description | Mandatory |
|---|---|---|---|
| DISBOName | Property | DIS name of bo to exchange in the message | Yes |
| multiPicklistAssociation | UsrProperty_DIS_EXTERNAL_SYSTEM|BORef | The multi-picklist association, that is created earlier. | Yes |
| triggeringFields | Code,Name | Comma separated Fields of the BO. If one of those fields is changed, the external systems that are linked are notified of the data change. | Yes |
4.3.1 Activation
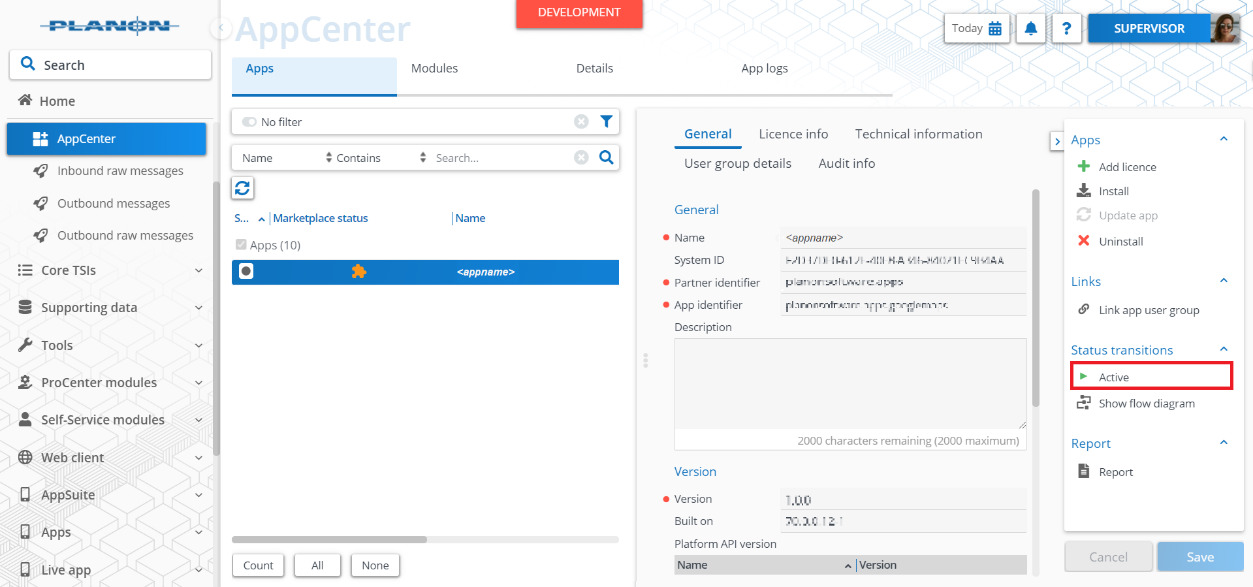
Once the app has been configured, you can activate the app by pressing the Active status transition from the action panel.
5. Planon configuration
The configuration is divided into several steps:
- Configure a Free-BO that will serve as the basis for the DIS-message queue
- Configure a Free-BO to store “Service” data
- Configure a Free-BO for storing the CBR-configurations
- Add the navigation group and corresponding TSI’s for DIS
- Configure external system(s)
- Import CBR-configurations
- Register CBR-configurations in Field Definer
- Register ConnectForDIS business rules
- Check app-settings for ConnectForDIS app
A configuration transfer package is provided for steps 1 and 2. This assumes that the free BO’s that are used in this transfer are not yet in use in the target system.
To import the package, follow the steps below:
- Navigate to the “Configuration Transfer” TSI.
- Select “Import configuration” from the action menu.
- Select the package file by browsing your computer.
- Click “Next” and make sure to check each mandatory step.
- When all information is checked, the import will start.
Please note that when deviating from the default, changes might be required to all CBR-configurations, CBR-registrations in the field definer and the settings for ConnectForDIS-app. In addition, all CBR registrations need to be inserted manually.
5.1 Configure Free-BO for DIS-message queue
By default, BO Free27 is used when importing the configuration using a transfer. When configured, the Free-BO should have the following structure.
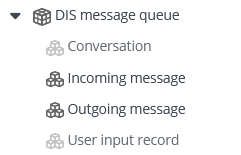
Next to the BO-structure and default system fields, the following free fields are configured:
| Fieldname | System name | Length | Field type |
|---|---|---|---|
| Asset | FreeInteger5 | 10 | BaseAsset |
| Conversation ID | FreeString50 | 50 | String, Text |
| Customer | FreeInteger1 | 10 | Customer |
| Error log | FreeRemark1 | 2000 | FreeString, Free field |
| ExternalSystem | FreeString21 | 30 | CodesCodeName, Picklists code descriptive: “DIS_EXTERNAL_SYSTEM” |
| Header UUID path | FreeString79 | 255 | String, Text |
| JSON message | FreeRemark2 | StringExtended, Extended String | |
| Message ID | FreeString51 | 50 | String, Text |
| Message type | FreeString30 | 30 | String, Text |
| Protocol | FreeString1 | 10 | String, Text |
| Protocol stage | FreeString2 | 10 | String, Text |
| Protocol version | FreeString3 | 10 | String, Text |
| Request / Order | FreeInteger6 | 10 | BaseOrder, Order |
| Retry count | FreeDecimal1 | 15 | BigDecimal, Big decimal |
| Service | FreeInteger7 | 10 | Free21, Free business object 21 |
| Service company | FreeInteger2 | 10 | Address, Address |
| Space | FreeInteger4 | 10 | Space, Space |
5.2 Configure Free-BO for Service Catalog
By default, BO Free21 is used when importing the configuration using a transfer. When configured, the Free-BO should have the following structure.

Next to the BO-structure and default system fields, the following free fields are configured:
| Fieldname | System name | Length | Field type |
|---|---|---|---|
| Standard order | FreeInteger1 | 10 | StandardOrder, Standard order |
| Address | FreeInteger2 | 10 | Address, Address |
5.3 Configure Free-BO for CBR-configurations
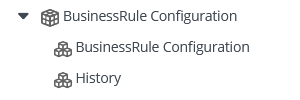
The assumption is made that the CBR-app is installed using the user guide that is provided with the app. When configured, this should have resulted in a Free-BO. In this example, Free10 is used to store the configurable businessrule configuration.
5.4 Add navigation group and TSI’s
When using the configuration transfer, a navigation group is created, together with the needed TSI’s.
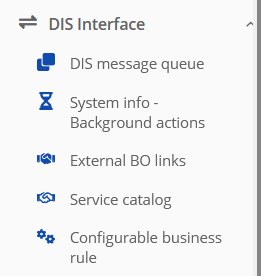
It shows the TSI’s needed, such as the queue itself, an overview of the background actions (for monitoring purposes), the external BO links, the service catalog (Free21) and the CBR-configurations.
5.5 Configure External System
Configuring an external system is comprised of two steps. First, the external system is added to a picklist. Second, an external system is created in Planon (External BO Link).
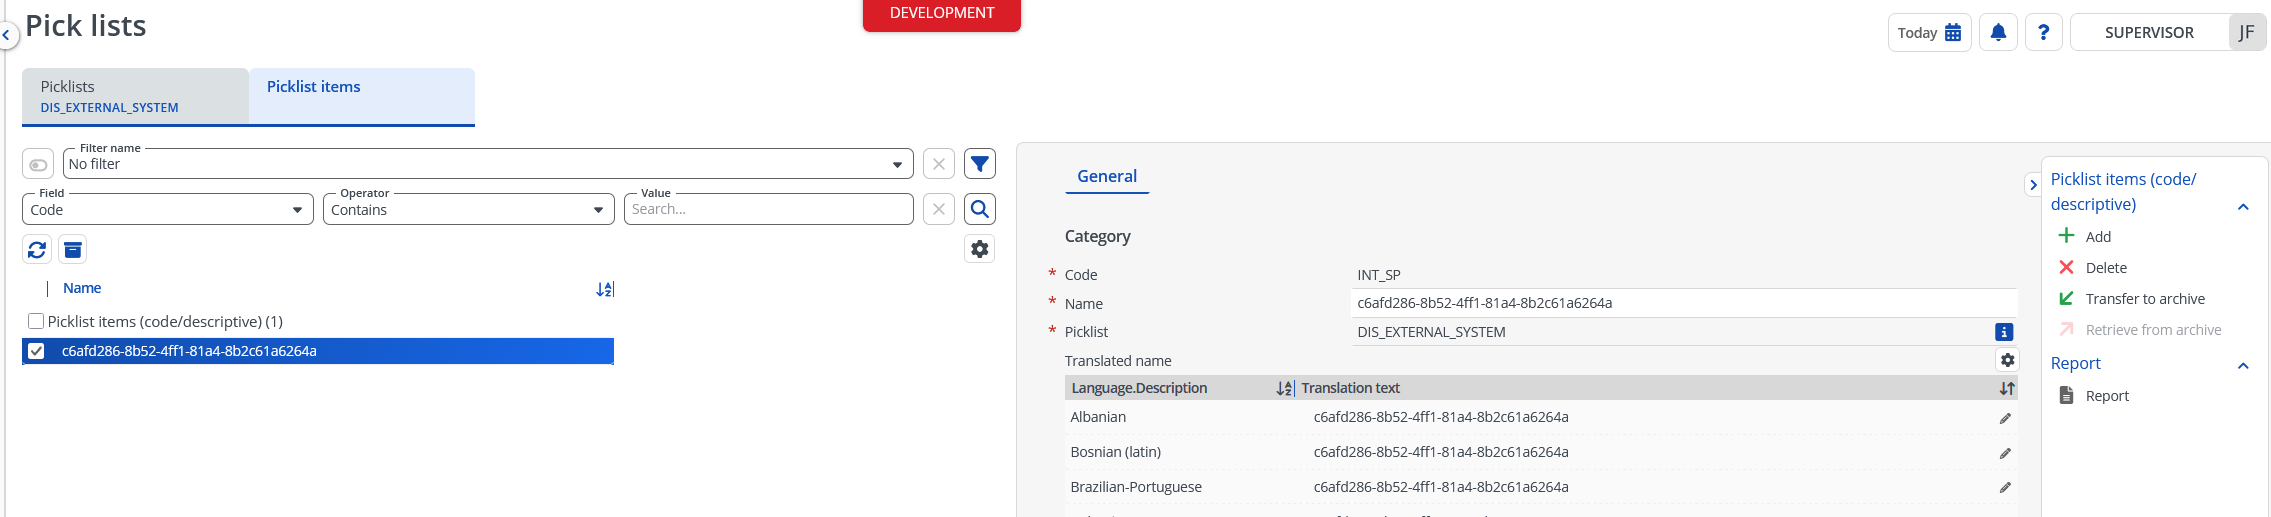
When using the transfer, a code-descriptive picklist is added (DIS_EXTERNAL_SYSTEM). This picklist is empty by default. To configure an external system, a picklist item should be inserted for each external system.
Step 1 — Add picklist item:
- Navigate to the “Pick lists” TSI.
- Select the picklist “DIS_EXTERNAL_SYSTEM”.
- Drill-down to the selection level “Picklist items”.
- Click “Add” and fill the fields:
- Code: The name of the external system
- Name: External system reference (UUID)
- Click “Save”.
Step 2 — Create External BO Link:
- Navigate to the TSI “External BO links”.
- Click “Add” on the action menu.
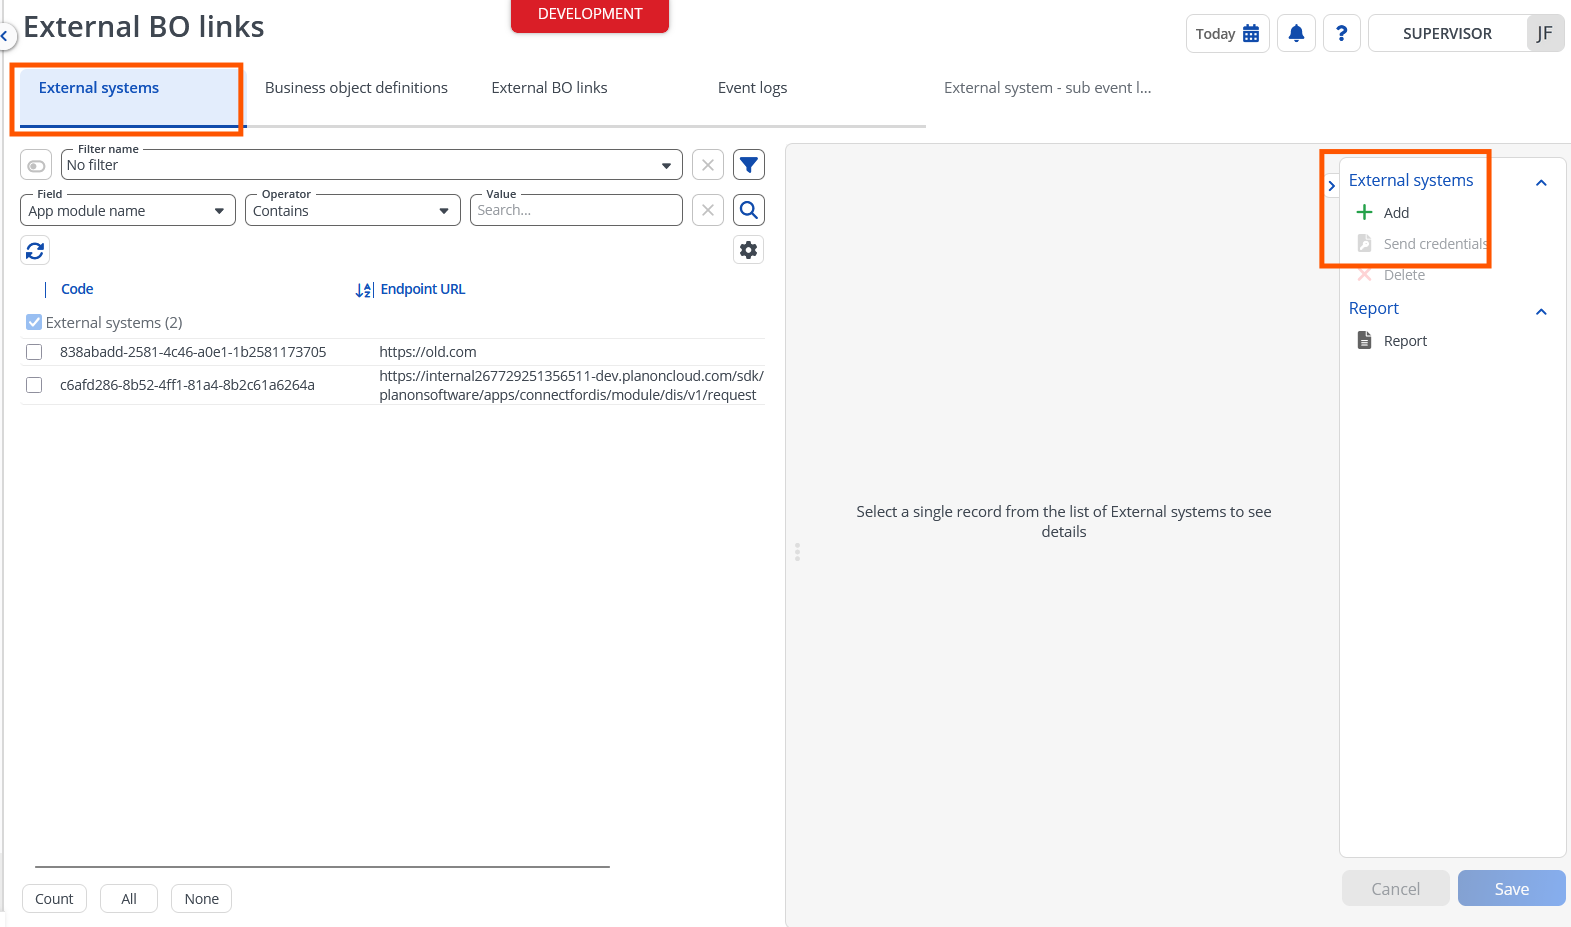
- Fill the fields:
- Code: The UUID you entered in the previous section, when adding a picklist-item.
- Endpoint URL: Provide the URL of the external system.
- Endpoint key: Provide the accesskey of the external system.
- Inbound account: Select the User that is used when inbound messages are received. A separate User is needed for each external system. This is due to the fact that on the User, the address is linked of the system you are connecting to.
- Click “Save”.
After configuring an external system, it is possible to share master data to that system. When this is done, it means your system is owner of the data. External systems may be linked to businessobjects of type Property, Asset, Space. Linking of the system is done using a multi-select free field.
Creating a multi-select picklist and displaying this on a layout is not part of this user guide and has to be done in advance. By default, this app is expecting the following system-names for the picklists:
UsrProperty_DIS_EXTERNAL_SYSTEMUsrBaseAsset_DIS_EXTERNAL_SYSTEMUsrSpace_DIS_EXTERNAL_SYSTEM
It is a combination of the UDBO system name and the name of the picklist. If you are using a different picklist, or different BO’s, change this accordingly in the module- and component settings.
5.6 Importing CBR-configurations
In the delivery package, an XML-file is provided alongside an Enterprise Talk definition. The latter is used to import the XML-file into Planon.
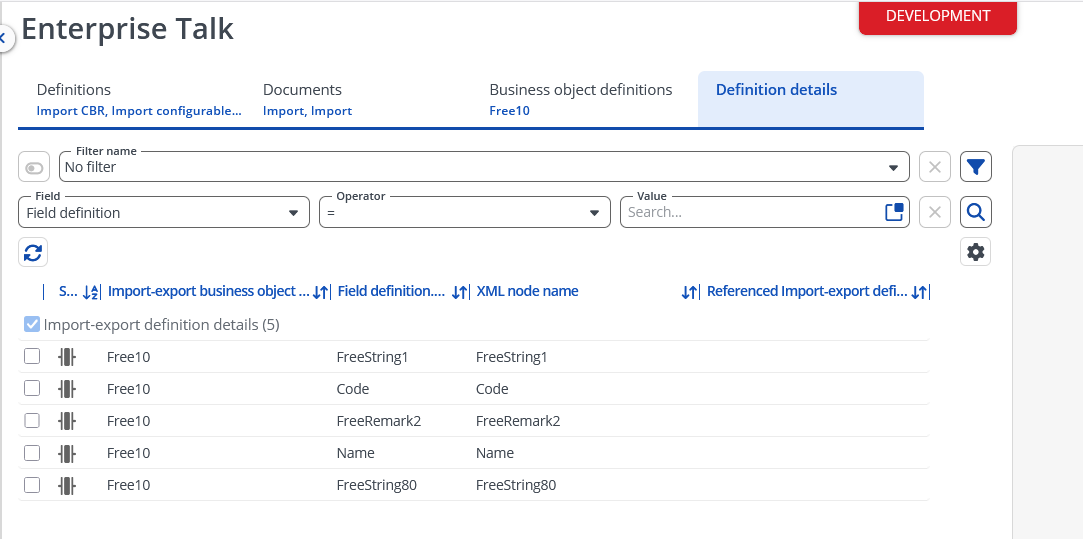
By default, Free BO Free10 is used. If a different BO is used when installing and configuring the CBR-app, please adapt the import so the correct BO is used.
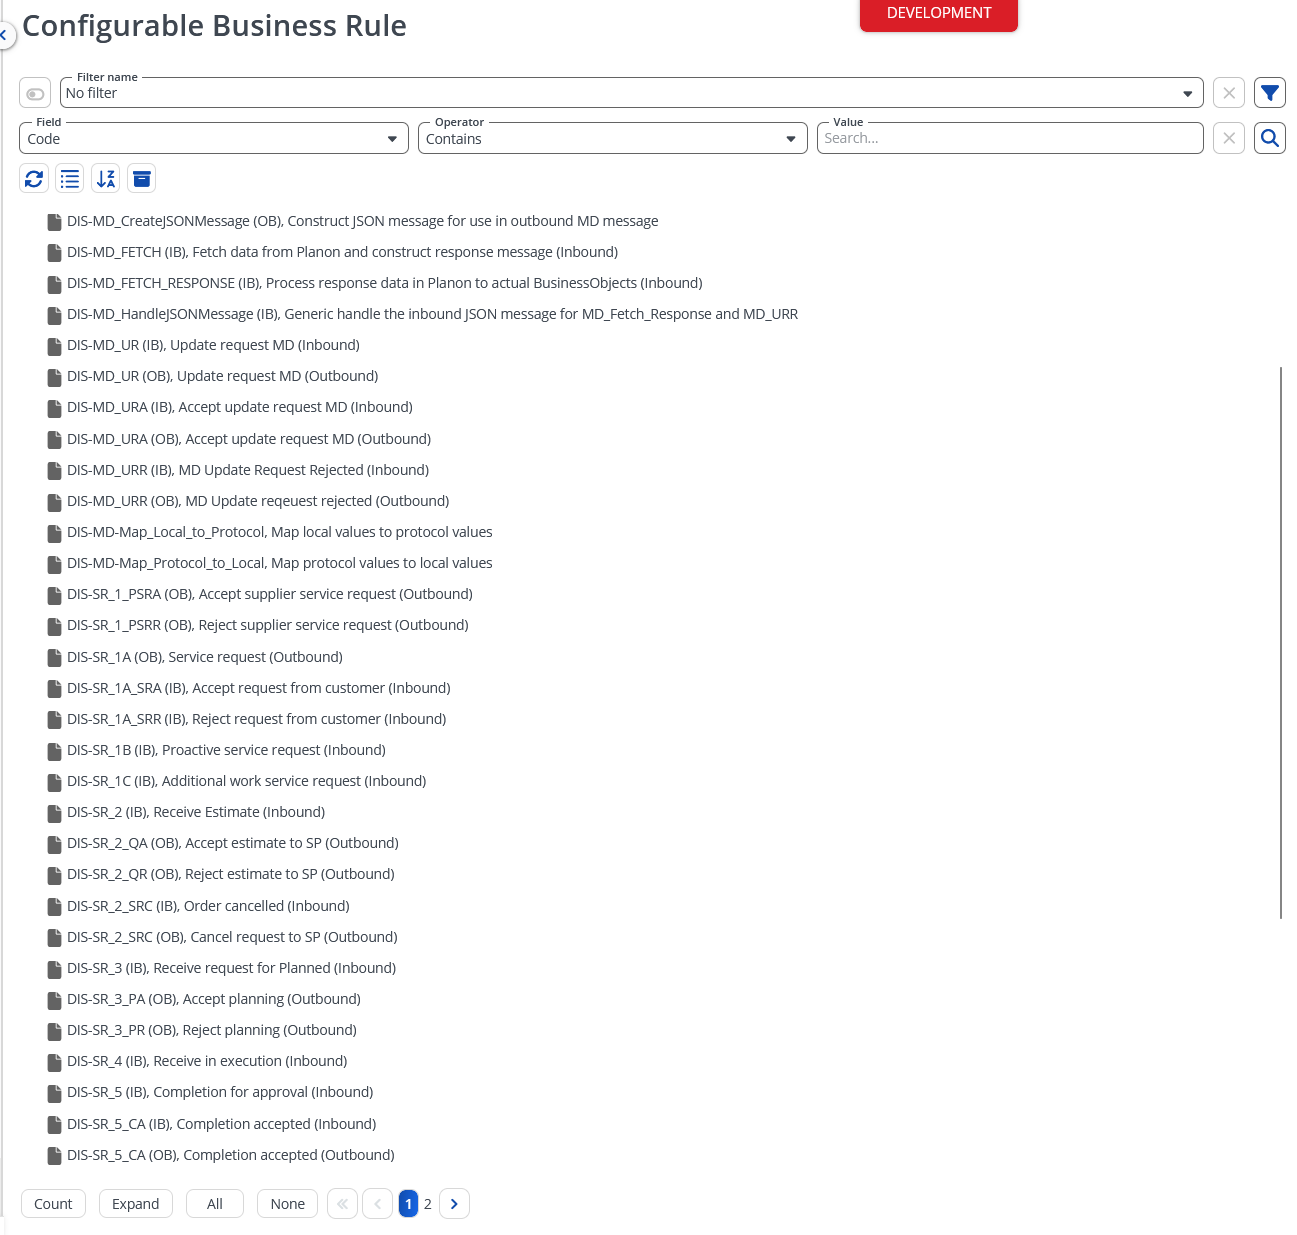
Please use the image below as reference to what fields should be imported.
To import the CBR-configurations, follow the steps below:
- Add the Enterprise Talk definition:
- Navigate to the “Enterprise Talk” TSI.
- Click on “Import definition”.
- Select the zip-file in the shown dialog. The zip-file is provided by Planon.
- Click “OK” and the definition is imported.
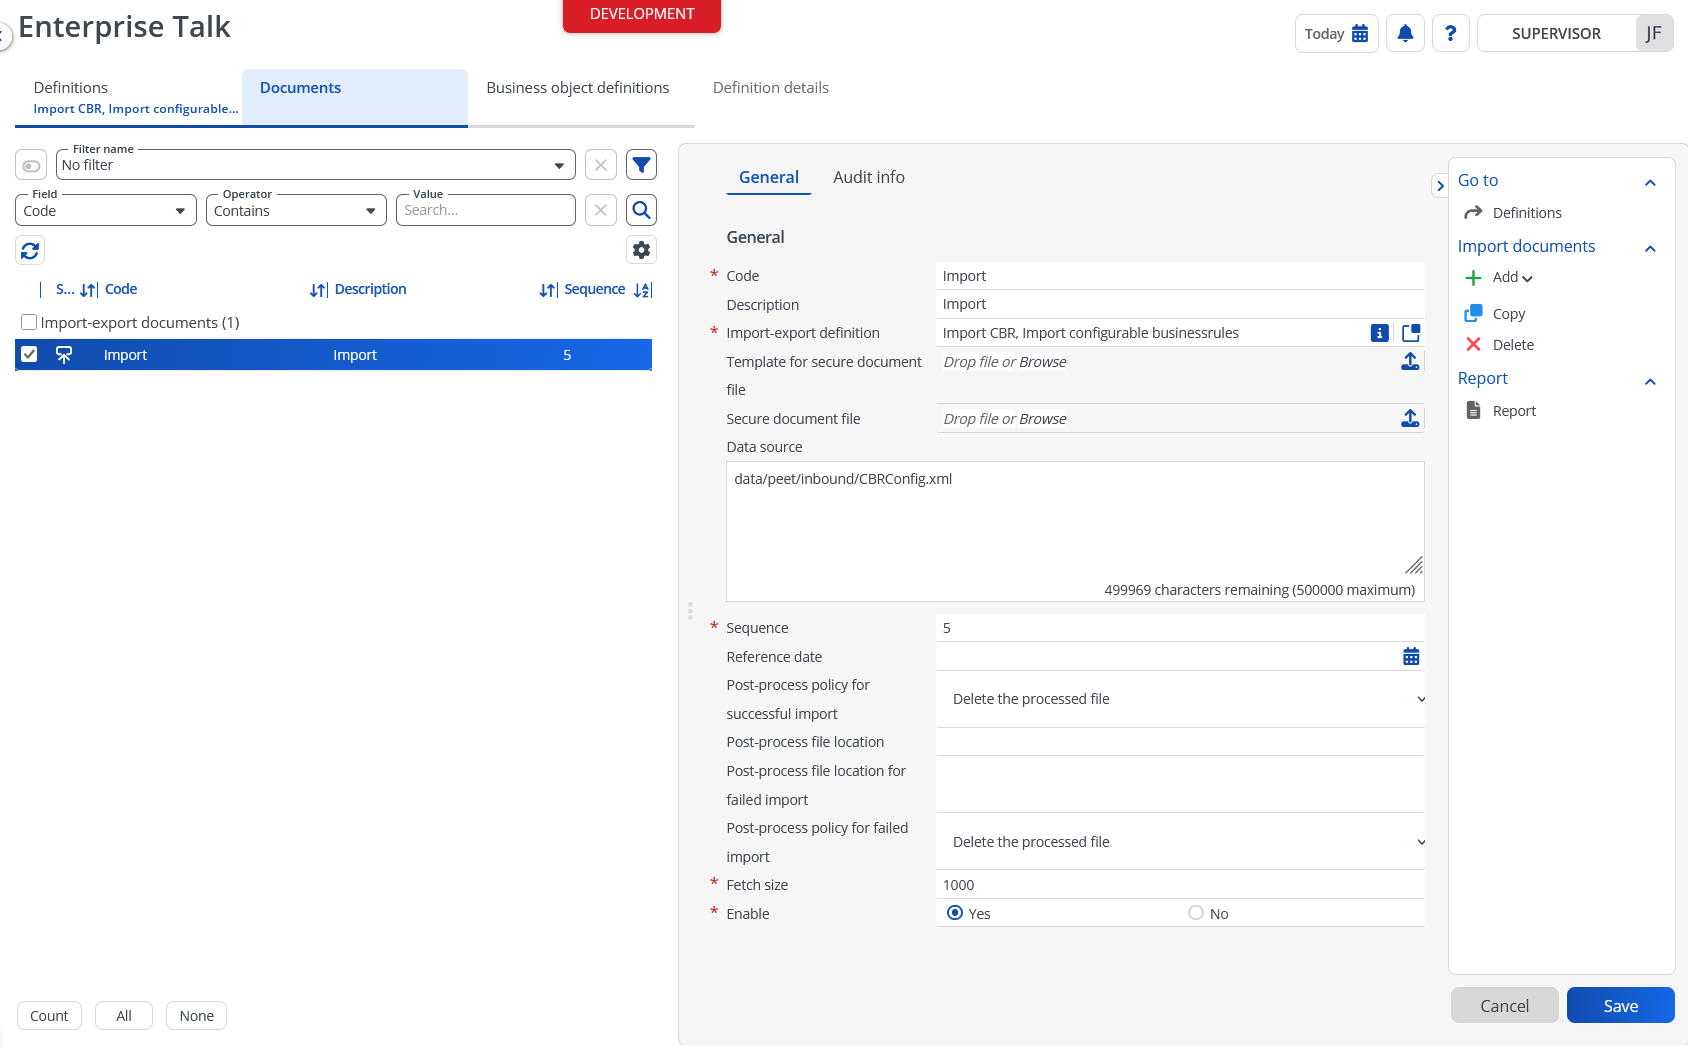
- If needed, change the import business object to the one that is used when installing the CBR-app.
- Upload the XML-file containing the CBR-configs to the PEET WebDAV, in the “Inbound” folder. (Default import location. Change if needed!)
- Navigate back to the selection step “Definitions” and select the just imported definition.
- Click “Run” on the action menu.
The CBR-configurations needed for DIS are now imported to the chosen FreeBO. When the CBR TSI is opened, a list of configurations should be visible, as shown below:
5.7 Registering CBR-configurations in the Field Definer
For the CBR to work, the just imported configurations need to be registered on their correct businessobject. When the config transfer is used, this is already configured for the businessobject UsrIncomingMessage and UsrOutgoingMessage.
For each registration, the classname planonsoftware.apps.configurablebusinessrule.ConfigurableBusinessRule is used. The CBR configuration code can be entered on the “Settings” tab when registering a configuration.

UsrIncomingMessage
| Business object | Sequence | Event type | Configuration code |
|---|---|---|---|
| UsrIncomingMessage | 10 | BU, Before Update | DIS-MD_FETCH (IB) |
| 20 | DIS-MD_FETCH_RESPONSE (IB) | ||
| 30 | DIS-SR_E_UTC (IB) | ||
| 40 | DIS-SR_1A_SRA (IB) | ||
| 50 | DIS-SR_2 (IB) | ||
| 60 | DIS-SR_2_SRC (IB) | ||
| 70 | DIS-SR_1A_SRR (IB) | ||
| 80 | DIS-SR_3 (IB) | ||
| 90 | DIS-SR_4 (IB) | ||
| 100 | DIS-SR_5 (IB) | ||
| 110 | DIS-SR_5_CA (IB) | ||
| 120 | DIS-SR_6 (IB) | ||
| 130 | DIS-SR_7 (IB) | ||
| 140 | DIS-SR_SRF (IB) | ||
| 150 | DIS-SR_1B (IB) | ||
| 160 | DIS-SR_1C (IB) | ||
| 170 | DIS-SUB_COMM (IB) | ||
| 190 | DIS-SUB_ATTA (IB) | ||
| 200 | DIS-MD_UR (IB) | ||
| 210 | DIS-MD_URR (IB) | ||
| 220 | DIS-MD_URA (IB) | ||
| 230 | DIS-SUB_WA (IB) |
UsrOutgoingMessage
| Business object | Sequence | Event type | Configuration code |
|---|---|---|---|
| UsrOutgoingMessage | 10 | BU, Before Update | DIS-MD_UR (OB) |
| 20 | DIS-MD_URA (OB) |
UsrOrder
| Business object | Sequence | Event type | Configuration code |
|---|---|---|---|
| UsrOrder | 10 | AI, After Insert | DIS-SR_1A (OB) |
| 10 | AU, After Update | DIS-SR_1A (OB) | |
| 25 | BU, Before Update | DIS-SR_2_QA (OB) | |
| 30 | DIS-SR_2_QR (OB) | ||
| 40 | DIS-SR_2_SRC (OB) | ||
| 50 | DIS-SR_3_PA (OB) | ||
| 60 | DIS-SR_3_PR (OB) | ||
| 70 | DIS-SR_5_CA (OB) | ||
| 80 | DIS-SR_5_CR (OB) | ||
| 90 | DIS-SR_6_PIA (OB) | ||
| 100 | DIS-SR_6_PIR (OB) | ||
| 110 | DIS-SR_1_PSRA (OB) | ||
| 120 | DIS-SR_1_PSRR (OB) |
UsrCommunicationLog
| Business object | Sequence | Event type | Configuration code |
|---|---|---|---|
| UsrCommunicationLog | 10 | BI, Before Insert | DIS-SUB_COMM (OB) |
| 20 | DIS-SUB_ATTA (OB) |
5.8 Registering ConnectForDIS businessrules
The following business rules are included with this app and should be registered. When using the configuration transfer, the registrations on UsrIncomingMessage and UsrOutgoingMessage are already present.
Master data change notifications
| Business object | Sequence | Event type | Classname | Description |
|---|---|---|---|---|
| Property | 10 | AU, After Update | planonsoftware.apps.dis.br.NotifyMDChanges | Creates DIS-message on change of business object |
| UsrMEAsset | ||||
| Space |
Message handling
| Business object | Sequence | Event type | Classname | Description |
|---|---|---|---|---|
| UsrIncomingMessage | 10 | AU, After Update | planonsoftware.apps.dis.br.HandleDisMessage | Handles DIS-Message |
| AI, After Insert | ||||
| UsrOutgoingMessage | 10 | AU, After Update | ||
| AI, After Insert |
5.9 Check app settings
The app-settings are set by default; please confirm they match your setup when using different fields than previously mentioned.
The value of SystemUUID should be a generated UUID. If other systems would like to connect, this UUID should be shared with them.
You are able to generate a UUID online, for example: https://www.uuidgenerator.net/
5.10 Access key
To allow an external system to communicate with the Planon instance, an access key needs to be created and shared. The assumption is made that access keys can be generated for users.
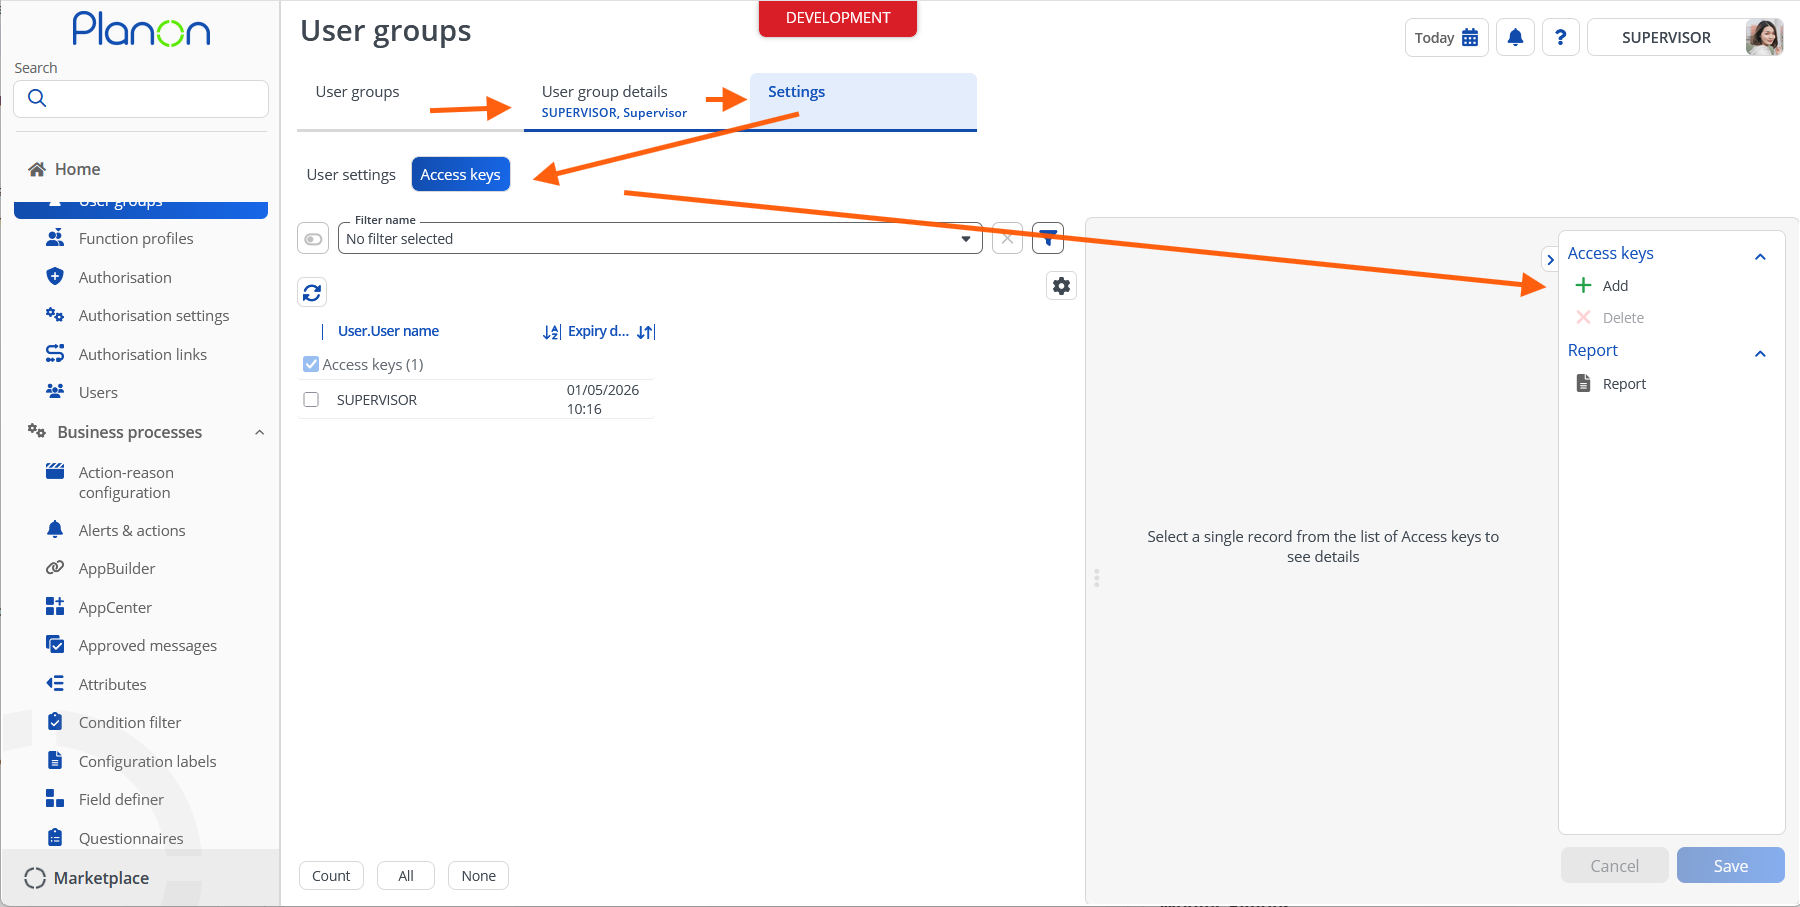
- Navigate to the User Groups TSI and drill down to the desired user group.
- Select the desired user to generate a key for.
- Drill down to “Settings” and select the “Access Keys” step.
- Click “Add” on the sidebar and fill the required fields.
- Click “Save” and copy the shown access key to a secure location, as it will only be shown once.
- Share this key with the external system.
5.10.1 Authenticate using the key
The external system needs to authenticate with the Planon instance, using the generated access key. This can be done by providing the access key in the authorization header of the POST-call:
Authorization: "PLANONKEY acceskey=<yourkeyhere>"
6. Troubleshooting
This chapter describes common things and known issues to check in case the app is not working as expected.
6.1 Error handling
For all components the errors will be written in the server logs, WildFly and Tomcat.
If an error occurs while sending, receiving or processing a DIS-message, this will be visible in the Error field, as configured in the previous sections. The error is written per each message.
The message can then be manually retriggered by changing the state of the message.