Planon Connect for Esri ArcGIS
Introduction
This document describes the features and installation steps for the Planon Connect for Esri App. This app allows interfacing data between Planon and Esri. Both Order and Asset data can be transferred. Additionally, the app allows integrating the Esri viewer in the Planon Assets TSI.
Prerequisites
Environment
This solution is designed to work with Planon Live L104 and above.
Constraints
There are no constraints for the use of this App.
Required (free)fields
- To store the coordinates of an Asset a free field on the Assets BO is required. This field must be at least 50 characters long. This is now optional from version 3.3.0 as the app supports the newly introduced system field Location.
- To store the coordinates of an Order a free field on the Order BO is required. This field must be at least 50 characters long.
- A new free field is required on each Business Object (BO) to act as a flag for controlling whether data should be pushed to Esri. This is needed only when data is imported from Esri using the enterprise talk worker.
Assumptions
- An order is stored as a point in Esri
- A property is stored as a polygon in Esri
- A rentable unit is stored as a polygon in Esri
- A contract is stored as polygon in Esri
- A reservation unit is stored as a polygon in Esri
- A space is stored as a polygon in Esri
Features
This chapter describes the features that this app contains.
Automatically create Planon feature services & layers in Esri
The app contains a worker which can automatically create a feature service in Esri on which Orders and Assets can be stored. Along with the feature service also the feature layer and fields are created. The layers are created with fixed fields on the layers based on the app settings. This feature is used to only create default layers.
From app version 3.0.0, this is not a mandatory step as layers already present in Esri can also be used.
Push Planon Orders to Esri
The app comes with a business rule which is used to insert, update and delete orders in Esri based on the configuration of the business rule. The data is interfaced to Esri via event connector.
The position of the order on the map is based on coordinates field on the order. If not available, the position of order is based on asset of the order if available, else based on the property linked to the order.
From version 3.0.0, it is also possible to send data based on filters.
Push Planon Assets to Esri
The app comes with a business rule which is used to insert, update and delete orders related in Esri based on the configuration of business rule. The data is interfaced to Esri via event connector. The position of the asset on the map is based on coordinates field on the asset.
From version 3.0.0, it is also possible to send data based on the filters. More details in the further sections.
Integrate Esri web map in TSI Selection levels
The app contains a ‘StepView’ component which can be added to the following selection levels in Planon:
- Assets
- Orders
- Rentable Units
- Contracts
- Properties
- Reservation Units
- Spaces
- Parcels
Using this stepview a configurable Esri map can be displayed in Planon. The selected BO in Planon will select the corresponding feature in Esri and vice versa.
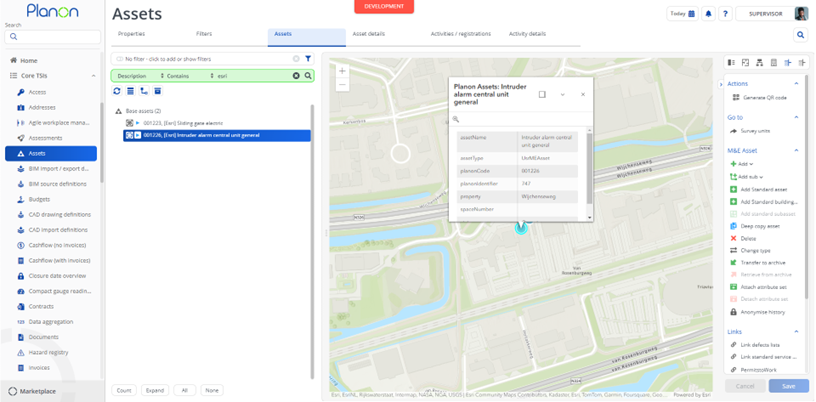
View Orders on Esri enabled webpage
The app contains a webpage which can be used to navigate orders on a Esri map. The page is also able to retrieve current device location. Additionally, the status of the orders can be changed on this map.
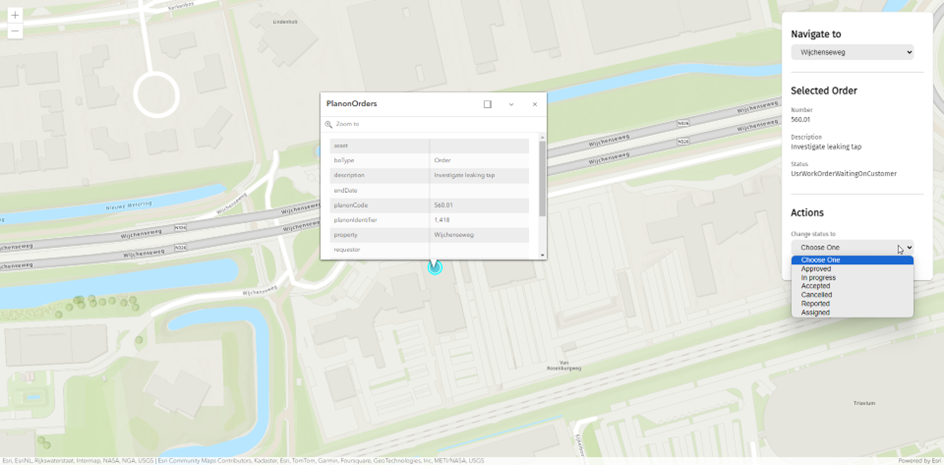
View and create Assets on Esri enabled webpage
Navigate assets on an Esri map, view asset details (recent orders, maintenance plan), and add a new asset by drawing a point. It is also possible to add a new Asset on the map by drawing a point. To create a new Asset, the standard asset library is used.
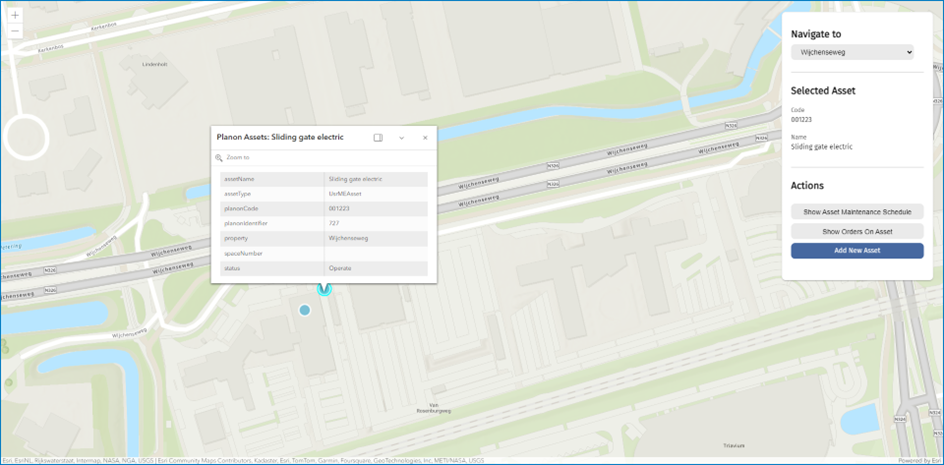
Push Planon data to Esri
From the app version 3.0.0, the app comes with a generic business rule supporting multiple filters and layers. This business rule provides the feasibility different set of data to different with the help of configuration on the business rule. For example, Assets of Asset Category “A” can be pushed to for example Layer1 and assets of category “B” can be pushed to Layer2. This also provides the feasibiliy of updating polygon features that exists in Esri.
Onboarding of existing Planon BOs to Esri
Now the app comes with the feature of onboarding existing customers to Esri. That is, the app now supports the export of Planon BOs to Esri in bulk via an Enterprise Talk workers. This worker supports export of BOs to different layers based on the filters configured.
Create or Update Planon BOs
Till version 3.2.2 The app comes with an enterprise talk worker to update co-ordinates of point features in Esri on the BOs that map to Planon. Since version 3.3.0 The enterprise talk worker also supports creating business objects in Planon. In case of an existing business object, the configured fields are also updated.
How does it work
Onboarding
In order to be able to send data to Esri, a feature service and feature layer must be created. The app comes with an Enterprise Talk Worker to automate this process by creating default feature service and feature layers for Orders and Assets.
The feature layers come with fields which are used to map Planon data to Esri point feature.
- Authenticate on the services using a token retrieved via the ‘https://www.arcgis.com/sharing/rest/generateToken’ endpoint.
- Create feature service using the ‘
/content/users/ /createService’ endpoint - Create feature layer using the ‘addToDefinition’ endpoint. Root for this endpoint is returned when a new service is created.
- When creating the layer the field definitions are also added.
This action results in the below in Esri.
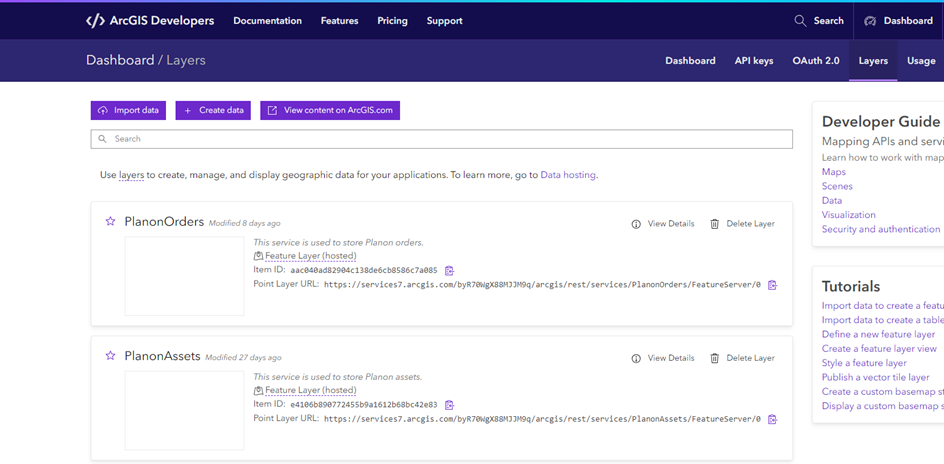
Since version 3.0.0, using the default created layers by Planon is optional as the app now also supports usage of layers that already exist in Esri.
Push Planon Orders to Esri (valid till version 2.x.x)
The app comes with a business rule planonsoftware.apps.connectforesri.br.SendOrderToEsri which can be configured on Insert, Update and Delete events of Orders in Planon to create, update or delete point features on the Order layer created by the enterprise talk worker. This comes with below settings which define the trigger points.
- insertTriggerStatuses – When the BO is set to any state configured in this setting it is inserted in Esri
- updateTriggerFields – When any of these fields is modified
- deleteTriggerStatuses – When the BO is set to any state configured in this setting is it removed from Esri
Field mapping
| Planon field | Esri field |
|---|---|
| Syscode | planonIdentifier |
| OrderNumber | planonCode |
| Description | description |
| AssetRef | asset |
| RefBODefinititionUserDefined | boType |
| RefBOStateUserDefined | status |
| BeginDateTime | startDate |
| EnddDateTime | endDate |
| PropertyRef | property |
| InternalRequestorPersonRef | requestor |
| SpaceRef | space |
Since version 3.0.0, this business rule is replaced by
planonsoftware.apps.connectforesri.br.SendDataToEsri. This provides more features like custom filters, custom mapping and use of any layers but not just Planon created layers.
Push Planon Assets to Esri (valid till version 2.x.x)
The app comes with a business rule planonsoftware.apps.connectforesri.br.SendAssetToEsri which can be configured on Insert, Update and Delete events of Assets in Planon to create, update or delete point features on the Asset layer created by the enterprise talk worker. This comes with below settings which define the trigger points.
- insertTriggerStatuses – When the BO is set to any state configured in this setting it is inserted in Esri
- updateTriggerFields – When any of these fields is modified
- deleteTriggerStatuses – When the BO is set to any state configured in this setting is it removed from Esri
Field Mapping
| Planon field | Esri field |
|---|---|
| Syscode | planonIdentifier |
| Code | planonCode |
| Name | assetName |
| RefBOStateUserDefined | status |
| RefBODefinititionUserDefined | assetType |
| SpaceRef | spaceNumber |
| PropertyRef | property |
Since version 3.0.0, this business rule is now replaced with a new business rule
planonsoftware.apps.connectforesri.br.SendDataToEsriwhich provides more features like custom filters, custom mapping and use of any layers but not just Planon created layers.
Displaying Esri maps in Planon TSI (stepview)
To display Esri maps in Planon a so called webmap id is required. In the Esri software webmaps can be created and saved. A webmap contains the configuration such as which type of map is drawn. Each map has a unique indentifier which can be used to retrieve it. In the app settings a webmap ID for both the corresponding BO map can be provided. This ID can be retrieved by taking it from the URL when the webmap is opened in Esri. This for example looks like ‘https://pl5yt05ptxx5l02b.maps.arcgis.com/apps/mapviewer/index.html?webmap=bb52520193ad4a1fa54c715d7447ddb5’. The part after ‘webmap=’ is the webmap id. Esri offers JavaScript APIs to interact with these webmaps. To authenticate on the webmap (in case it is not public) the user will be prompted to login to Esri. When you have SSO enabled this will be a seamless experience. By using the syscode / planonIdentifier combination the Planon BO’s can be identified on the Esri map.
Field Mapping for Properties
| Planon field | Esri field |
|---|---|
| Code | Configurable (setting on module of the app) |
Field Mapping for Rentable Units
| Planon field | Esri field |
|---|---|
| Code | Configurable (setting on module of the app) |
Field Mapping for Contracts
| Planon field | Esri field |
|---|---|
| Code | Configurable (setting on module of the app) |
Field Mapping for Reservation Units
| Planon field | Esri field |
|---|---|
| Syscode | Configurable (setting on module of the app) |
Field Mapping for Spaces
| Planon field | Esri field |
|---|---|
| Syscode | Configurable (setting on module of the app) |
Field Mapping for Parcels
| Planon field | Esri field |
|---|---|
| Syscode | Configurable (setting on module of the app) |
Inspect data in Esri enabled page
The app also deploys two webpages on Planon which can be used to interact with the Esri maps. This works in a similar way to the stepview described earlier. The difference is the webpages can be used standalone and offer more features.
Orders
- URL:
<Planon URL>/services/sdk/platform/webpages/planonsoftware/apps/connectforesri/module/esriorders - Can capture device location
- Order status can be changed
Assets
- URL:
<Planon URL>/services/sdk/platform/webpages/planonsoftware/apps/connectforesri/module/esriassets - Can capture device location
- Can add assets based on Standard Assets
- View details such as recent orders
- From version 3.0.0: assets added on webpage shown as In progress; refreshed on page reload, as creation is handled via business rules
Properties
- URL:
<Planon URL>/services/sdk/platform/webpages/planonsoftware/apps/connectforesri/module/esriproperties - Capture device location
- Link Planon properties to Esri polygons (replaced by Properties TSI step view)
Push any Planon BO data to Esri (Since version 3.0.0)
This app comes with two business rule that can be configured on any BO.
SendDataToEsri– create/update features in EsriDeleteDataInEsri– delete features in Esri
Features
- Custom filtering – provide a filter expression
- Custom mapping – map Planon <> Esri fields
- Multiple layers – route to different layers; constraint: the same BO record must not be present on multiple Esri layers
Onboarding of existing Planon BOs to Esri
The app comes with custom worker and a set of settings to define the mapping between Esri and Planon BO field mapping. The BOs can be filtered using the Planon filters in the Business Object definition of Enterprise Talk as shown below.
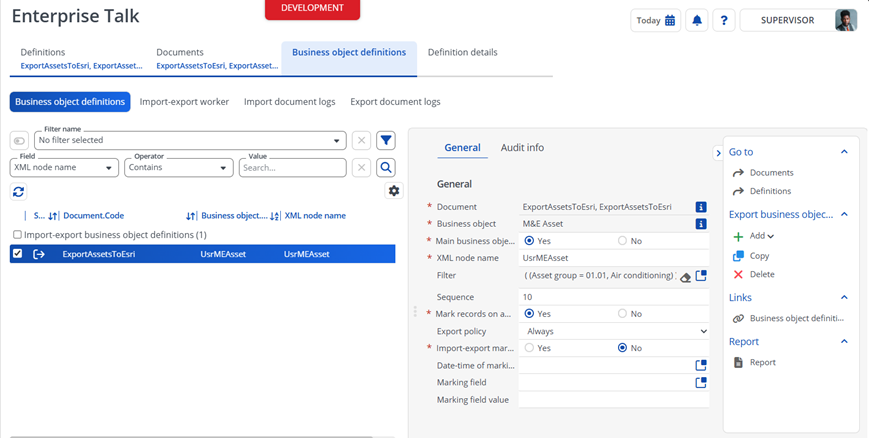
To export Bos of different filters to different layers, multiple export documents are created each one for a layer. For example, All assets of type M&E Asset & Asset Group Air Conditioning needs to be exported to layer MechanicalAssets layers, an export document needs to be created with a Business Object of type UsrMEAsset with filter Asset Group Air Conditioning as shown in screen shot Similary assets to be exported to a different layers, needs another export document.
Create or Update Planon BOs
There are cases, where BOs of Planon already in Esri but there are no co-ordinates on the BOs in Planon. The app now comes with custom worker, to update the co-ordinates by fetching the data from Esri. The data can be fetched from multiple layers. Since version 3.3.0, the same enterprise talk worker supports creation of Bos in Planon. Also supports the update of configured fields along with update of co-ordinates.
Third party system configuration
This chapter describes the required configuration on the external / third party system.
Create OAuth 2.0 Application
In order to log in to ArcGIS Online or Enterprise using OAuth 2.0 authentication a OAuth 2.0 application must be created in Esri. Follow the steps below to do so.
- Click on ‘manage OAuth 2.0 applications’
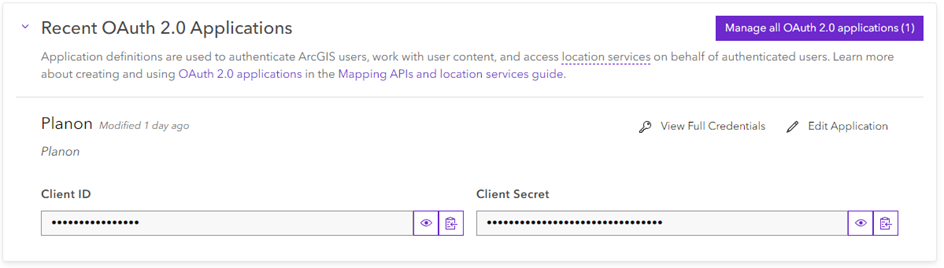
- Click on ‘new application’
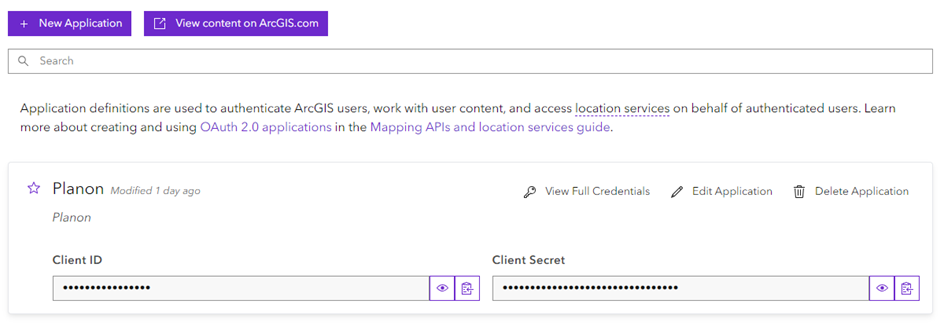
- Provide a title and a description, for example ‘Planon, Planon OAuth Application’ and click ‘Create Application’.
- Add a Redirect URL, this is the URL of your Planon environment, for example https://myplanon-prod.planoncloud.com/

- You are now done, the Client ID from the newly added OAuth 2.0 application must be added in the Planon app settings (see chapter 6.2).
Creating feature layers in Esri
This chapters provides you the steps on how to create feature layers in Esri
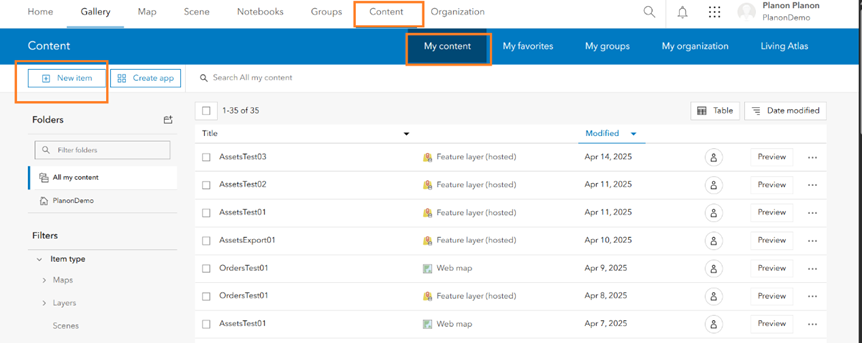
- Login to ESRI Portal
- Go to Content Section and click on New Item
- Select Feature Layer
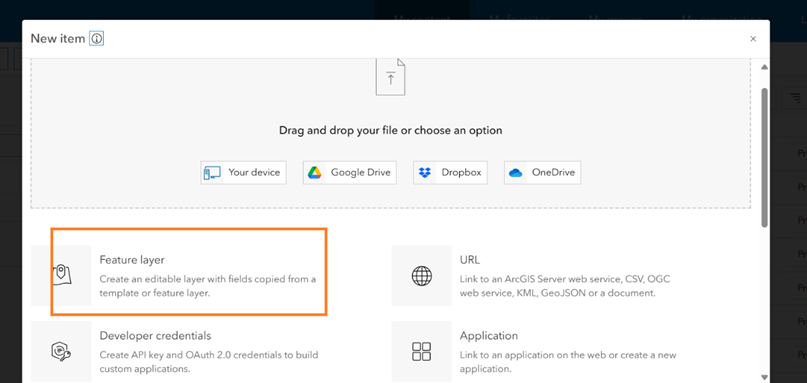
- Select the option Define your own layer and click Next
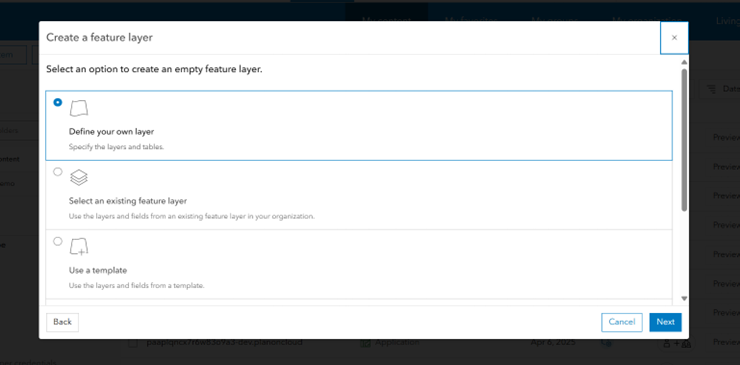
- Provide the name of the layer and click Next
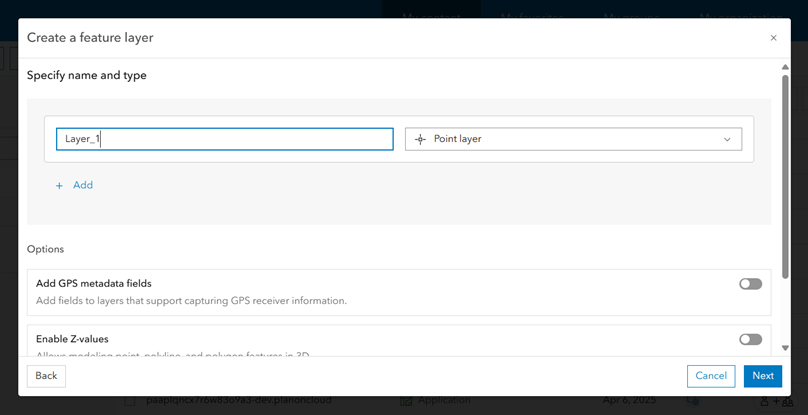
- Save the layer
- Once the layers is created, it opens the view in the Portal
- Click on Data tab and Add the fields using the Add Field button
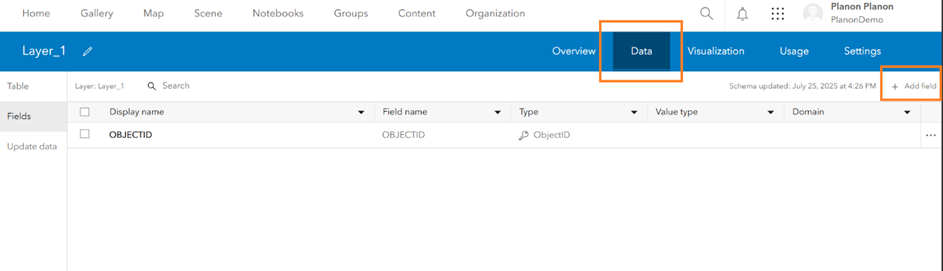
- Once the required number of fields are added, these can be provided in Planon on the app as described in further chapters.
Installation
This chapter describes the steps required to install this app on your Planon environment.
Installation Process
There are two ways to install the app:
- Using the Marketplace
- Manual installation
Install the app by using the marketplace
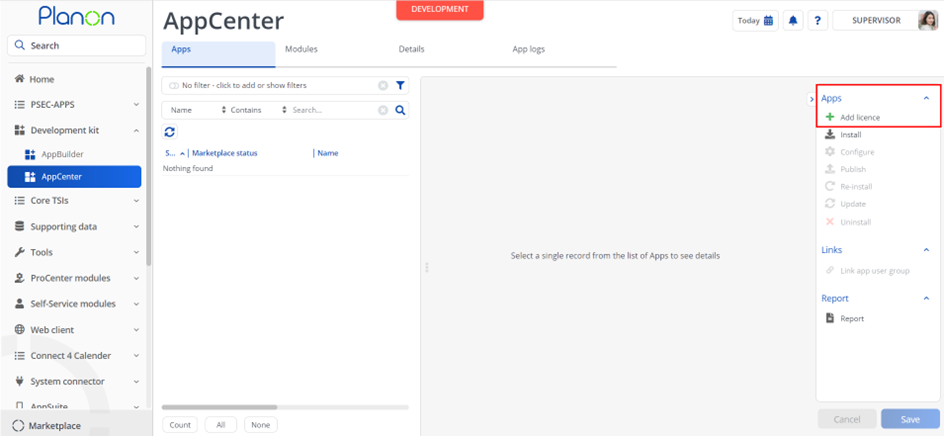
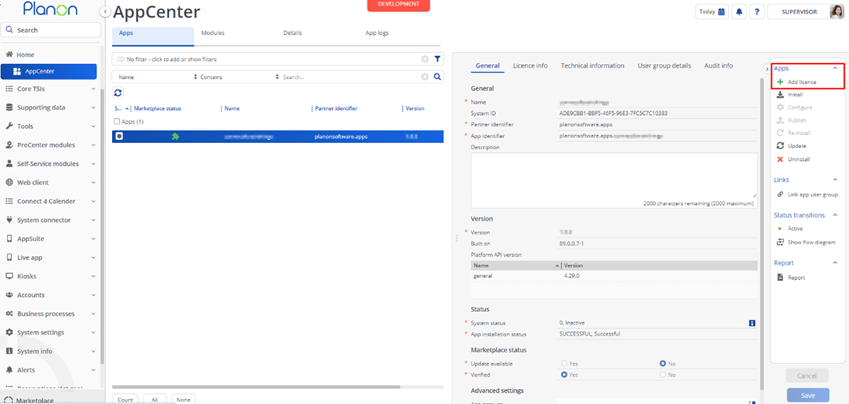
In case your environment is configured to use the Planon app store the only thing required to install the app is to add the app license in the AppCenter TSI. Planon will automatically download and install the app.
Manual installation
In case you want to perform a manual installation follow the steps below.
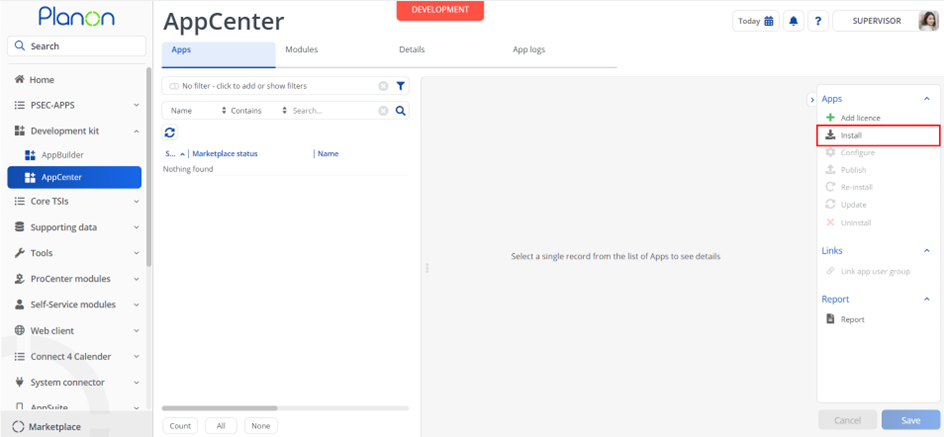
- Open AppCenter TSI from Planon webclient and click on install from action menu
- Browse to the .ppk file
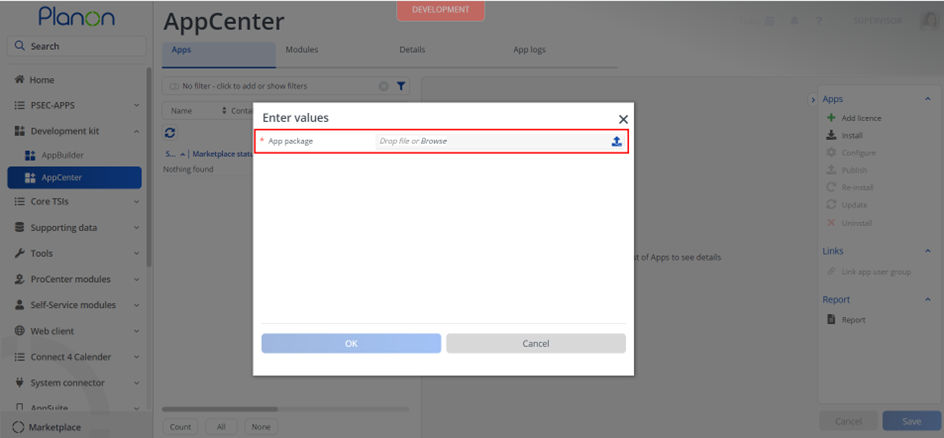
- Click OK to install the app and follow the installation process
- When the app is successfully installed, the app will appear in the AppCenter
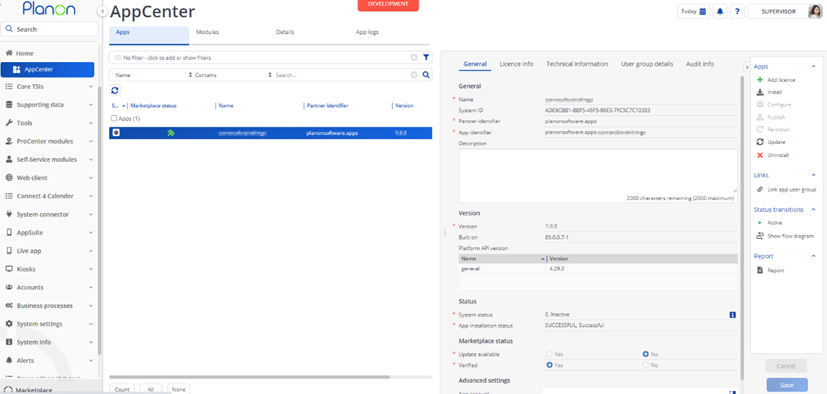
- Add the app license in Apps TSI
App settings
This chapter describes and explains the settings that are available for this app.
- Now that the app is installed, please provide the app settings (the app configuration) for each module in the Details level > Module settings selection step. Provide the module settings.
- For more details regarding the settings see the next chapter.
- Click Save button after providing the module settings.
The module settings are used by all the components in the app. So make sure all the settings are configured. Missing of these settings might impact the Step View and SDK Page of the app.
Description of module settings
assetCoordinatesField– FreeString on Asset BO to store Asset location (≥ 50 chars)defaultAssetsLayerName– Esri Assets layer name (e.g.,PlanonAssets)assetsWebMapID– Webmap ID to display AssetsinterfaceLanguage– Language used to interface to Esri (e.g.,ENG)orderCoordinatesField– FreeString on Order BO (≥ 50 chars)ordersWebMapID– Webmap ID to display OrdersPassword– Esri account passwordesriBaseURL– Base URL of Esri environment (e.g.,https://.../arcgis/rest/services/)esriPortalURL– Esri portal URL (https://www.arcgis.comby default)defaultOrdersLayerName– Esri Orders layer name (e.g.,PlanonOrders)clientID– Esri OAuth 2.0 client idpropertiesLayerPlanonCodeFieldName– Field in Esri Properties layer storing Planon code (defaultplanonCode)propertiesWebMapID– Properties webmap IDusername– Esri account usernamestandardAssetsAvailableForInsert– Allowed standard assets codes (comma-separated; empty for all)maintenanceLibraryForInsert– Maintenance library codes; supports user group mapping (see table below)renatableUnitsLayerPlanonCodeFieldName– Esri Rentable Units field storing Planon code (defaultplanonCode)rentableUnitsWebMapID– Rentable Units webmap IDcontractsLayerPlanonCodeFieldName– Esri Contracts field storing Planon code (defaultplanonCode)contractsWebMapID– Contracts webmap IDreservationUnitsLayerPlanonSystemcodeFieldName– Esri Reservation Units field for Planon system code (defaultplanonCode)reservationUnitsWebMapID– Reservation Units webmap IDplanonBoEsriLayerMapping– Mapping of Planon BO to Esri Layer, e.g.,UsrAsset-Trees,GrassspacesWebMapID– Spaces webmap IDspaceLayerPlanonSystemcodeFieldName– Esri Spaces field for Planon system code (defaultplanonCode)parcelWebMapID– Parcles webmap IDparcelLayerPlanonSystemcodeFieldName– Esri Parcels field for Planon system code (defaultplanonCode)
maintenanceLibraryForInsert
Till version 3.0.0, the standard assets displayed are based on the maintenance libraries conifgured. If left empty, all standard assets are displayed in the Assets Webpage. From version 3.1.0, this setting is now also adapted to support User Group based libraries. For example, if a User linked to UserGroup1 should only see standard assets from the maintenace library 1 (ML1) and 2 (ML2), the setting can be configured as below:
UserGroup1-ML1,ML2
Similarily it can be extended to support multiple user groups UserGroup1-ML1,ML2;UserGroup2-ML1,ML3
Activation
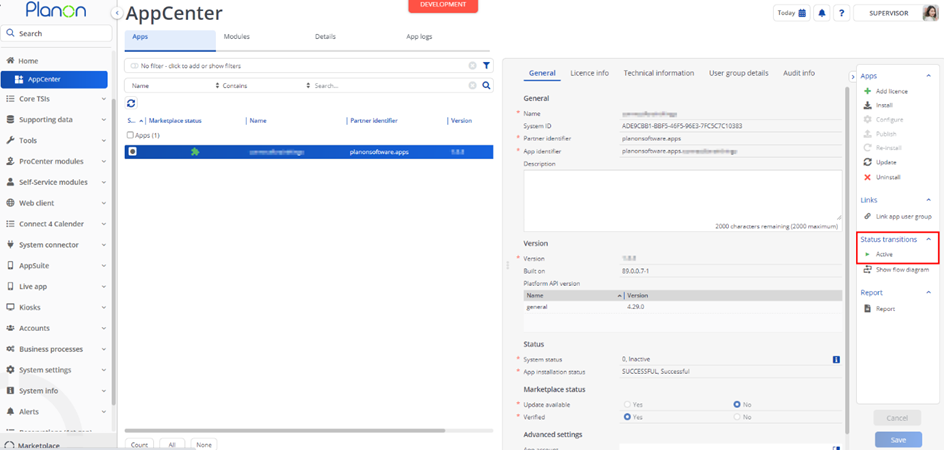
Once the app has been configured, you can activate the app by pressing the Active status transition from the action panel. Always make sure that the required User groups are linked correctly and the Configure action is executed before activating the App.
Planon Configuration
Onboarding feature service and feature layers
If you want to automatically onboard Planon feature services/layers to Esri a Enterprise Talk worker can be used.
- Create a new Enterprise Talk definition. Make sure the field ‘use platform workers’ is set to yes.
- Drill down to ‘Documents’ and add a new export document
- Drill down to ‘Business object definitions’, step ‘import-export workers’
- Add a new worker, use the class
planonsoftware.apps.connectforesri.worker.OnboardPlanonToEsri. - Provide the settings needed for the worker
- onboardAssets
- Set to yes to create a assets feature service
- onboardOrders
- Set to yes to create a orders feature service
- onboardAssets
- Go back to the Enterprise Talk definition and execute it. If all is well the Planon assets and orders feature services should now be created in Esri.
Push Planon Orders to Esri (till version 2.x.x)
If you want to automatically exchange orders with Esri, the below business rule has to be registered. Follow the steps below to configure this.
- Go to the TSI ‘Field Definer’
- Navigate Order Business Object you want to add the business rule
- Put the Business Object under construction
- Drill down to ‘Details’ and to Extensions step
- Add new extension
planonsoftware.apps.connectforesri.br.SendOrdersToEsri - Event type: Required event for example AI, AU or AD
- Provide the settings
- insertTriggerStatuses – System name of the statuses
- updateTriggerFields – System name of the fields
- deleteTriggerStatuses – System name of the statuses
- Add new extension
- Save the newly added extension
- Go back to the business object and set it to completed
Push Planon Assets to Esri (till version 2.x.x)
If you want to automatically exchange assets with Esri, the below business rule has to be registered. Follow the steps below to configure this.
- Go to the TSI ‘Field Definer’
- Navigate Asset Business Object you want to add the business rule
- Put the Business Object under construction
- Drill down to ‘Details’ and to Extensions step
- Add new extension
planonsoftware.apps.connectforesri.br.SendAssetsToEsri - Event type: Required event for example AI, AU or AD
- Provide the settings
- insertTriggerStatuses – System name of the statuses
- updateTriggerFields – System name of the fields
- deleteTriggerStatuses – System name of the statuses
- Add new extension
- Save the newly added extension
- Go back to the business object and set it to completed
See chapter 8 to migrate to the new business rules in app version 3.0.0.
Registering the step views
In case you want to use a Esri webmap in a Planon TSI you have to add this first. To do so, follow the steps below.
- Go to the TSI ‘TSIs’
- Find the assets TSI to which you want to add the stepview
- Set the TSI under construction
- Go the ‘Assets’ selection level
- Open the linked step actions and add the ‘Esri Asset Viewer’ action
- The same steps can be used to add the stepview for orders, properties and rentable units in their respective TSI’s / selection levels.
Push Planon Data to Esri (Since version 3.0.0)
Create or Update data
- Go to the TSI ‘Field Definer’
- Navigate to the Business Object you want to send data to Esri
- Set the BO to under construction
- Go to Details level and Extensions step
- Click on Add action
- Add new extension
planonsoftware.apps.connectforesri.br.SendDataToEsri - Event type: AU and/or AI based on the requirement
- Provide the settings as explained in 7.5.1.1
- Save the newly added extension
- Go back to the business object and set it to completed
- Add new extension
- Similary this BO can be configured on other business objects as required Note: To update polygon features, it is mandatory to set the setting updateGeometry to false.
Sample settings
{
  "coordinatesField": "FreeString31",
  "esriKeyField": "planonCode",
  "esriPlanonMapping": [
    "planonCode:Code",
    "assetName:Name",
    "property:PropertyRef.Code-PropertyRef.Name",
    "spaceNumber:SpaceRef.Code"
  ],
  "filter": "PropertyRef EQUALS 14",
  "flagField": "",
  "layerName": "PlanonAssets",
  "planonKeyField": "Code",
  "triggerFields": ["FreeString31", "Name"],
  "updateGeometry": true
}
Description of Settings
triggerFields– list of system field names triggering the rule on changefilter– conditions to apply before sending data (see 7.5.3)layerName– target Esri layercoordinatesField– system name storing coordinates on the BOesriPlanonMapping– mappingEsriField:PlanonFieldupdateGeometry– iftrue, updates geometry in EsriesriKeyField– Esri field used as keyplanonKeyField– Planon field matched toesriKeyFieldflagField– optional flag to skip sending
Delete Data
- Go to the TSI ‘Field Definer’
- Navigate to the Business Object you want to delete data to Esri
- Set the BO to under construction
- Go to Details level and Extensions step
- Click on Add action
- Add new extension
planonsoftware.apps.connectforesri.br.DeleteDataInEsri - Event type: AU and/or AD based on the requirement
- Provide the settings as explained in 7.5.2.1
- Save the newly added extension
- Go back to the business object and set it to completed
Settings
{
  "esriKeyField": "planonCode",
  "filter": "",
  "layerName": "TestAsset",
  "planonKeyField": "Code",
  "triggerFields": [""]
}
Details on Filtering
This is used to filter the assets to be sent to Esri. For example, if we have to filter the records containing ‘000’, the value for the filter param should be as below Code CONTAINS 000 To add multiple filters, for example Code containing 000 and Name does not contain Test, below is format Code CONTAINS 000 & Name NOT_CONTAINS Test Multiple values (in case of IN operator) can be combined using ‘,’. Multiple filters can be combined using the ‘and’ keyword. Reference fields will be filtered based on the lookup field of the referenced business object (usually ‘Code’).
Supported operators: EQUAL, NOT_EQUAL, LESS, LESS_EQUAL, GREATER, GREATER_EQUAL, IN, NOT_IN, CONTAINS, NOT_CONTAINS, STARTSWITH, NOT_STARTSWITH, ENDSWITH, NOT_ENDSWITH, NULL, NOT_NULL.
To create Asset in Esri added from Webpage
From version 3.0.0, below configuration is needed, to create asset in Esri that is added from Webpage. Add extension as described in the chapter 7.5.2 for Asset BO on After Update event and parameters below.
triggerFields: coordinates field system namelayerName:PlanonAssetscoordinatesField: coordinates free field system nameesriPlanonMapping: [“planonCode:Code”,“planonName:Description”,“property:PropertyRef.Name”,“spaceNumber:SpaceRef.Code-SpaceRef.Name”]updateGeometry:truefilter: matches assets created via SDK pageesriKeyField: Esri layer key fieldplanonKeyField: Planon key field
Onboarding existing Planon BOs to Esri Enterprise Talk
If you want to automatically onboard Planon BOs to Esri, a Enterprise Talk worker can be used.
- Create a new Enterprise Talk definition. Make sure the field ‘use platform workers’ is set to yes.
- Drill down to ‘Documents’ and add a new export document
- Drill down to ‘Business object definitions.
- Go to ‘import-export workers’ step
- Add a new worker, use the class ‘planonsoftware.apps.connectforesri.worker.ExportBusinessObjectsToEsri’.
- Provide the settings needed for the worker
- esriPlanonMapping: This setting provides mapping between Planon BO and Esri layer fields. In below example, planonCode is Esri layer field and Code is System name of Code field of BO BO in Planon. Similary multiple fields can be configured and mapped to sub levels of fields on BO BO [ “planonCode:Code”, “planonName:Description”, “property:PropertyRef.Name”, “spaceNumber:SpaceRef.Code-SpaceRef.Name” ]
- layerName: Name of the layer in Esri on which the BO needs to be created
- esriKeyField : Name of the field on Esri layer to map with Planon BO
- planonKeyField : System Name of the field on BO in Planon to map with Esri asset
- coordinatesField : System Name of the field on BO in Planon used to store Co Ordinates
- Now go to Export Import Business Objects step.
- Create Export Busoness Object for the BO
- Provide the filter for exporting the BO
- Provide other mandatory fields
- Save the changes.
- Go back to the Enterprise Talk definition and execute it. If all is well the Planon assets should now be created in Esri.
- If BO from different layers are to be created in different layers, different export documents are to be created.
Create or Update Planon BO with Esri Feature
If you want to create or update BOs in Planon from features in Esri, a Enterprise Talk worker can be used.
- Create a new Enterprise Talk definition. Make sure the field ‘use platform workers’ is set to yes.
- Drill down to ‘Documents’ and add a new import document
- Drill down to ‘Business object definitions.
- Go to ‘import-export workers’ step
- Add a new worker, use the class ‘planonsoftware.apps.connectforesri.worker.ImportBusinessObjectsFromEsri’.
- Provide the settings needed for the worker
- esriKeyField : Name of the field on Esri layer to map with Planon BO
- planonKeyField : System Name of the field on BO in Planon to map with Esri asset
- layerName: Name of the layer in Esri fromwhich the BO needs to be updated
- coordinatesField: System name of the Co-Ordinates field on the Business Object
- planonBOSystemName: System name of the Business Object to be created or updated
- planonEsriFieldMap: The is to provide mapping between Esri fields and Planon fields. Multiple esri fields can be mapped to one Planon field too. Example : “planonField1:esriField1”,”planonField2:esriField3,esriField4”
- flagField: System name of the Flag field on the Planon BO. If configured with a value, the field is updated with a fixed value to skip the trigger of Business rules. If left empty, nothing is updated and Business rules trigger to send data to Esri. Check the Notes below for more details
- Go back to the Enterprise Talk definition and execute it. If all is well the assets should be created or updated in Planon
- If assets from different layers are to be imported, different import documents are to be created.
Steps to be taken care before importing the data from Esri Since the Esri app supports both Planon-to-Esri and Esri-to-Planon onboarding, there is a possibility that updates may be unintentionally sent back to Esri when data is imported into Planon from Esri Usecase1: Onboarding the data into Planon only once In this case, as the requirement is to import data from Esri to Planon only once, to prevent unintended updates to Esri while importing data into Planon, we recommend deactivating the extensions described in chapter 7.5.1 (configured to push data to Esri on the relevant business objects) before performing data imports via Enterprise Talk. Once the data is successfully imported, the extensions can be activated. In future, if at all you need to import the data again from Esri to Planon, you need to repeat the above step or go with the below usecase.
Usecase2 : Regular update of data into Planon If the usecase is to regularly import the data from Esri, then we recommned to follow below steps. A dedicated flag field (free field) must be added to each relevant business object that is subject to import. This flag must be configured consistently in both Enterprise Talk and in the extensions referenced in chapter 7.5.1. If the flag is not configured correctly in both places, the system may inadvertently trigger a data push to Esri during the import process. This can create undesired bidirectional updates, potentially resulting in endless update loops and, in severe cases, may cause the environment to crash. Notes:
- Values from Esri for reference fields should always correspond to lookup values in Planon. If corresponding record is not found, then the field is ignored
- Co-ordinates are stored only for point features
Troubleshooting
Error handling
- Errors are recorded in the server logs:
- Tomcat log for web components
- Webpages
- PSS modules
- Stepview
- TSI Action
- JAX-RS webservices
- Wildfly log for server-side components
- Business rules
- Scheduled tasks
- Workers
- Event Connector
- Tomcat log for web components
- UI components (TSI Actions) also display errors in the interface