Planon Connect for IAdea - Room Booking
Introduction
IAdea is a global provider of enterprise-grade digital signage and smart workplace solutions. The company offers hardware such as meeting room panels, smart signboards, kiosks, and media players, along with remote device management through IAdeaCare. Its products are built on open standards (HTML5, W3C SMIL) and integrate with third-party calendar and content management systems. Designed for 24/7 operation, IAdea devices are widely used in corporate workplaces, education, healthcare, retail, and hospitality environments to enhance communication, space management, and user experience.
Planon Connect For IAdea Room Booking app provides the feasibility to remotely monitor and control the IAdea room booking panel.
The app comes with 3 features
Link Planon Reservation Unit and IAdea device
Manage the device configuration like content url and screen off times
Unlink Planon Reservation Unit and IAdea device
Prerequisites
Environment
This solution is designed to work with Planon Live L121 and above.
Constraints
The app is based on below constraints
Have access to IAdea Care
Have a service account in IAdea care
Required free BOs & free fields
The app requires below free fields
Business Object BaseAsset
- 1 Free String field to store the Kiosk code on the Asset
Assumptions
The user has basic Planon knowledge
The admin has knowledge on Planon configurations like adding an extended action, adding action to layout etc
Features
Link Planon Reservation Unit and IAdea device
The app comes with a user extended action that is used to link the reservation unit in Planon to the IAdea device. Once the device and reservation unit are linked, the users can now manage the device configuration.
During the onboarding process ie linking process, the device is updated with the content url referring to Planon Kiosk Url that displays the reservations
Monitor and Control IAdea device
Once the device is linked to reservation unit, the device configurations like content url, screen off time can be managed. Even the app provides the feasibility of restarting the device remotely.
Unlink the reservation unit and device
The app also comes with the feature of unlinking the device and reservation unit.
How does it work?
This chapter provides a technical description of the features above.
The linking, managing and unlinking of device is done via IAdea care or IAdea services which provides the API feasibility to do the corresponding actions
The further chapters explain the necessary steps to setup the IAdea care service account.
Link reservation unit and IAdea device
The app provides a user extended action which is used to link the device and the reservation unit.
When the user clicks on the action, a Popup opens with 3 input fields as shown below
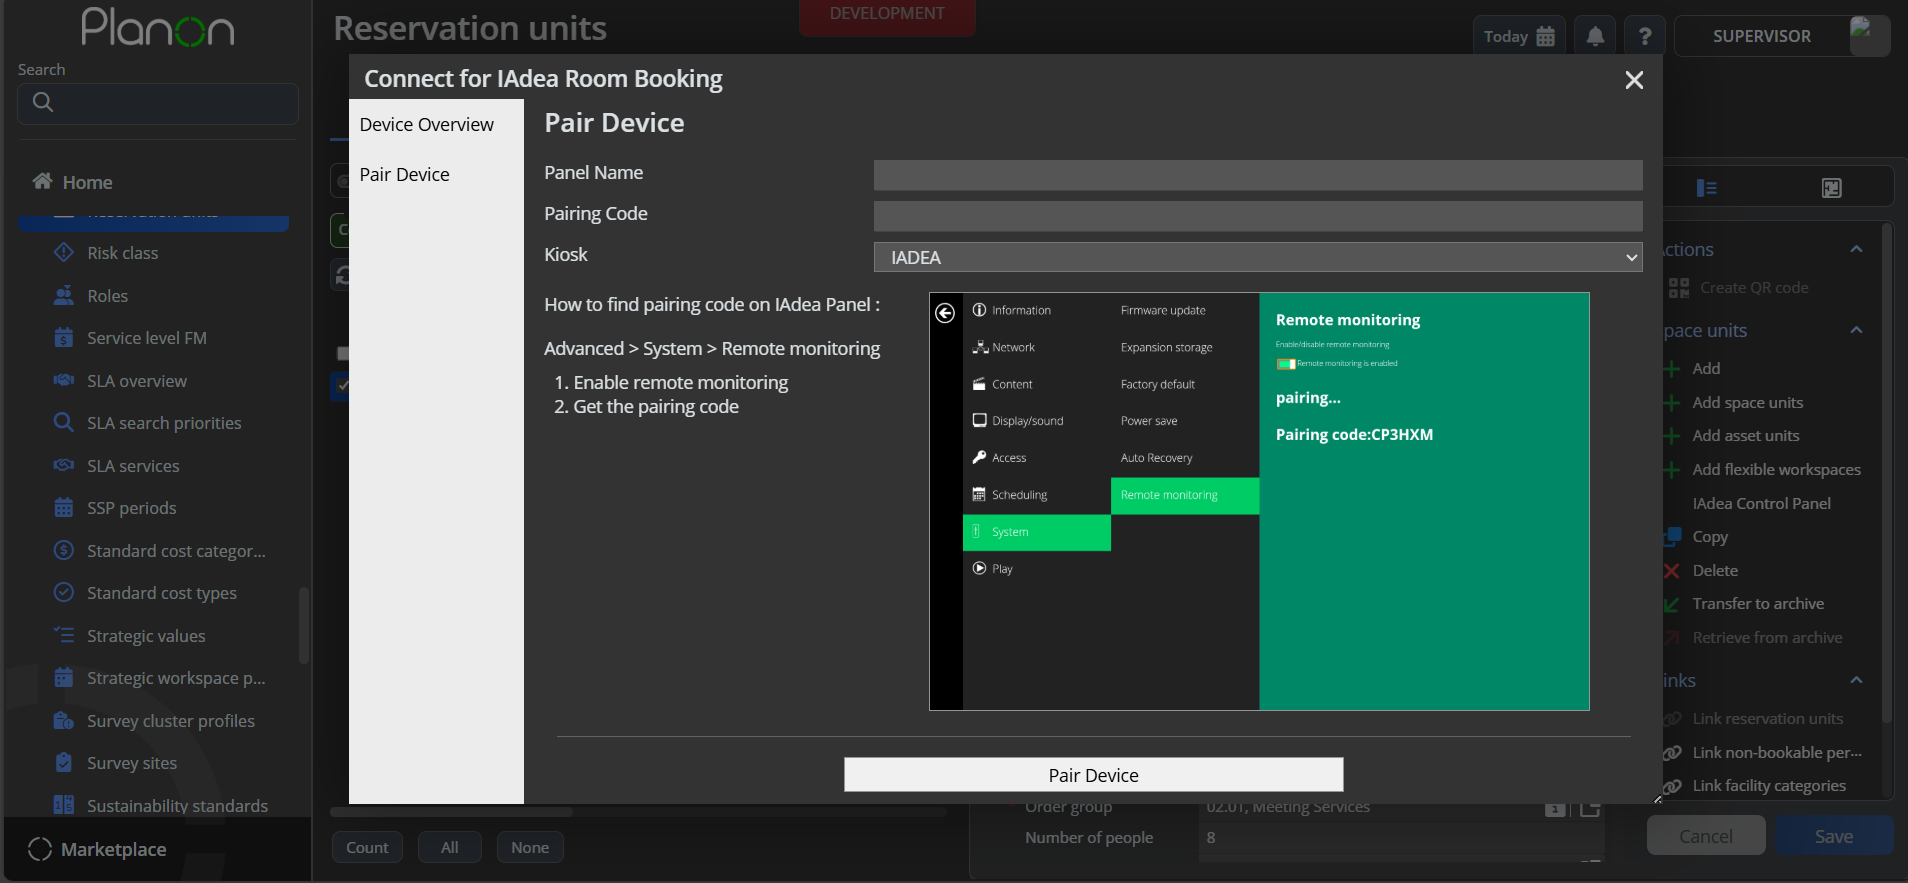
Panel name – Name to display on the Panel
Pairing Code – Code generated on the physical device which is used to link device and reservation unit
Kiosk – Code of the Kiosk in Planon that shows the reservations data
Once the 3 fields are provided with relevant information and clicks on Pair Device button, the app uses the IAdea service account and its API to link the device and the selected reservation unit.
Firstly, a virtual device is created with the provided panel name and then the virtual device is linked to the physical device via the pairing code provided.
Endpoint used to create virtual device:
https://api.iadea.oniadea.com:443/iAdeaCare/v1/virtualDevices
Method type: POST
Authentication: using a Bearer token generated using IAdea care access key id and secret configured in the settings
Message body:
{
"virtualDeviceName" : "<Panel name from the input>"
}
Endpoint used to pair virtual device:
https://api.iadea.oniadea.com:443/iAdeaCare/v1/virtualDevices/<Id of the virtual device>/pair
Method type: POST
Authentication: using a Bearer token generated using IAdea care access key id and secret configured in the settings
Message body:
{
"pairingCode" : "<Pairing code from the input>"
}
After successfully linking, an asset is also created with the reference to this selected reservation unit which is the counter part of the physical device in Planon. Also external BO link is created in Planon which acts a link between asset created and IAdea virtual device.
Manage device
Manage device configuration
The feature provides the feasibility to set or update content url, set screen time off and restart the device.
When the user selects a reservation unit in Planon and clicks the action configured, if a device is already linked to a device.
If a device is already linked, the action opens the popup as below
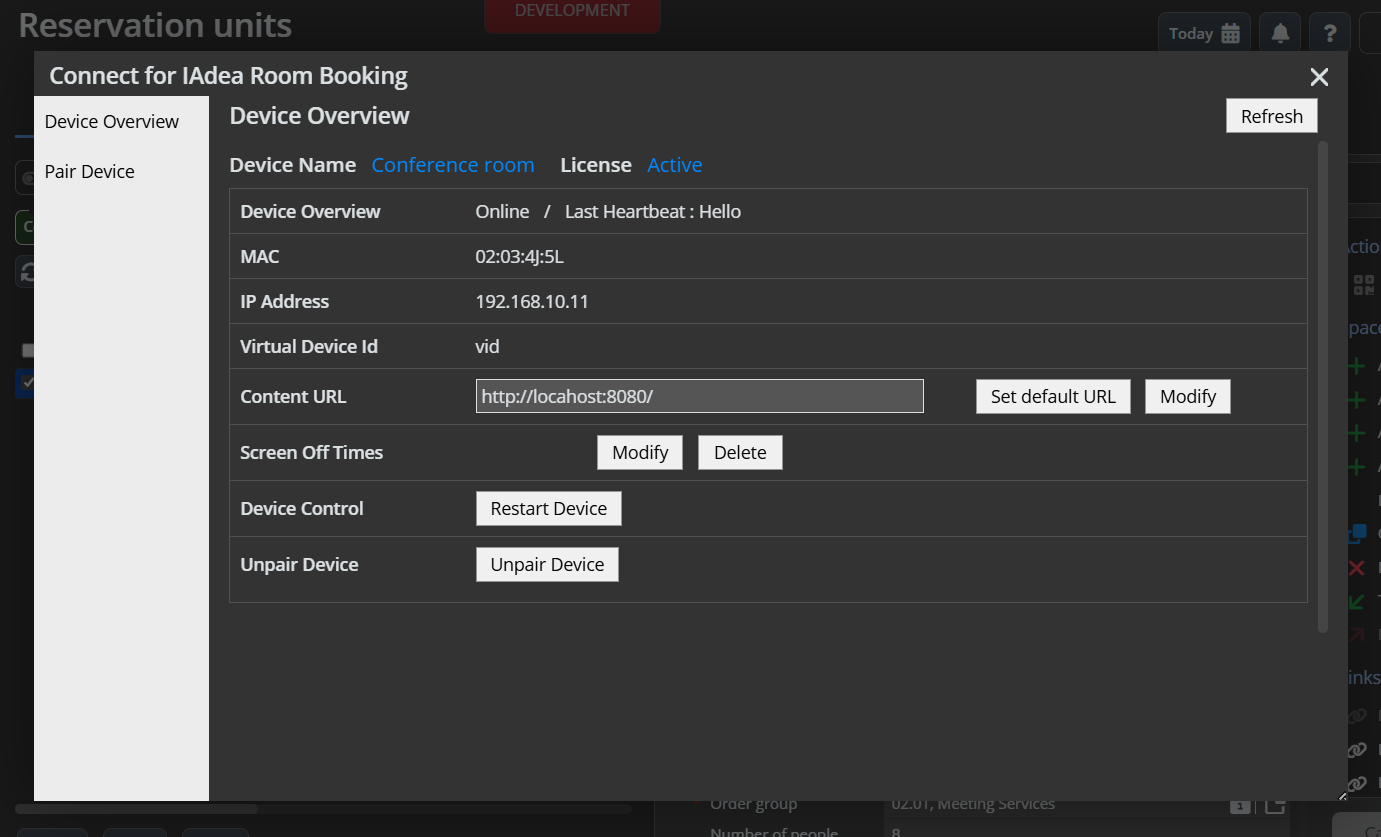
Using the action modify, one can modify the content url. To set the url to default url, once can use the set default url action.
Similarly, one can also manage the screen off time configurations.
The Restart device button is used to restart the device remotely.
All the device updates are handled via the batch tasks with corresponding action through the API accounts/tickets
Unlink device
The overview panel also comes with a button to Unpair the device. Once the Unpair device action is clicked, the device is unlinked, the external bo link is deleted and the asset is deleted.
Endpoint used to unpair:
https://api.iadea.oniadea.com:443/iAdeaCare/v1/virtualDevices/<Id of the virtual device>/pair?removeVirtualDevice=true
Method type: DELETE
Authentication: using a Bearer token generated using IAdea care access key id and secret configured in the settings
IAdea Configuration
This chapter provides the necessary steps to setup account in IAdea portal and create an access key for API integration
Sign up an IAdeaCare account
- Please reference “3. Account Setup Process” in IAdeaCare User Manual. IAdeaCare - User Manual – IAdea Support
Create IAdeaCare access key.
Login IAdeaCare
Miscellaneous -> Access Key -> Create access key
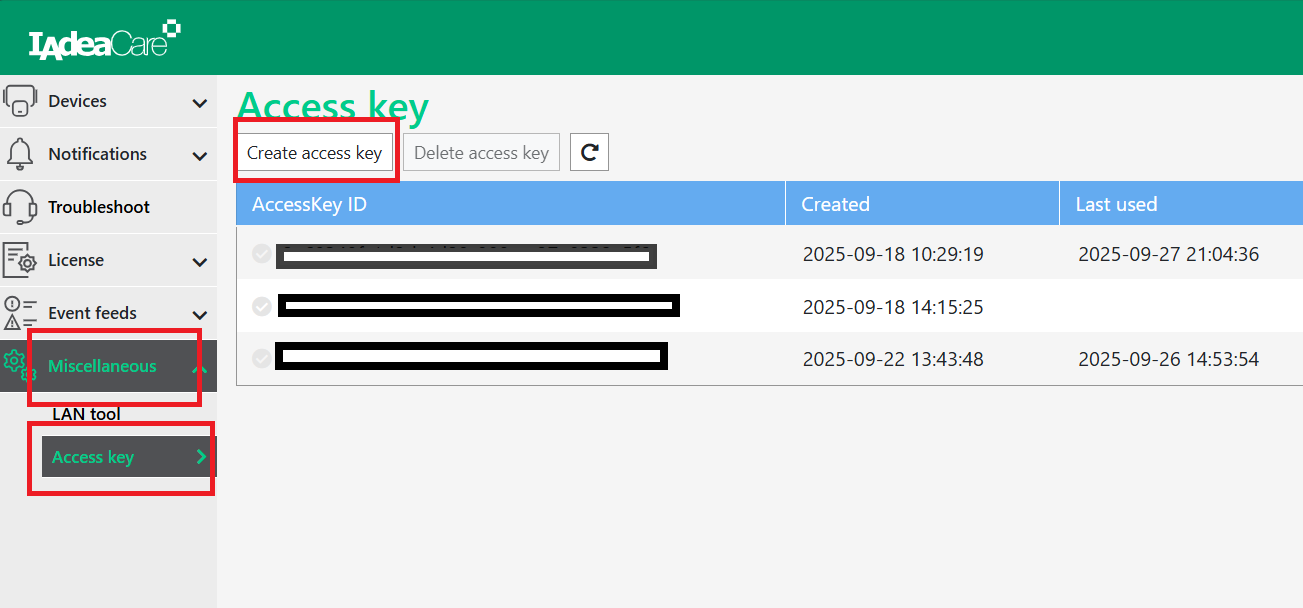
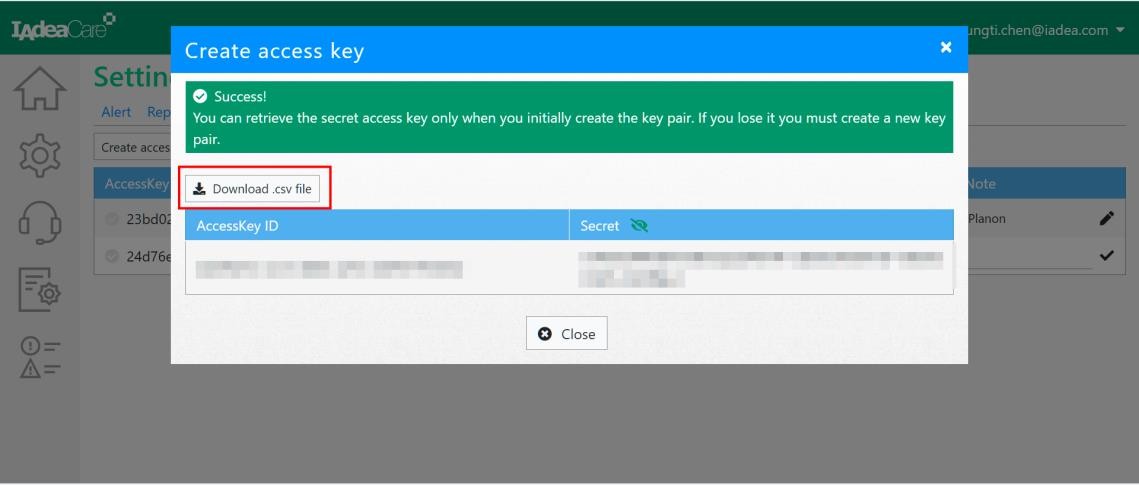
- Once the key is generated, the details can be downloaded
Installation
This chapter describes the steps required to install this app on your Planon environment.
Installation Process
There are two ways to install the app:
- Using the Marketplace
- Manual installation
Install the app by using the marketplace
In case your environment is configured to use the Planon app store the only thing required to install the app is to add the app license in the AppCenter TSI. Planon will automatically download and install the app.
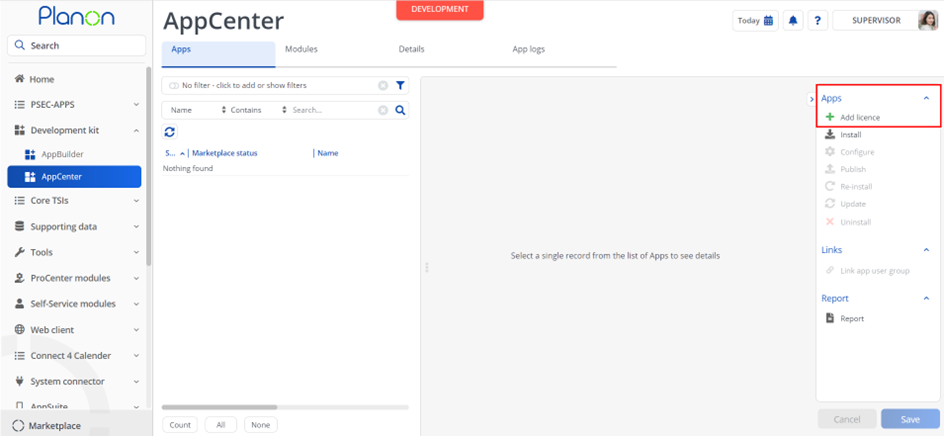
Manual installation
In case you want to perform a manual installation follow the steps below.
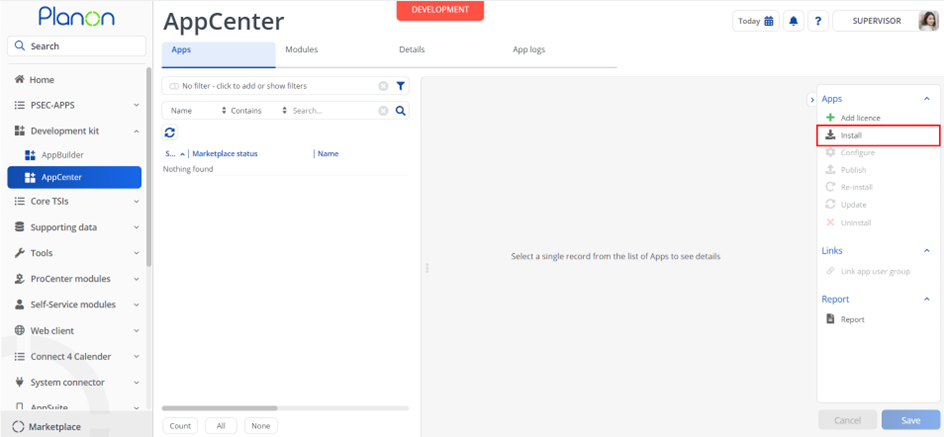
- Open AppCenter TSI from Planon webclient and click on install from action menu
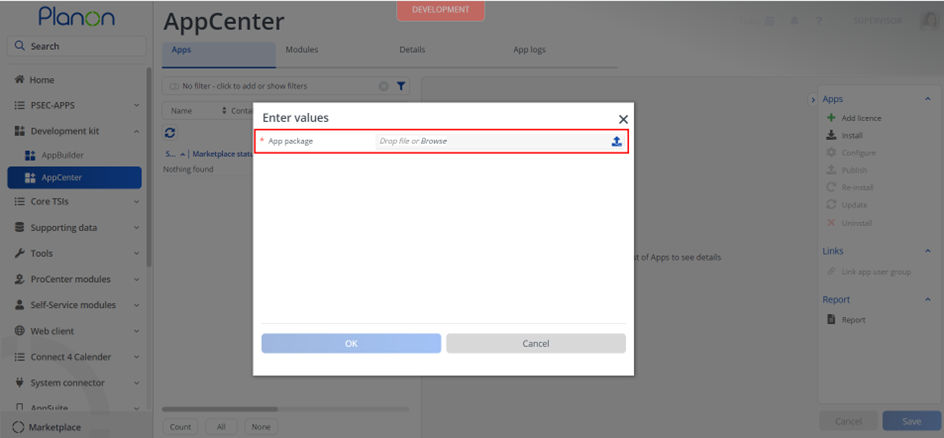
- Browse to the .ppk file
- Click OK to install the app and follow the installation process
- When the app is successfully installed, the app will appear in the AppCenter
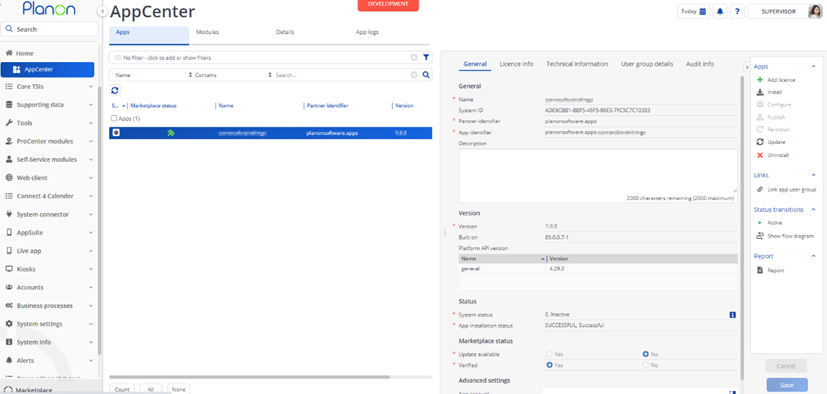
- Add the app license in Apps TSI
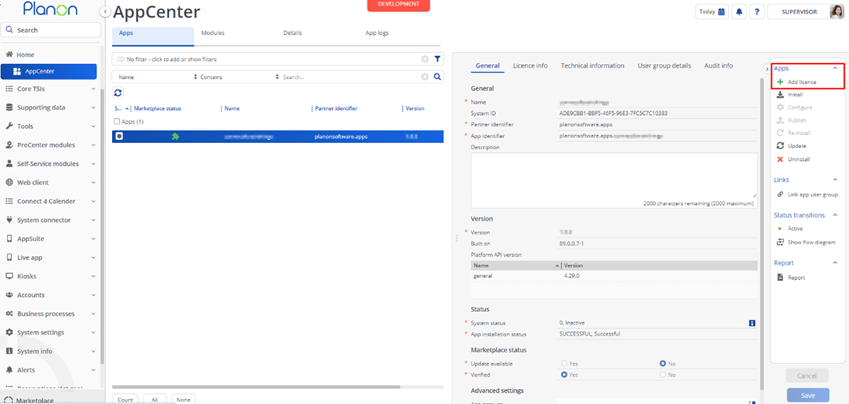
App Level Configuration
Add module settings
- Provide the module settings which are available in the Module Settings section. Here is an example:
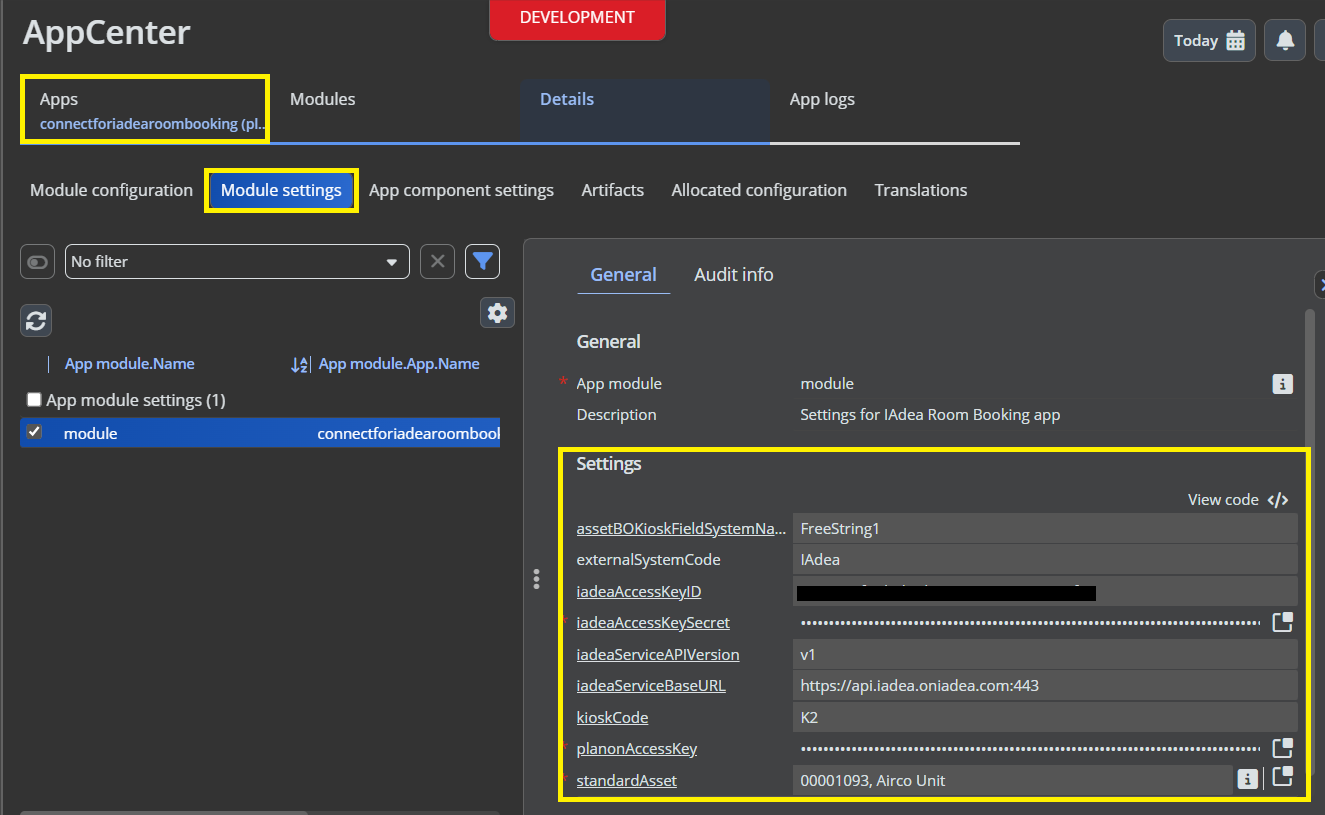
- Click the Save button after populating the module settings values.
Module Setting details
| Parameter | Example Value | Description |
|---|---|---|
| assetBOKioskFieldSystemName | FreeString1 | System name of a free field on Asset BO to store Kiosk code |
| externalSystemCode | IAdea | This is used to manage the links between devices and reservation units |
| iadeaAccessKeyID | Any string value | ID of the access key generated in IAdea care portal |
| iadeaAccessKeySecret | Any string value | Secret of the access key generated in IAdea care portal |
| iadeaServiceAPIVersion | v1 | API version to be used |
| iadeaServiceBaseURL | ActualCompletionPropertyDateTime | Base url of the IAdea API |
| kioskCode | K2 | Code of the reservation kiosk in Planon |
| planonAccessKey | Access key of Planon | This is used to login to meeting room kiosks |
| standardAsset | Standard Asset in Planon | This is used to create an asset after linking a Panel |
Example settings in view code mode
{
// Provide system name of a Planon field of type String on Asset BO to store Kiosk Name
"assetBOKioskFieldSystemName" : "FreeString1",
// Provide a name for the External System in Planon to manage the links
"externalSystemCode" : "IAdea",
// IAdea service access key ID
"iadeaAccessKeyID" : "<Access key ID from IAdea care>",
// IAdea service access key credential
"iadeaAccessKeySecret" : {
"secure" : "<Access key secret from IAdea care>"
},
// Version of IAdea Service API
"iadeaServiceAPIVersion" : "v1",
// Base Url of IAdea Service API
"iadeaServiceBaseURL" : "https://api.iadea.oniadea.com:443",
// Assign code(s) of the Kiosk to display on the meeting room panel. This is also used to Pair Reservation Unit with IAdea Panel
"kioskCode" : "K2",
// The Access key configured is used to connect to meeting room panels to Planon.
"planonAccessKey" : {
"secure" : ""
},
// While pairing a Reservation unit to IAdea Panel an asset is created based on the configured Standard Asset
"standardAsset" : {
"primaryKey" : 2
}
}
Activation
Once the app has been configured, you can activate the app by pressing the Active status transition from the action panel. Always make sure that the required User groups are linked correctly and the Configure action is executed before activating the App.
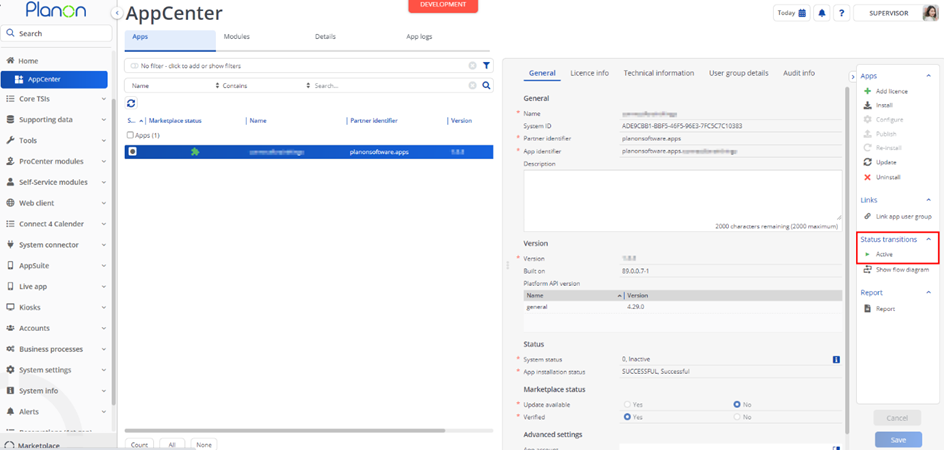
Planon Configuration
This chapter describes the required configuration in the application such as adding a TSI Action to field definer / layouts (if applicable) and/or configuring any free fields.
BO External System
When an asset is successfully paired with IAdea device, an external bo link is created which acts as a link between Planon asset and IAdea device.
To create an external BO link, an external system must be present.
Follow below steps to create external system
Go to External BO Links TSI
Check if an external system is already present with a code provided in the app settings (externalSystemCode)
If not present, create a new record with the code same as one in the settings
BO BaseAsset (Fields)
One free field is required on the Asset to store the Planon Kiosk code on the asset BO.
| Description | Free field type | Planon field Type | Pick List |
|---|---|---|---|
| Kiosk code | Any available FreeString | String |
BO ReservationSpaceUnit
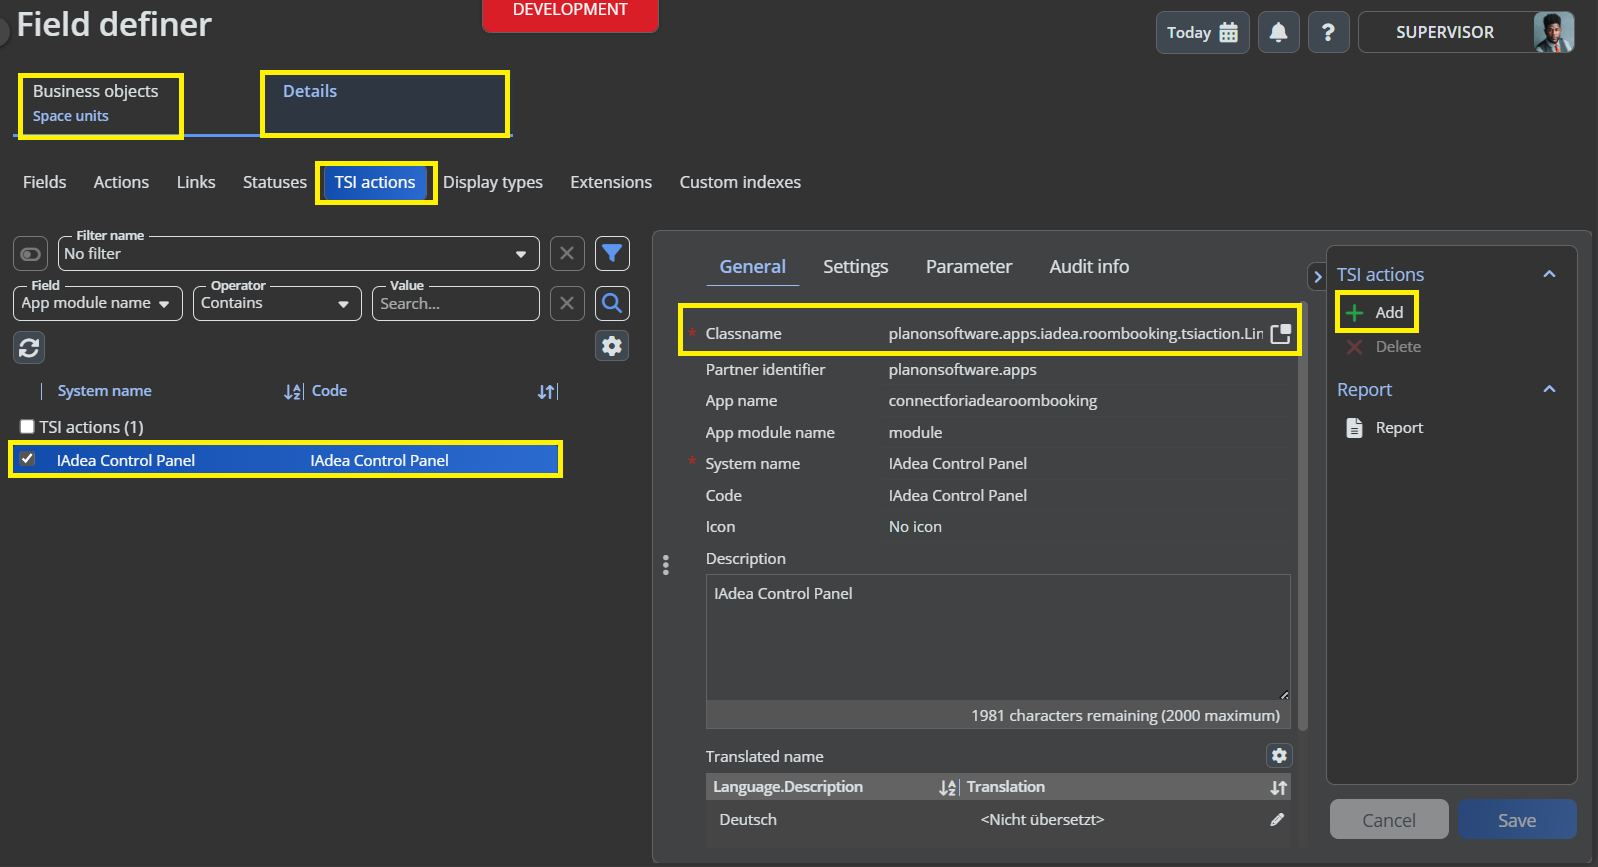
Go to the TSI Field definer
Select the BO with system name BaseReservationUnit
Set the BO to Under Construction
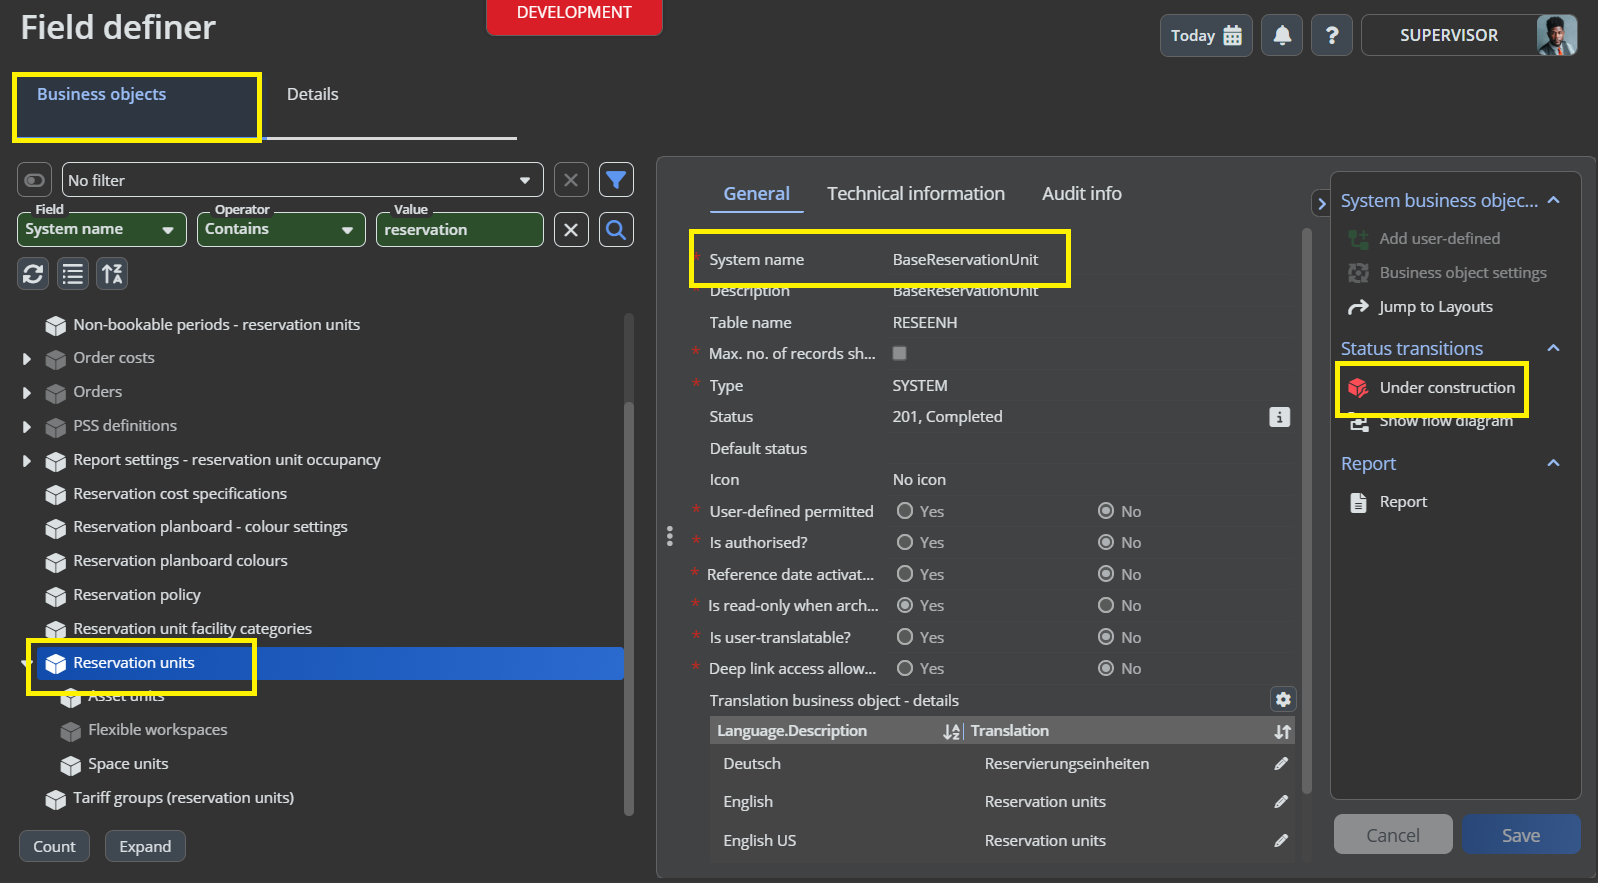
Now select the UDBO with system name “ReservationSpaceUnit”
Go to details level and to the Extended actions or TSI Actions step
Click on Add action
Troubleshooting
Error handling
- Errors are recorded in the server logs:
- Tomcat log for web components
- Webpages
- PSS modules
- Stepview
- TSI Action
- JAX-RS webservices
- Wildfly log for server-side components
- Business rules
- Scheduled tasks
- Workers
- Event Connector
- Tomcat log for web components
- UI components (TSI Actions) also display errors in the interface