Planon Connect for MazeMap
Introduction
This document describes the functionality and usage of the Planon Connect for MazeMap integration app.
This digital wayfinding solution boosts productivity and improves the experience for occupants and visitors at campus sites and in large buildings such as universities, hospitals, offices and conference venues, by making it easier for them to navigate from A to B, both indoors and outdoors.
Indoor visualisation and wayfinding is an important element in occupant-centric processes and services like room reservations, workplace booking and visitor management. Combining MazeMap’s digital wayfinding solution with Planon’s platform enables organisations to offer a valuable navigation solution and enhanced experience to building users.
Prerequisites
Environment
This solution is designed to work with Planon Live L71 and above.
Constraints
- In order to use meeting room integration it is required to have OAuth configured with Planon. This app has been tested on the Planon cloud using keycloak OAuth. Configuring OAuth is out of scope for this guide.
Required (free)fields
A (free) field on Property of type ‘CodesCodeName’ with default ‘YESNO’ picklist linked to indicate whether the property has been synchronized to MazeMap
A (free) field on Floors of type ‘CodesCodeName’ with default ‘YESNO’ picklist linked to indicate whether the floor (the DWG) should be synchronized with MazeMap
The user defined system name of the fields above should be ‘UsrMazeMapFlag’
Assumptions
This design and functionality of the solution is based on the following assumptions:
The filenames for the DWG drawings in Planon are unique
Labels of spaces in the DWG drawings are mapped to the space code in Planon
The free fields that have to be configured on property and floor BO’s to indicate whether the BO has been synchronized to MazeMap should have the user defined systemname ‘UsrMazeMapFlag’.
It is assumed you are in posession of a MazeMap API Key and API Key ID (required for base data synchronization)
Features
The purpose of this app is to provide integration between Mazemap and Planon. This allows Planon customers to synchronize their CAD drawings and Planon data with Mazemap for indoor navigation and wayfinding.
Feature 1 - Update campus map and base data in MazeMap
In Planon ProCenter, data from an AutoCAD drawing (.dwg format) can be imported, by mapping Planon ProCenter business objects and fields with the entities (polylines, blocks, attributes, and text) that are present in the layers of the AutoCAD drawing. The CAD drawings are read into Planon per building, per floor (so not one drawing for the entire campus).
To provide this data to MazeMap both the drawings (DWG) and base data such as property and floor data can be sent to MazeMap using an TSI action in the Planon client.
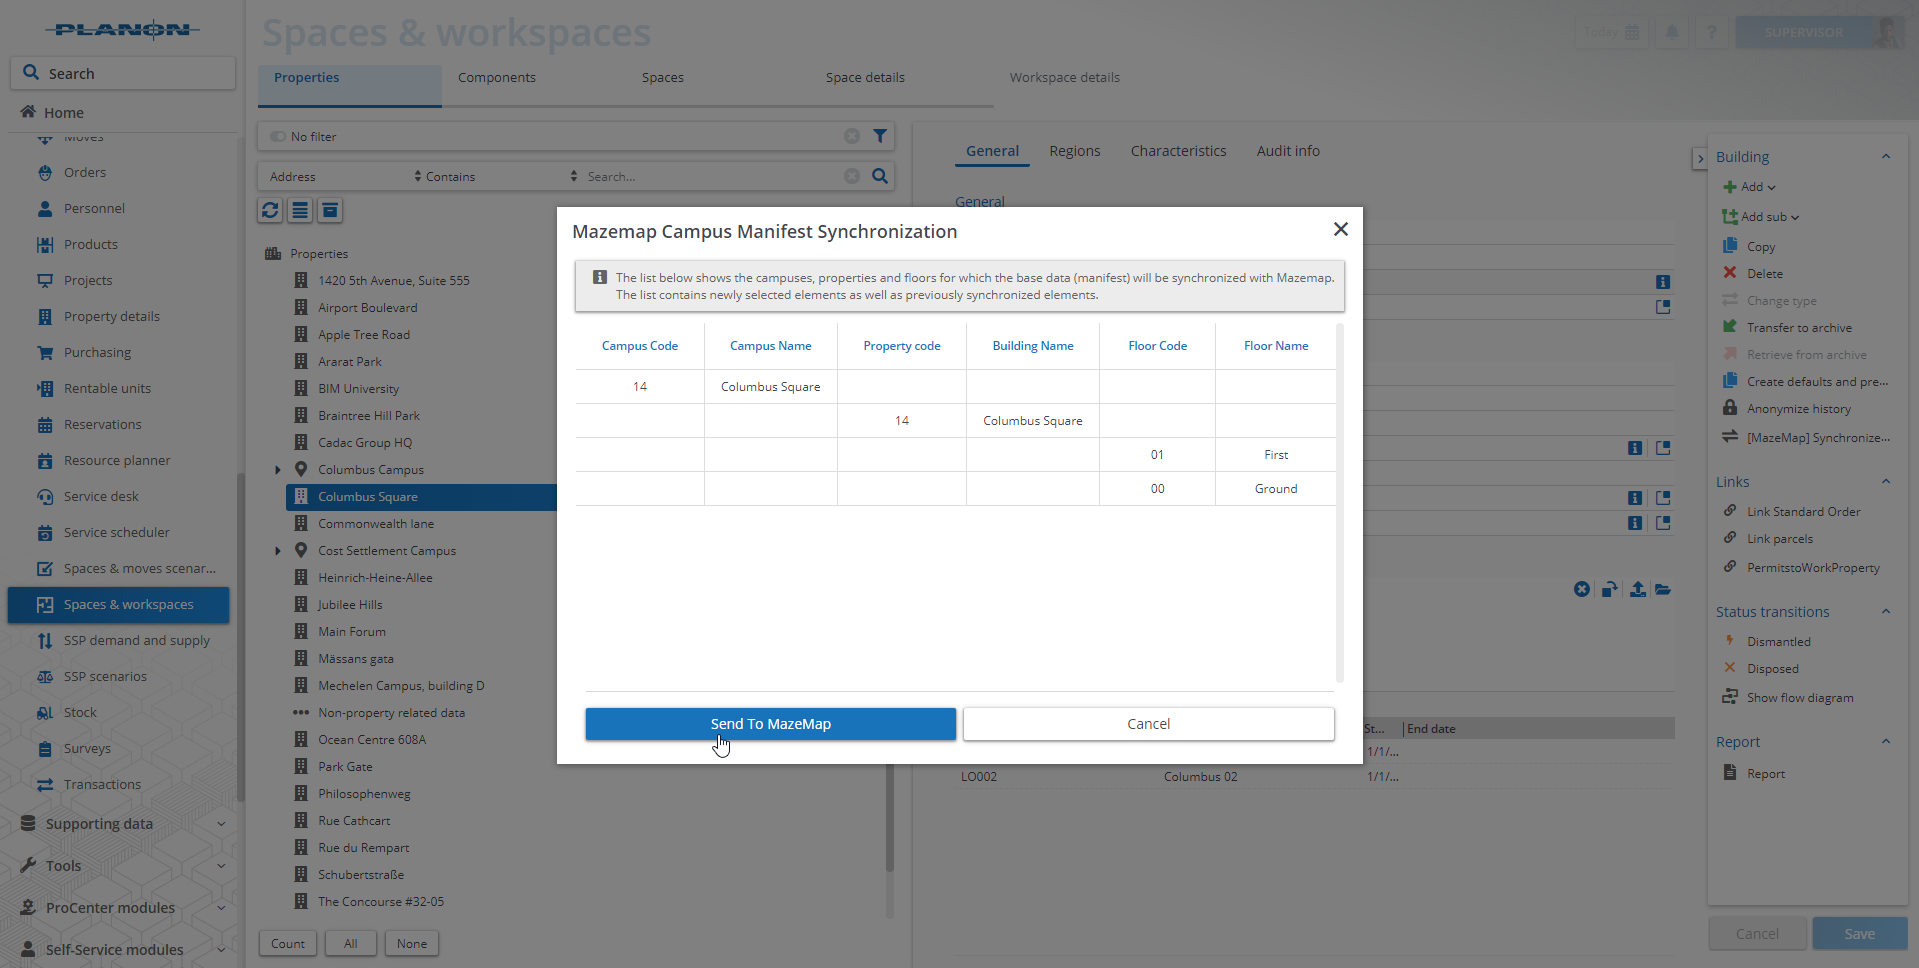
Feature 2 - Synchronize space details and POI’s with MazeMap
To provide MazeMap with the latest space details from Planon and display these on the map this data can be automatically synchronized with MazeMap every 24 hours. If the user selects a space on the map, the following basic data, which is stored in Planon ProCenter, can be displayed:
Space number and floor
Space name
Space type
Feature 3 – Meeting room integration
The meeting room integration feature allows users to book spaces and/or workspaces in Planon from MazeMap. Besides this the current reservation unit availability will also be displayed in MazeMap.
Display reservation unit status (available, occupied)
Boom reservation unit from MazeMap
Cancel reservation from MazeMap (only for bookings created by user)
Display upcoming bookings
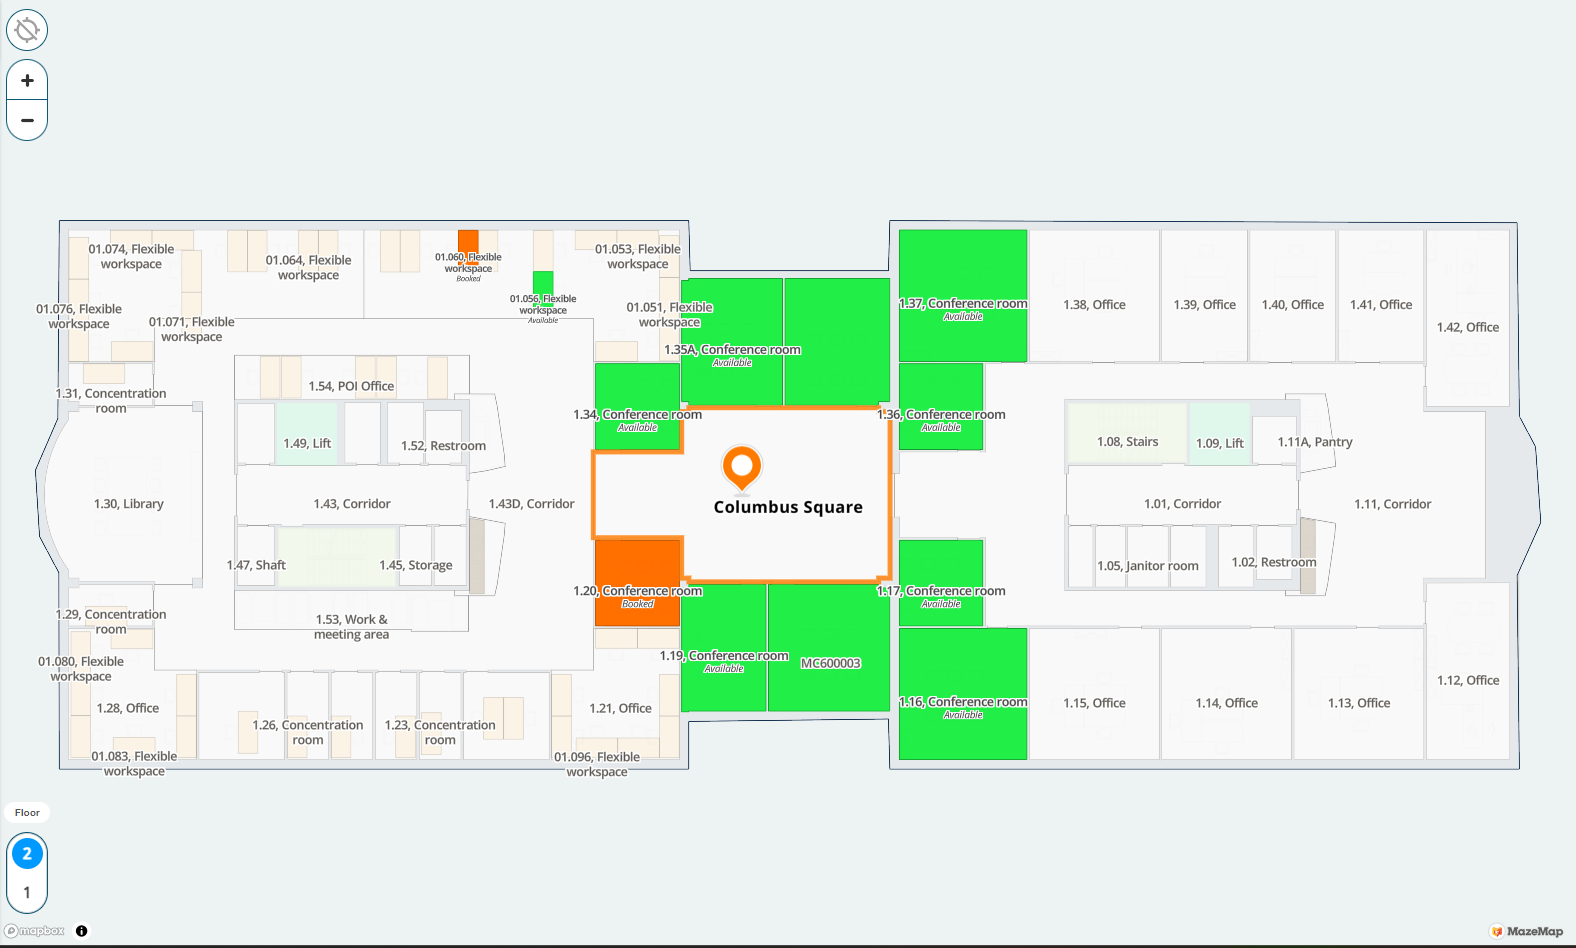
Feature 4 – Route optimization
The route optimization feature allows your workers to plan an optimal route when working at a specific site.
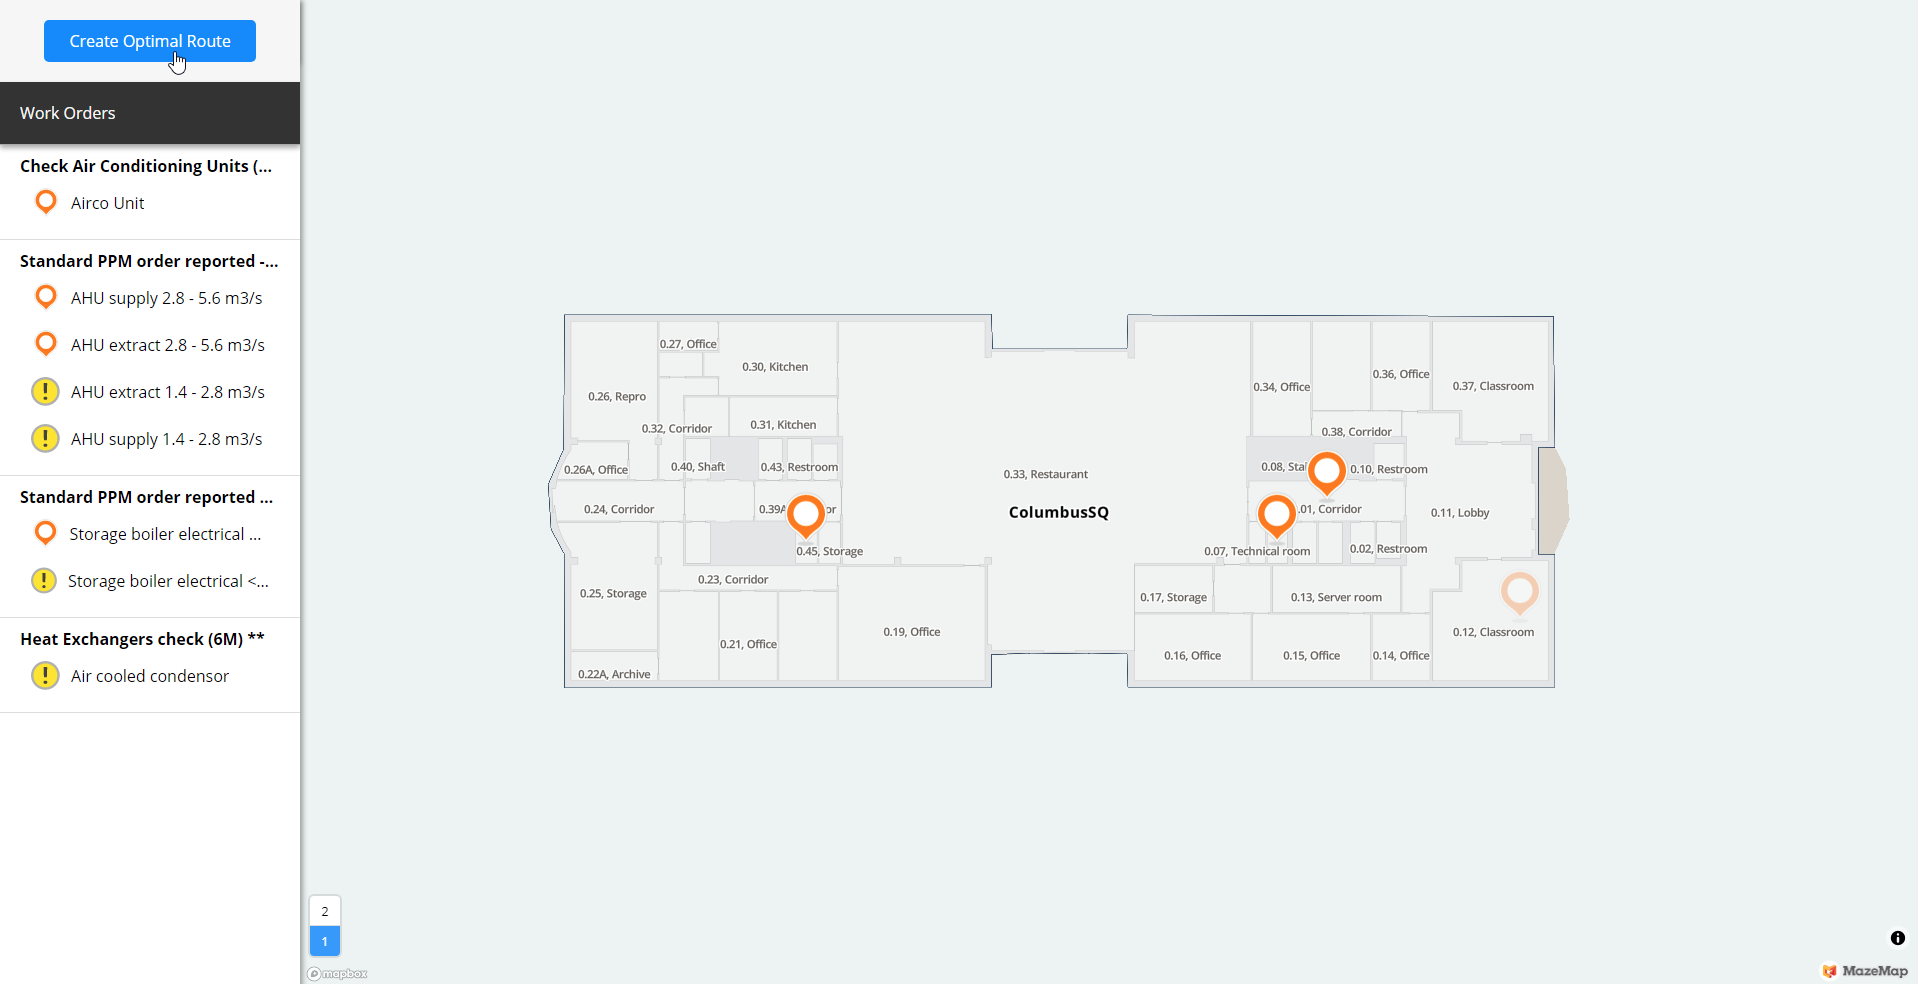
Feature 5 – Integrate MazeMap in Planon Mobile App
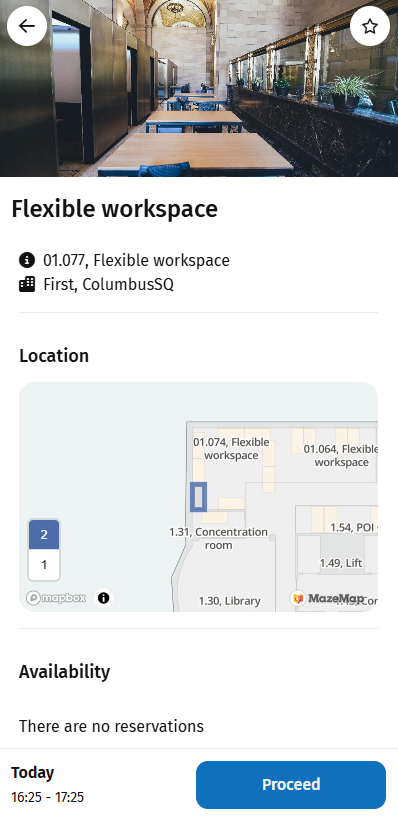
A mobile module has been created that loads in the Mazemap view into the Planon app. This is a full size mobile page. A user is able to do the following in this page:
scroll through the Mazemap campus
search for rooms using the search bar
zoom in and out
select a floor and look at the rooms on this floor
view extra information in the information window
The mobile extension also consists of multiple cards that can be added to specific pages in the mobile app.The cards all have the same functionality of showing a location on the Mazemap view. The cards have a few minor changes as in what page it is shown and what (referenced) location it must show.
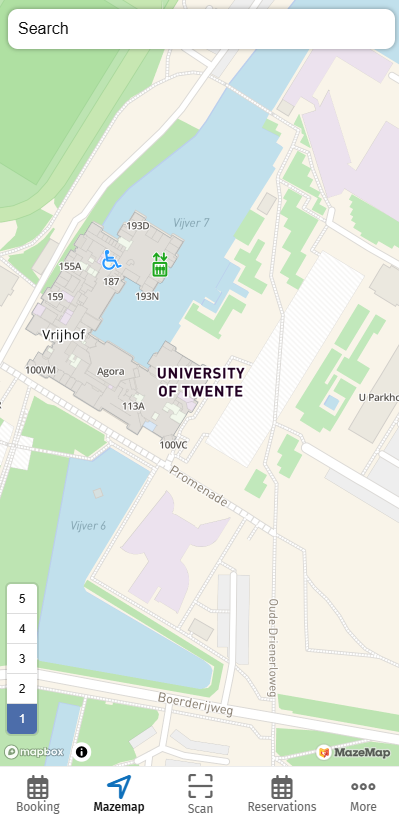
How does it work
This chapter contains the functional and technical description of the solutions proposed.
TSI Action to upload (initial) manifest
The first step in setting up the integration is uploading manifest data to MazeMap. Uploading a manifest to Mazemap is only required when setting up for the first time or in case (major) changes have been made to a campus, a new campus has to be added etc.. Uploading a manifest also requires manual intervention on the Mazemap side. Therefore this is a deliberate action which has to be triggered by the user and not something that is automatically triggered. When uploading a new manifest any previous manifest will be overwritten!
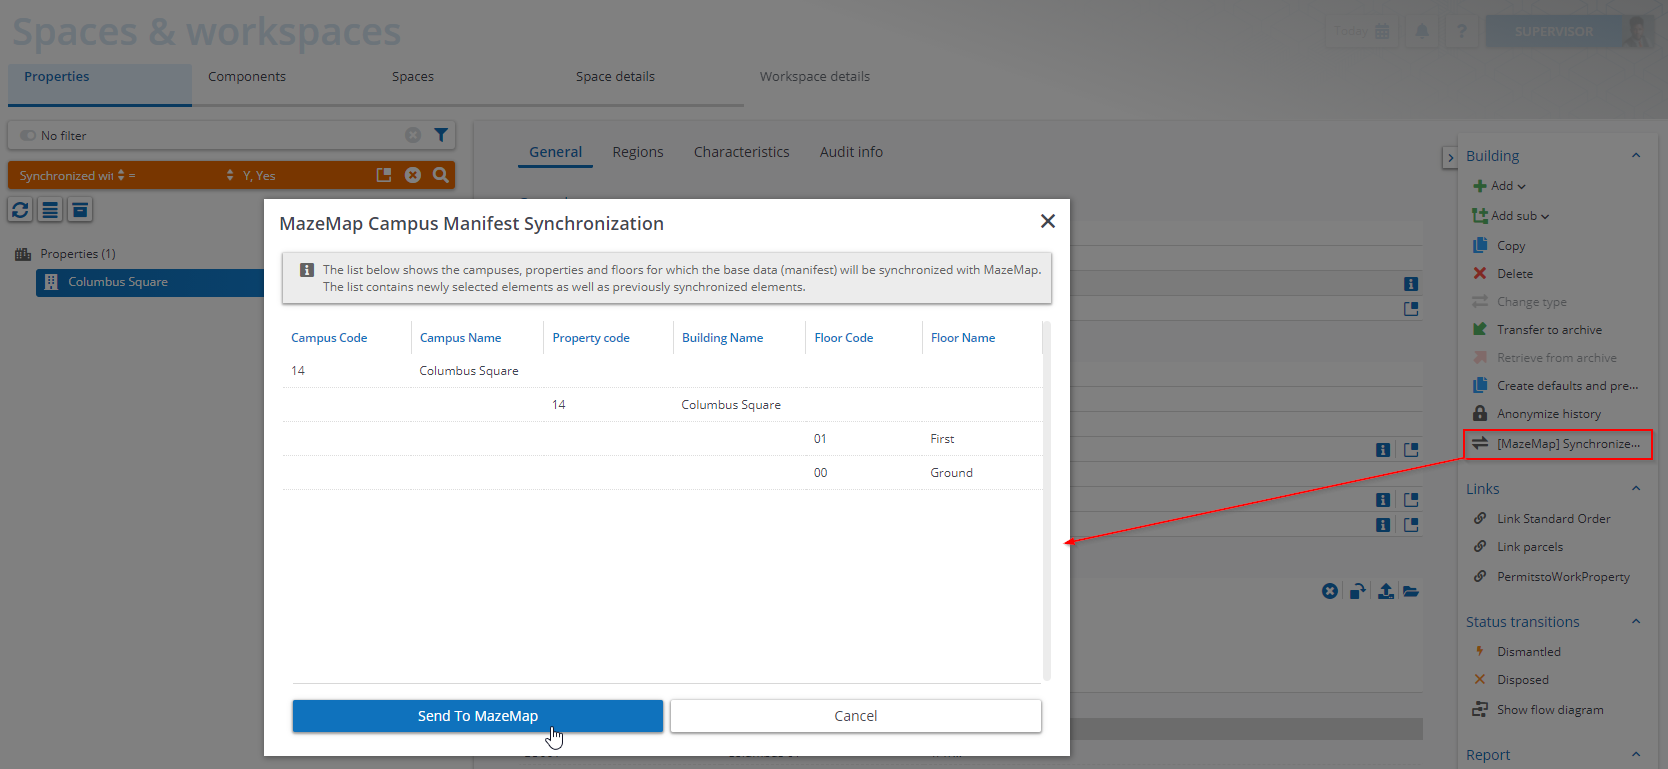
The screenshot above shows the Campus Manifest Synchronization TSI Action. Once opened from the action panel it displays the information which will be synchronized with MazeMap. Pressing the ‘Send to MazeMap’ button will provide the information to the MazeMap updates API and a success or failure message will be displayed.
Technical details
This TSI Action calls the MazeMap manifest endpoint as described on the following URL; https://updates.mazemap.com/v1/docs/.
| Planon BO’s | Property, Floor | |
|---|---|---|
| MazeMap API | /manifest | |
| Mapping | ||
| Planon BO | Field systemname | MazeMap API field |
| Property | Code | campus -> id |
| Property | Name | campus -> name |
| Property | Code | buildings -> id |
| Property | Name | buildings -> name |
| Property | Location | buildings -> latitude |
| Property | Location | buildings -> longitude |
| Floor | Floor.code.code | floors -> id |
| Floor | Name | floors -> name |
| Floor | Property.code + _ + Floor.code | floors -> drawings |
TSI Action to upload DWG drawing
Once the manifest has been uploaded we can upload the drawings. Uploading a DWG to Mazemap is only required when setting up for the first time or in case (major) changes have been made to a floor layout. Uploading a DWG also requires manual intervention on the Mazemap side. Therefore this is a deliberate action triggered by the user and not something that is automatically triggered.
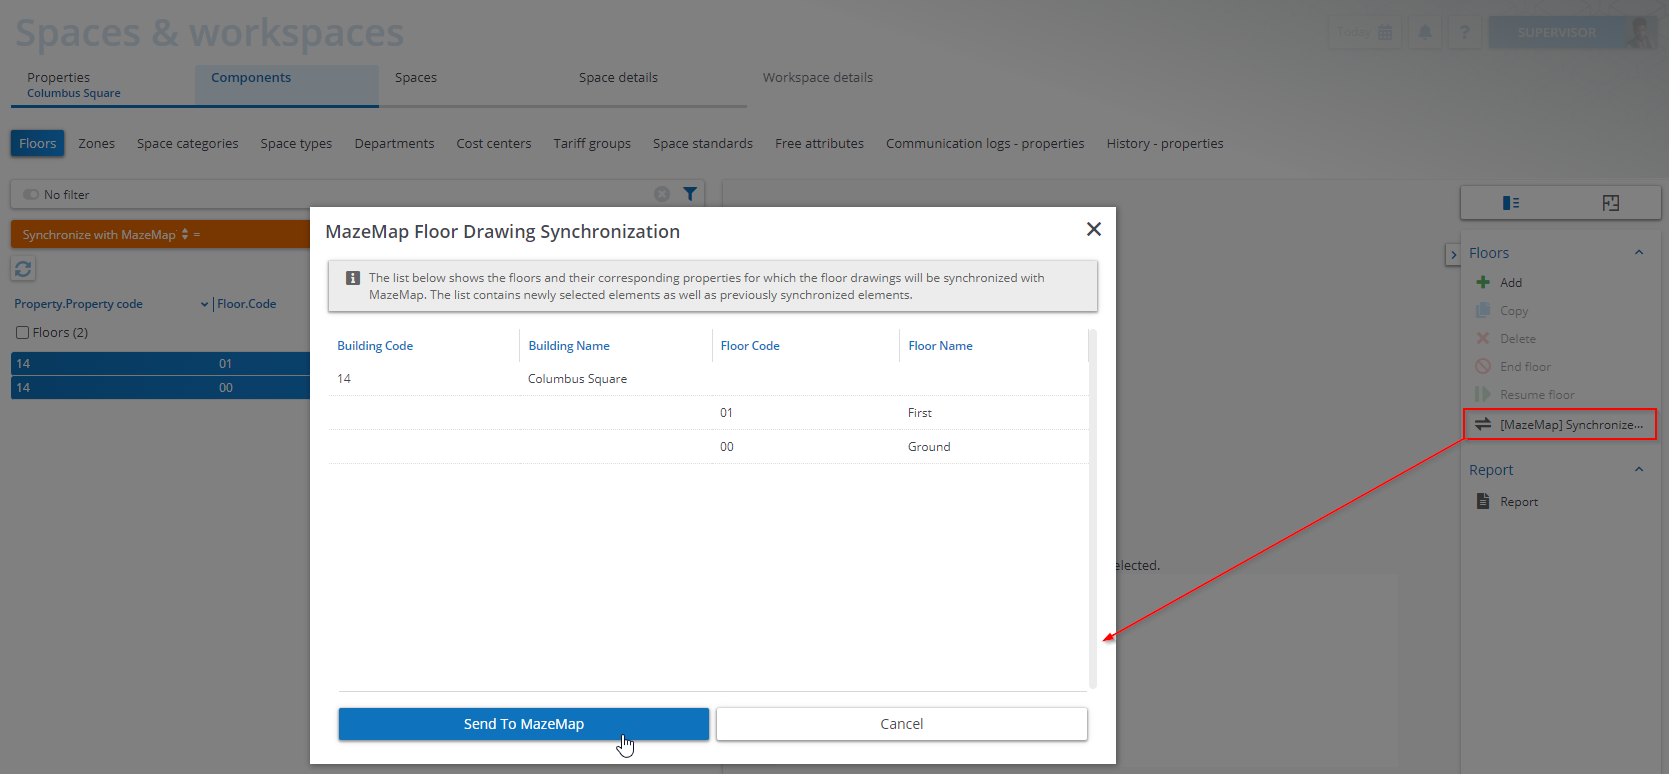
The screenshot above shows the Floor Drawing Synchronization TSI Action. Once opened from the action panel it displays the floors for which the drawing will be synchronized with MazeMap. Pressing the ‘Send to MazeMap’ button will provide the information to the MazeMap updates API and a success or failure message will be displayed.
Technical details
This TSI Action calls the MazeMap drawings endpoint as described on the following URL; https://updates.mazemap.com/v1/docs/.
| Planon BO’s | Floor | |
|---|---|---|
| MazeMap API | /drawings | |
| Mapping | ||
| Planon BO | Field systemname | MazeMap API field |
| Floor | Property.code + _ + Floor.code | id |
| Floor | FloorAttributeAutoCADDrawingRef -> binary | dwg |
Task extension to synchronize POI’s
In order to provide POI’s to MazeMap a task extension has been developed which provides the POI’s to a REST service provided by MazeMap. On the MazeMap side POI’s are updated once every 24hrs. All spaces that are part of the property / floors synchronized to MazeMap are send as POI.
Technical details
This task extension calls the MazeMap manifest pois as described on the following URL; https://updates.mazemap.com/v1/docs/.
| Planon BO’s | Property, Floor, Space, ReservationUnit | |
|---|---|---|
| MazeMap API | /pois | |
| Mapping | ||
| Planon BO | Field systemname | MazeMap API field |
| Property | Code | campusId |
| Property | Code | buildingId |
| Floor | Floor.code.code | floorId |
| (Work)Space | Code | roomId |
| (Work)Space | Code, Name | textDisplayOnMap |
| (Work)Space | SpaceType.name | roomType |
| (Work)Space | Determined by app setting | extraSearchWord |
| - | - | linkableIdentifier |
| ReservationUnit | Syscode | externalReferences |
| ReservationUnit SpaceUsage ReservationUnit | MaximumPersonCount NetArea Facilities | description |
| ReservationUnit | MaximumPersonCount | peopleCapacity |
| Space | Determined by app setting | infoUrl |
| Space | Determined by app setting | infoUrlText |
REST service to allow booking and display of room availability in MazeMap
In order for a user to be able to book rooms and display room status from MazeMap, Planon provides a REST service that exposes this information to MazeMap. The REST service exposes this data for all spaces that are linked to a reservation unit in Planon. Creation of new reservations is done based on a configurable standard order. The app adds the reservation unit, requestor and start/end datetime fields to this.
This service requires OAuth and only works on Planon environments with OAuth configuration in place!
All date/time interactions between Planon and MazeMap are in UTC timezone
Technical details
In the document ‘MazeMap Requirements for meeting room integration.pdf’ MazeMap has provided a list of functionalities that the endpoint should have. This includes;
- Get current room availability
| URL | …/sdk/platform/jaxrs/planonsoftware/apps/connectformazemap/meetingroomintegration/roomavailability |
|---|---|
| URL params | from, to, ids |
| Sample request | curl –location –request GET ‘https://mazemap-dev.planoncloud.com/sdk/platform/jaxrs/planonsoftware/apps/connectformazemap/meetingroomintegration/roomavailability?from=2021-07-14T04:00:00&to=2021-07-14T17:00:00&ids=137,127’ |
| Sample response | [{“isAvailable”:false, “id”: 137}, { “isAvailable”: true, “id”: 127 } ] |
**
- Get room schedule
| URL | …/sdk/platform/jaxrs/planonsoftware/apps/connectformazemap/meetingroomintegration/roomschedule |
|---|---|
| URL params | from, to, id |
| Sample request | curl –location –request GET ‘https://mazemap-dev.planoncloud.com/sdk/platform/jaxrs/planonsoftware/apps/connectformazemap/meetingroomintegration/roomschedule?from=2020-07-14T04:00:00&to=2021-07-30T17:00:00&id=149' |
| Sample response | [ { “startDateTime”: “2020-08-31T12:32:00”, “endDateTime”: “2020-08-31T13:32:00” }, { “startDateTime”:“2020-09-16T12:32:00”, “endDateTime”: “2020-09-16T13:32:00” } ] |
- Create event
Notice the URL for create event is using the services sdk since for this request the actual user session is used (via OAuth) instead of a Planon accesskey
| URL | …/services/sdk/platform/jaxrs/planonsoftware/apps/connectformazemap/meetingroomintegration/bookroom |
|---|---|
| URL params | from, to, id |
| Sample request | curl –location –request POST ‘https://mazemap-dev.planoncloud.com/services/sdk/platform/jaxrs/planonsoftware/apps/connectformazemap/meetingroomintegration/bookroom?from=2021-04-30T13:30:00&to=2021-04-30T14:00:00&id=149' |
| Sample response | { “bookingID”: “304.00”, “success”: true} |
- Get user events
Notice the URL for user events is using the services sdk since for this request the actual user session is used (via OAuth) instead of a Planon accesskey
| URL | …/services/sdk/platform/jaxrs/planonsoftware/apps/connectformazemap/meetingroomintegration/userreservations |
|---|---|
| URL params | from, to, id |
| Sample request | curl –location –request GET ‘https://mazemap-dev.planoncloud.com/sdk/platform/jaxrs/planonsoftware/apps/connectformazemap/meetingroomintegration/userreservations?id=140&from=2021-06-23T08:19:20&to=2021-06-30T09:19:21' |
| Sample response | [ { “startDateTime”: “2020-08-31T12:32:00”, “endDateTime”: “2020-08-31T13:32:00” }, { “startDateTime”: “2020-09-16T12:32:00”, “endDateTime”: “2020-09-16T13:32:00” } ] |
- Cancel event
| URL | …/sdk/platform/jaxrs/planonsoftware/apps/connectformazemap/meetingroomintegration/cancelreservation |
|---|---|
| URL params | id |
| Sample request | curl –location –request POST ‘https://mazemap-dev.planoncloud.com/sdk/platform/jaxrs/planonsoftware/apps/connectformazemap/meetingroomintegration/cancelreservation?id=304.00' |
| Sample response | { “success”: true} |
All the features above have been implemented in the REST service mentioned which are deployed by this app. An ‘event’ is a Planon reservation in this case.
BR and REST service to allow MazeMap to retrieve work assignment, order, and asset details
In order for workers in the field to generate an optimal route for handling their work on a campus MazeMap offers a route optimization service. This service can be started from the Planon Mobile field services app. This works in the following way:
When a order is assigned to a tradesperson a business rule generates a communication log that contains a MazeMap link. This link contains information such as the campus and the tradesperson for which it is generated.
When the link is opened, MazeMap requests a REST service on the Planon side to provide more details on all the work assignments for the engineer on the campus on that day. Based on this information an optimal route will be generated.
Technical details
The webservice that provides MazeMap with the Work Assignment details is implemented on the following endpoint: “…/sdk/platform/jaxrs/planonsoftware/apps/connectformazemap/routeoptimization/workassignments”. As URL parameters the webservice accepts ‘buildingid’ (planon property syscode), ‘engineerid’ (person syscode) and ‘date’.
An example response of this webservice looks like this:
[
    {
        "description": "Check Air Conditioning Units (1M)",
        "plannedBeginDatetime": "2021-05-11T14:00:00",
        "plannedEndDatetime": "2021-05-11T14:30:00",
        "resourcePerson": "Adrian Mease",
        "workOrder": {
            "orderNumber": "243.00",
            "description": "Check Air Conditioning Units (1M)",
            "spaceNumber": "0.16",
            "spaceName": "Office",
            "floorCode": "00",
            "floorName": "Ground",
            "campusCode": "14",
            "campusName": "Columbus Square",
            "propertyCode": "14",
            "propertyName": "Columbus Square",
            "assets": [
                {
                    "code": "000244",
                    "description": "Airco Unit",
                    "vendor": "Hitachi",
                    "classification": "Control climate",
                    "informationText": "Unit is located in top left corner",
                    "spaceNumber": "1.12",
                    "spaceName": "Office",
                    "floorCode": "01",
                    "floorName": "First",
                    "propertyCode": "14",
                    "propertyName": "Columbus Square"
                }
            ]
        }
    }
]
Installation
This chapter describes the steps required to install this app on your Planon environment.
Installation Process
There are two ways to install the app:
- Using the Marketplace
- Manual installation
Install the app by using the marketplace
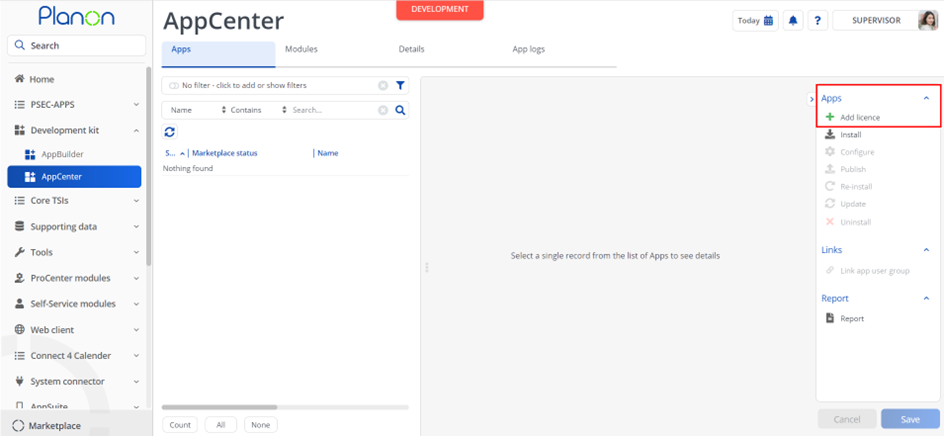
In case your environment is configured to use the Planon app store the only thing required to install the app is to add the app license in the AppCenter TSI. Planon will automatically download and install the app.
Manual installation
In case you want to perform a manual installation follow the steps below.
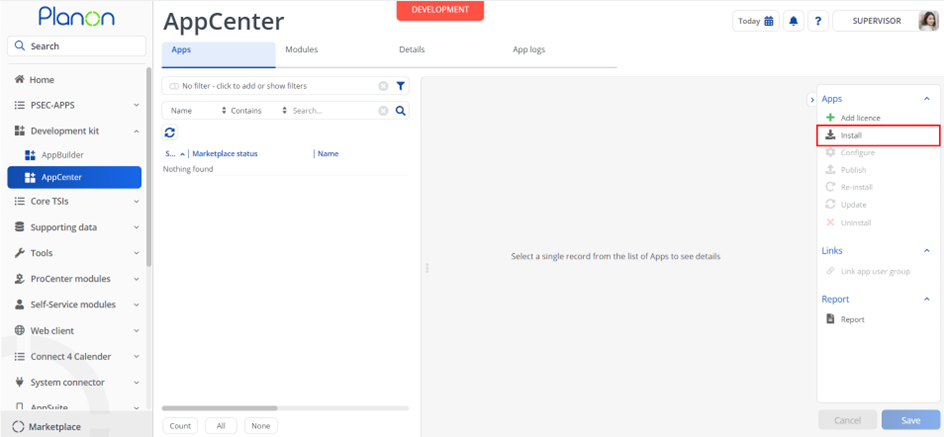
- Open AppCenter TSI from Planon webclient and click on install from action menu
- Browse to the .ppk file
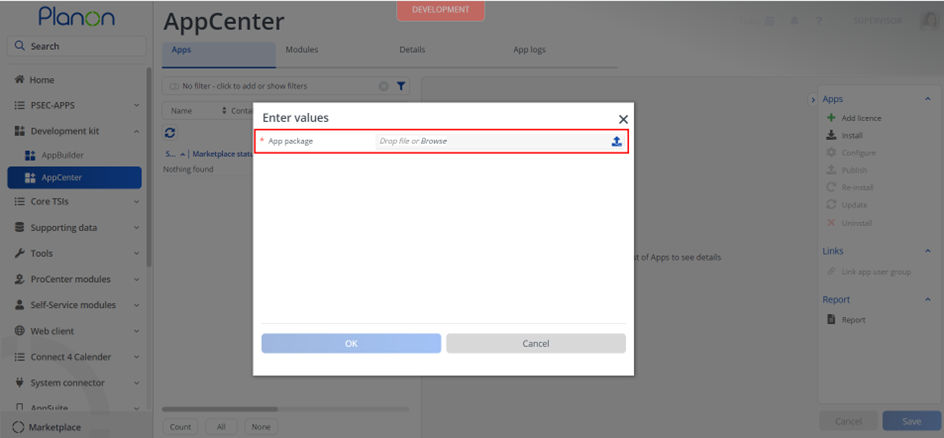
- Click OK to install the app and follow the installation process
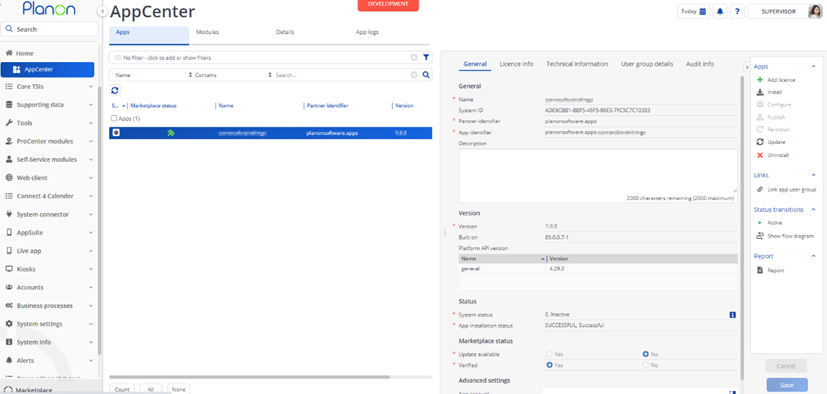
- When the app is successfully installed, the app will appear in the AppCenter
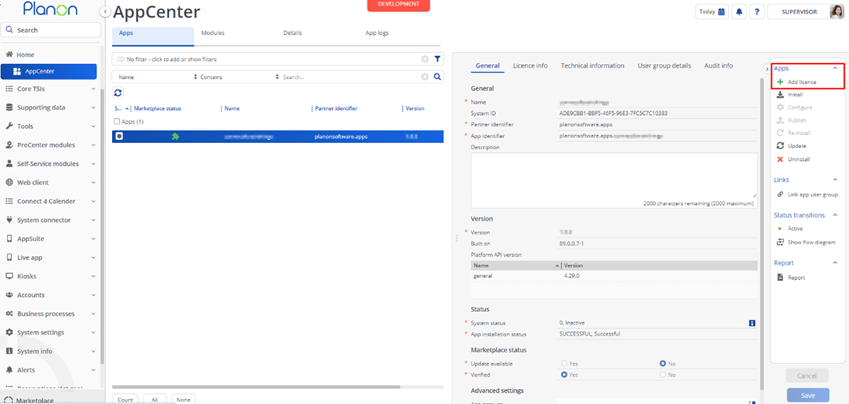
- Add the app license in Apps TSI
App Settings
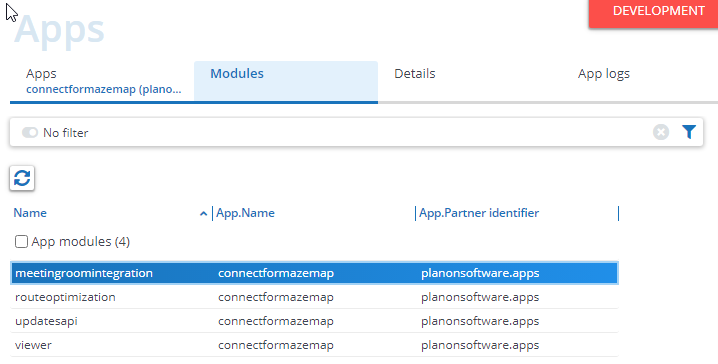
This chapter describes which settings are available for the connect for MazeMap app. After installation, we can see all the modules in details in the ‘Modules’ section. It is not mandatory to configure all modules, you only have to configure the modules that are applicable for your use cases.
Updates API module
The updates API module contains all features related to synchronizing base data between Planon and MazeMap.
| Name | Description | Sample value |
|---|---|---|
| mazeMapAPIKey | MazeMap API-KEY | gi0E6cslJgWsdfzQ0Jw4wtA6BHAnUU |
| mazeMapKeyId | MazeMap KEY-ID | 1ZgbUF7sdfDWlJKgvPtMC0jUUBx_k7h |
| mazeMapFlagFieldNameForBuildingBO | MazeMap flag field name for building BO | FreeString10 |
| mazeMapFlagFieldNameForFloorBO | MazeMap flag field name for floor BO | FreeString5 |
| mazeMapRoomTypeSource | Set which Planon BO to use to fill the roomtype in MazeMap. Possible values are ‘SpaceType’ or ‘SpaceStandard’. | SpaceType |
| textDisplayOnMap | Set which Space BO fields to display in a Space on the MazeMap. | CodeAndName |
| extraSearchWordFields | Set which field values will be provided as ‘extra search words’ to MazeMap | FreeString12,Code,PropertyRef:Name |
| uploadFloorPlanEndPoint | floor plan API end-point | https://updates.mazemap.com/v1/ drawings |
| uploadManifestEndPoint | upload campus manifest API end-point | https://updates.mazemap.com/v1/ manifest |
| uploadPOIsEndPoint | upload POIs API end-point | https://updates.mazemap.com/v1/ pois |
| allowBookingFromMazeMapField | The system name of the field (type YESNO picklist) on the Reservation Unit BO that indicates if booking from MazeMap is allowed. Leave empty to allow all. | FreeString1 |
Meeting room integration module
The meeting room module contains all settings required to create bookings from MazeMap and display room availability.
| Name | Description | Sample value |
|---|---|---|
| getLoginURL | To OAuth login URL MazeMap will redirect the user to when booking a room | https://fr3-authdev.planoncloud.com/auth/realms/mazemap-dev/protocol/openid-connect/auth?response_type=token&client_id=Planon&login=true |
| reservationCancelledStatus | The status to which a reservation should be set when it is cancelled from MazeMap | UsrReservationCancelled |
| standardOrderCode | The code for the standard order used to create a reservation from MazeMap | MM01 |
| availabilityBasedOnReservations | When this settings is set to true reservation unit availability will be determined based on reservations in the system. Can be combined with availabilityBySensorData but be aware of performance penalty | true |
| availabilityBasedOnSensorData | When this settings is set to true reservation unit availability will be determined based on sensor data in the system. Can be combined with availabilityByReservations but be aware of performance penalty. | false |
| allowBookingFromMazeMapField | The system name of the field (type YESNO picklist) on the Reservation Unit BO that indicates if booking from MazeMap is allowed. Leave empty to allow all. | FreeString1 |
Route optimization module
The route optimization module does not have any settings. All settings related to the route optimization are set on the component settings of the route optimization business rule.
Route optimization Business Rule component settings
| Name | Description | Sample value |
|---|---|---|
| comlogDescription | The value to set in the comlog ‘name’ field | MazeMap Route Optimization |
| comlogTypeName | The comlog UDBO systemname to create | UsrCommunicationLog |
| mazeMapBaseURL | The base URL used for URL generation | https://planon-maintenance-route.mazemap.com/ |
| triggerStatus | The system name of the status when the BR should trigger | UsrPlannedMaintenanceOrderAssigned |
Translations
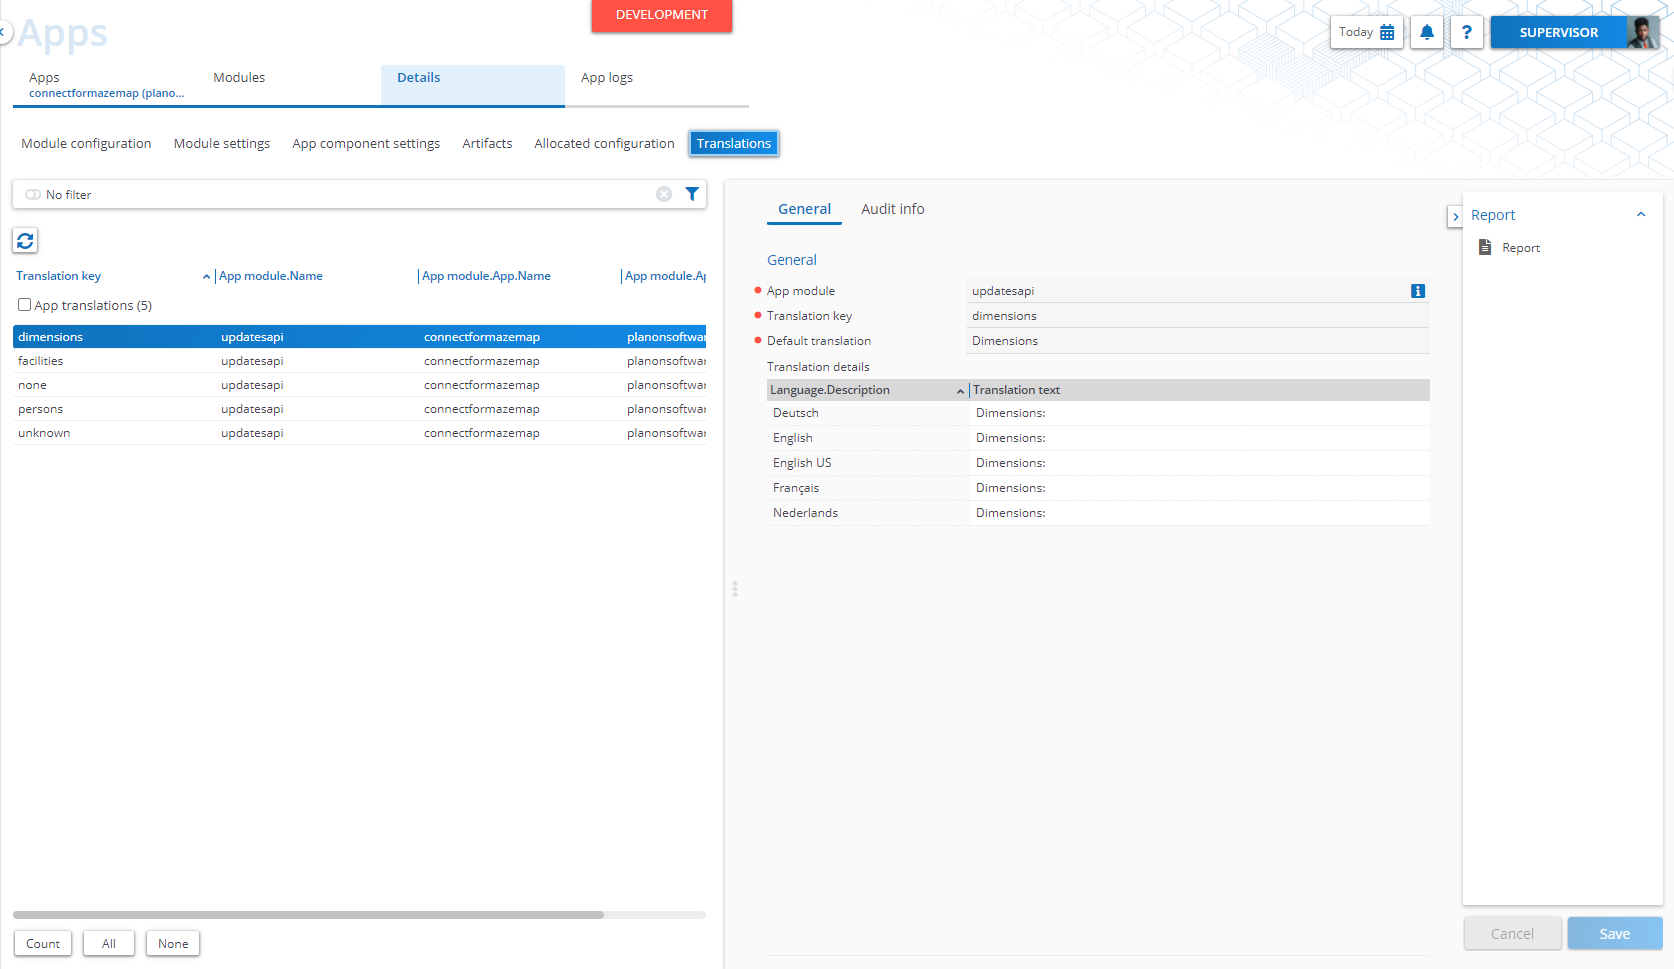
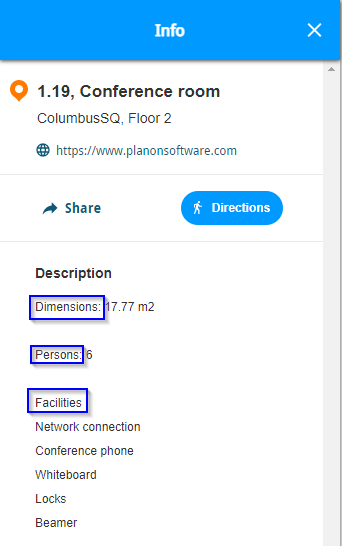
The app contains several translations which can be used to change the labels used in the space description which is send to MazeMap. The translations can be changed in the AppCenter. Select the app and drilldown to ‘Details 🡪 Translations’.
Module settings
The settings for the mobile module page can be found in the TSI AppCenter.
Go to the AppCenter or Apps TSI.
Select the app ‘connectformazemap’.
Go to the Details 🡪 Module settings.
Select the module ‘mobilepageservermodule’. Here you can set the module settings for the mobile module:
| Setting | Default Value | Description |
|---|---|---|
| campusID | Mazemap Campus ID to initially center the map. | |
| initialFloorNumber | 0 | Mazemap zLevel (floor) setting for initial map. |
| highlightColor | #4C6DAA | Hexadecimal color for highlighting rooms and desks on the map. Default value is ‘#4C6DAA’ (blue). |
Activation
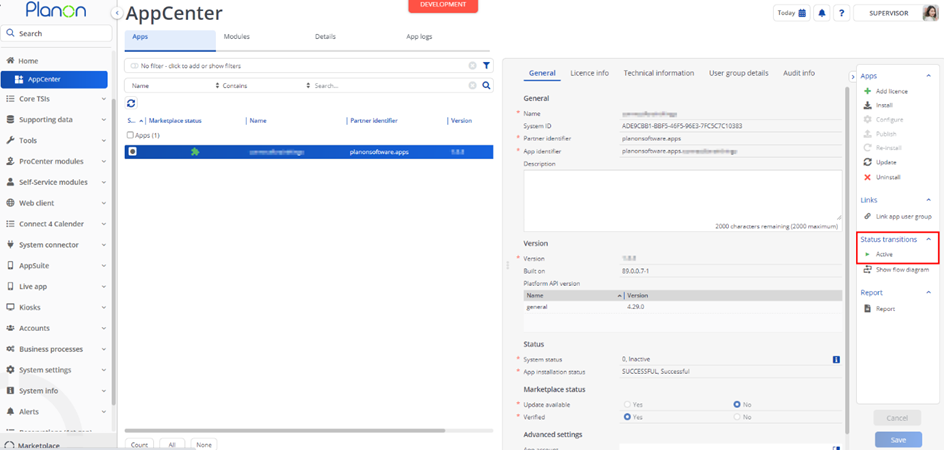
Once the app has been configured, you can activate the app by pressing the Active status transition from the action panel. Always make sure that the required User groups are linked correctly and the Configure action is executed before activating the App.
Planon Configuration
After successful installation and activation of the app we need to configure some components in Planon. It is not mandatory to configure all components, you only have to configured what is needed for your business case.
UploadCampusManifest TSI Action configuration
Open Field Definer TSI
Search BO with system name ‘Property’
Select the base BO (in case searched with UDBO name) and update the status to ‘Under Construction’
Now go to the ‘Details’ level and select the ‘Extended actions’ section.
Click on the ‘Add’ link which is available right side under Extended actions.
After clicking on the Add link a new page will be opened and select the ‘General’ tab.
Here we need to mention our TSI action details.
Select ‘planonsoftware.apps.mazemap.wcx.MazeMapCampusManifestClientExtension’ TSI action class for ‘Web2Client class name’ field.
Partner Identifier, App name, App module name fields will be populated automatically after selecting the Web2Client class name field.
Now, provide a unique name for the ‘System name’ field and provide values for ‘Code’, ‘Icon’ fields.
Now Save the changes.
After saving the changes we get an option to update names for the configured TSI action in different languages.
Provide names in the ‘Translated name’ section and save the changes.
After completing all the above changes now update the base BO status to ‘Completed’.
Now, we need to configure the above TSI action in ‘Layouts’.
Select the TSI action configured BO and click on ‘Jump to Layouts’.
Select the corresponding layout and update the status to ‘Under Construction’.
Add the configured TSI action under the ‘Actions’ section and Save the changes
After saving the changes update the layout status to ‘Completed’.
Now logout and login to reflect the changes.
FloorPlanDrawing TSI action configuration
Open Field definer TSI
Search BO with system name ‘Floor’
Select the base BO (in case searched with UDBO name) and update the status to ‘Under Construction’
Now go to the ‘Details’ level and select the ‘Extended actions’ section.
Click on the ‘Add’ link which is available right side under Extended actions.
After clicking on the Add link a new page will be opened and select the ‘General’ tab.
Here we need to mention our TSI action details.
Select ‘planonsoftware.apps.mazemap.wcx.MazeMapFloorPlanDrawingClientExtension’ TSI action class for ‘Web2Client class name’ field.
Partner Identifier, App name, App module name fields will be populated automatically after selecting the Web2Client class name field.
Now, provide a unique name for the ‘System name’ field and provide values for ‘Code’, ‘Icon’ fields.
Now Save the changes.
After saving the changes we get an option to update names for the configured TSI action in different languages.
Provide names in the ‘Translated name’ section and save the changes.
After completing all the above changes now update the base BO status to ‘Completed’.
Now, we need to configure the above TSI action in ‘Layouts’.
Select the TSI action configured BO and click on ‘Jump to Layouts’.
Select the corresponding layout and update the status to ‘Under Construction’.
Add the configured TSI action under the ‘Actions’ section and Save the changes
After saving the changes update the layout status to ‘Completed’.
Now logout and login to reflect the changes.
POI Upload Task Scheduler
Open Scheduled tasks TSI
Select ‘SYSTASKUSEREXTENSION’ job in Scheduled jobs level
Now, go to ‘Task user extension’ level
Click on ‘Add’ link which is available right side under Scheduled task user extension.
After clicking on the Add link a new page will be opened and select the ‘General’ tab.
Here we need to mention our task scheduler details.
Select ‘planonsoftware.apps.mazemap.tsx.MazeMapPOIsUploadScheduler’ scheduler class for ‘Class name’ field.
Partner Identifier, App name, App module name fields will be populated automatically after selecting the Class name field.
Now provide the Code, Start date-time, Schedule, User fields as per requirement.
After updating the fields save the changes.
After saving we need to update the scheduler status to ‘Active’ and also update the ‘SYSTASKUSEREXTENSION’ job status to ‘Active’ in Scheduled job level.
CreateMazeMapComlog BR configuration
Open the ‘Field definer’ TSI
Search for the Order BO(s) for which you would like to generate MazeMap route optimization comlogs
Select the base BO (in case searched with the UDBO name) and update the status to ‘Under Construction’
Now go to the ‘Details’ level and select the ‘Extensions’ section.
Click on the ‘Add’ link which is available on the right side under ‘Extension usage’.
After clicking on the Add action a new page will be opened, fill out the following details:
Classname: “planonsofware.apps.mazemap.CreateMazeMapComlog”
Event type: AU
Sequence: depening on your configuration
Fill out the settings as described in the settings chapter
Freefield Configuration
As described in the prerequisites the solution requires two free fields to be available in order to work. One on the Properties BO and one on the Floors BO. Both fields should be of the type ‘CodesCodeName’ with the standard ‘YESNO’ picklist linked to it. Please see the webhelp for more details on how to configure freefields in Planon.
Mobile card configuration
Every mobile card is created for a specific Mobile page. When the ConnectForMazemap app is installed and active, the cards become available in the TSI App configuration. Here you can make the card visible, set the position of the card/block on the page and fill the card settings. When the card is made visible and this is saved, the card will appear in the mobile app.
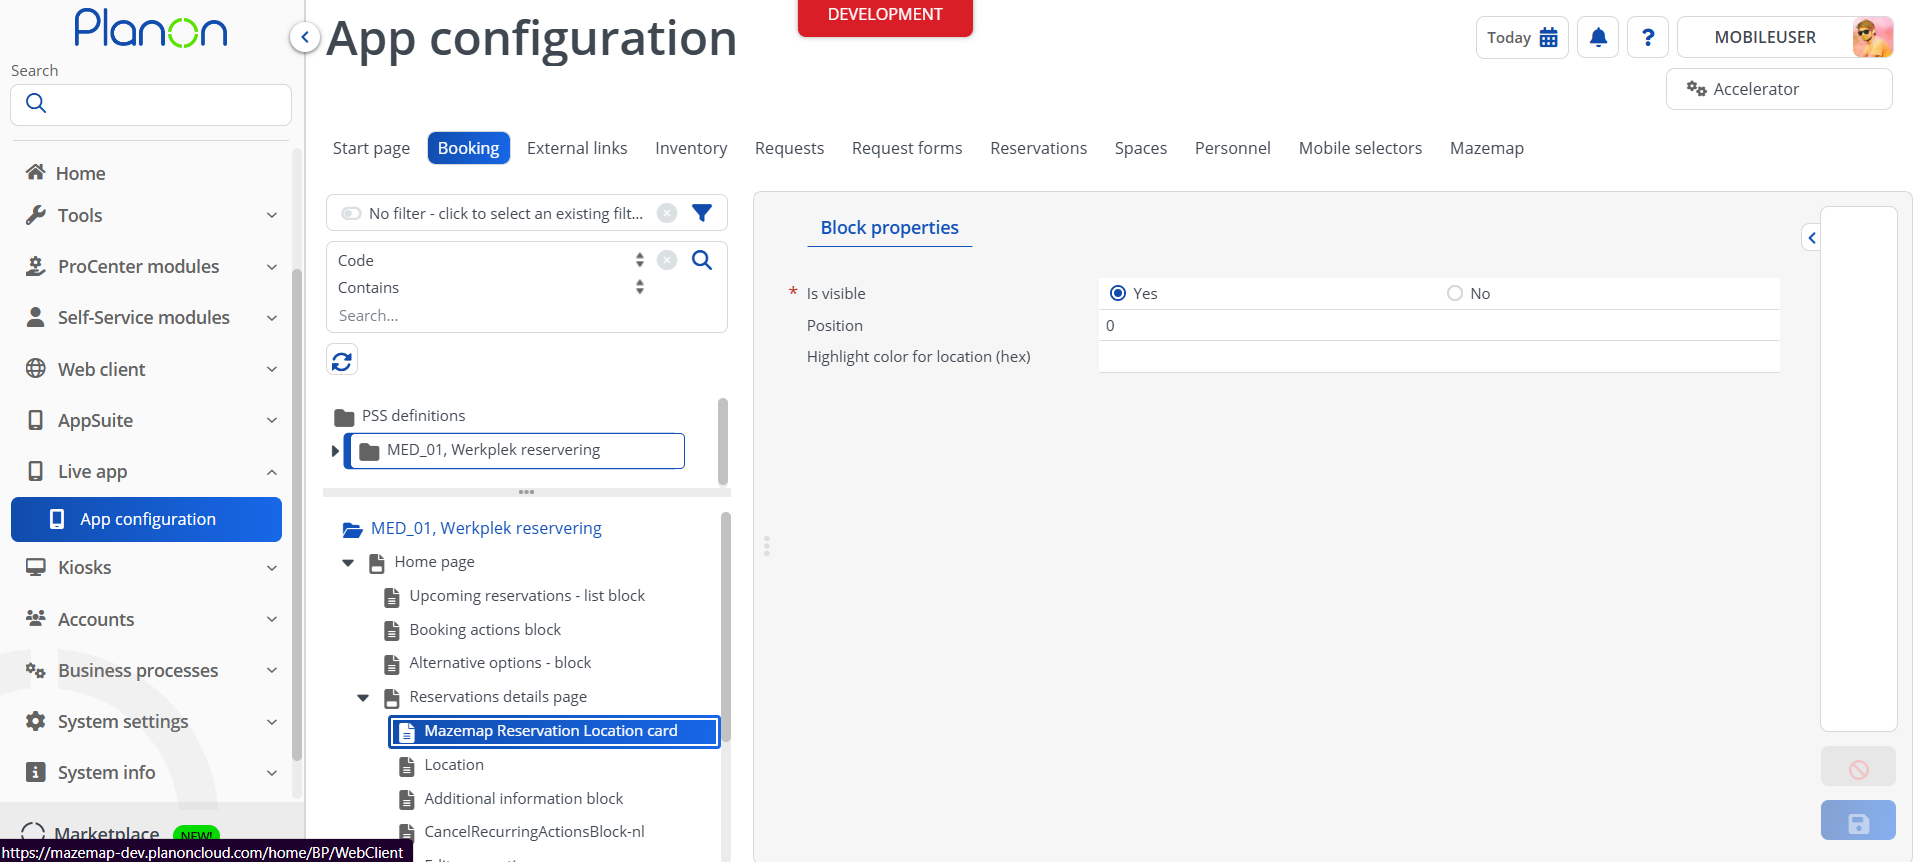
Mobile card settings
Below is a table that outlines the mobile card settings, including the setting name, its default value, and a description of each setting. These settings can be set in the TSI App configuration.
| Setting | Default Value | Description |
|---|---|---|
| Highlight color for location (hex) | #4C6DAA | HEX color of the highlighted room on the Mazemap map. The default color is blue (#4C6DAA). This setting can be used to set a custom color. |
Mobile card module settings
There are also module settings that have to be configured once and is used for all cards in this app. These settings can be found in the TSI AppCenter.
Go to the AppCenter or Apps TSI.
Select the app ‘connectformazemap’.
Go to the Details 🡪 Module settings.
Select the module ‘mobilecardservermodule’. Here you can set the module settings for the mobile cards:
| Setting | Default Value | Description |
|---|---|---|
| poiIdentifierField | Syscode | The field to use as the MazeMap POI identifier. The options are ‘Syscode’ (default) or ‘PropertyAndRoomCode’. |
| mazeMapCampusPropertyMapping | Use this setting to map the MazeMap campus id’s against the property codes in Planon. Example: Planon property code;MazeMap campus id. Split multiple values with comma ,. |
Mobile module configuration
The Mazemap mobile module page can be added to the mobile app, using the following steps.
Make sure the ConnectForMazemap app is installed and active in the AppCenter TSI.
Go to the TSI named ‘TSIs’ and select the ‘Live app – app configuration’ TSI.
Set the TSI under construction by clicking on the lock icon.
Click the ‘+’ at the selection steps and add the selection step ‘Mazemap’.

Complete the action by clicking on the lock icon again.
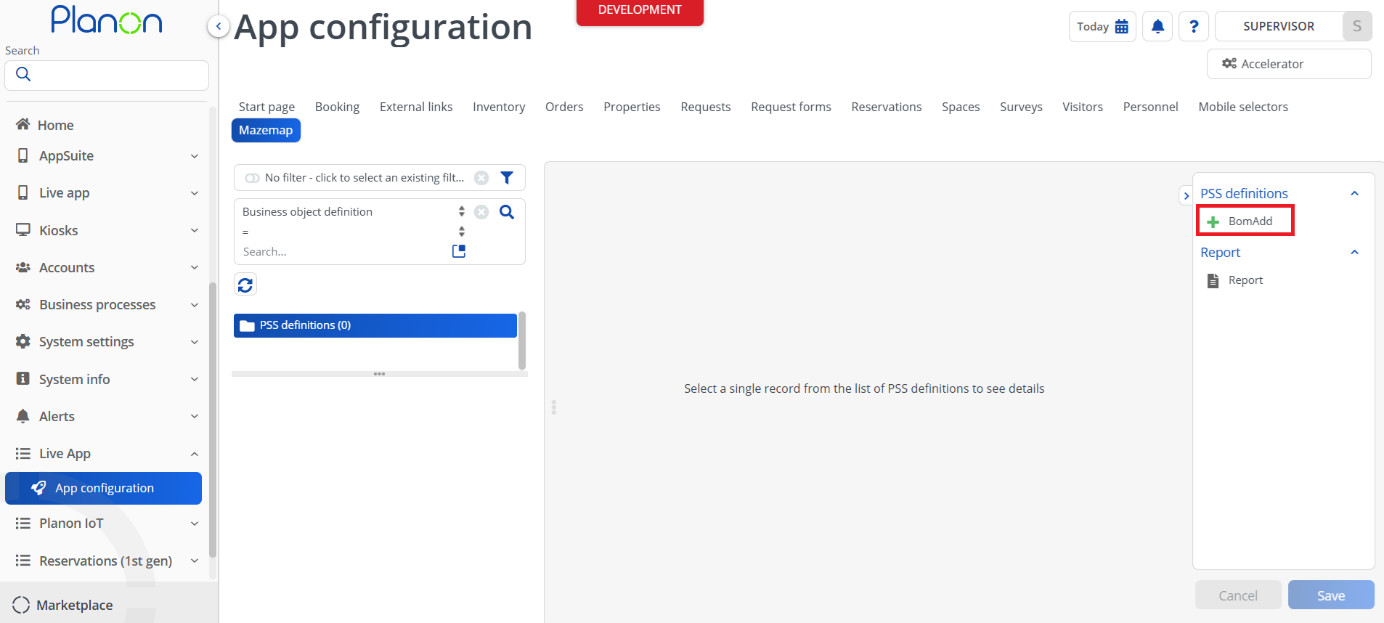
Navigate to the TSI ‘App configuration’ and select the newly added ‘Mazemap’ step.
Add a new Mazemap definition and save.
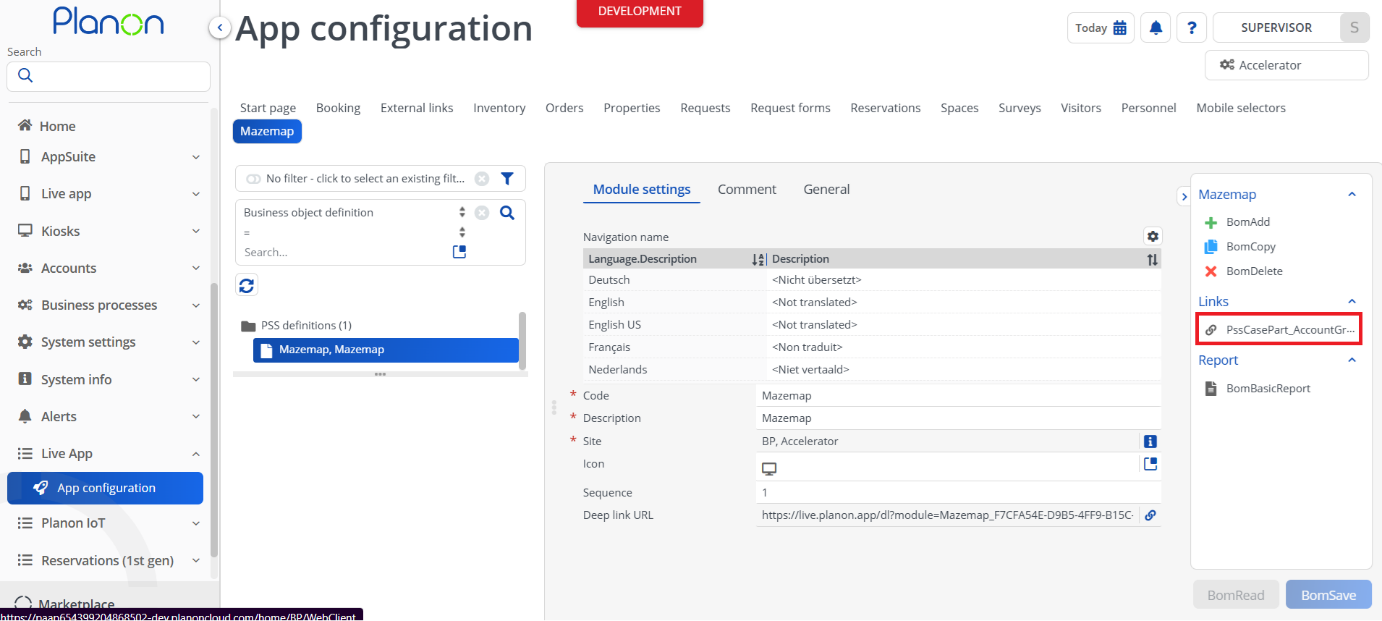
Make sure the new definition is linked to the correct UserGroups, by linking the user groups in the Action menu:
MazeMap configuration
To fully integrate MazeMap and Planon there is also some configuration required on the MazeMap side. MazeMap will need you to provide the following information in order to do a full configuration.
Inform MazeMap once you have send the Manifest, Floor drawings and POIs (for basic data integration)
Provide MazeMap with an Planon access key (for meeting room integration and/or route optimization). See the webhelp on how to generate an access key.
Provide MazeMap with the OAuth login URL (for meeting room integration)
Troubleshooting
Error handling
For all server side component the errors will be written in the logs. Component that also have an UI (like TSI Actions) should also display any errors in the interface.
Additionaly it must be possbile to enable debug logging which provides more insights in the steps that the code carries out.
The required webservices will return the standard HTTP response codes such as 200, 403, 500 etc.