Planon Extension - Automatic User Account creation
Introduction
This document outlines the specification for the Create and Manage Accounts app. This app contains multiple business rules that add extra functionality between Accounts, Persons, and External Accounts.
The main features of this app are:
Create an Account when a Person is created or activated
Update Accounts based on changes to the corresponding Person
Link and unlink a Person to/from an Account when needed
Create and manage External Accounts
This document also describes the installation and configuration of the business rules. It covers the technical installation of the software component(s) and the configuration in Planon.
Prerequisites
Environment
This app is designed to work with Planon L104 and above.
Constraints
N/A
Required (free)fields
N/A
Assumptions
N/A
Features and properties
The purpose of this app is to create and update the Account BO based on the Person BO.
Feature 1: Create Account
When a Person is created, an Account is automatically added and linked to this Person. The Account is linked to the configured Account Groups. Additionally, this rule can also be registered on an update event to restore the Account when a Person is set from an inactive to an active state. A move order can also be generated when a Person is created. This can be controlled by the configuration.
Feature 2: Manage Person and Account data
When the start date or end date of the Person is updated, the Account will also be updated with the corresponding dates.
When the email address of a Person is changed, the email address can also be updated in the User Settings of the corresponding User. The User can decide which email address should be changed based on the app settings.
When the first name or last name of a Person is changed, the Account description is updated based on the setting that determines whether the first name or the last name comes first.
When the status of a Person is changed to an end status (configurable in the app settings), the end date of the Account is set to the day before. For example, if the Person is deactivated today, the Account’s end date is set to yesterday, which means the Account can no longer be accessed from today. If the start date is the same as yesterday, the start date is changed to one day earlier. In addition, the User can choose to end occupancies related to the Person and unlink the related assets.
Feature 3: Unlink Person and Account Group
If the end date of the Account is in the past, the app can unlink the Person and Account Groups from the Account. The User can decide whether to unlink them.
Feature 4: Create and manage External Account
This feature creates and manages External Accounts for Users.
When the email field (configurable) in the User Settings BO is changed, any existing External Accounts referring to the old email address for the configured connections are marked as non-primary. A new primary External Account is then created based on the new email address for the configured connections. This is performed only if the Account belongs to the configured Account User Groups.
How does it work?
This chapter contains a more in-depth description of the app.
Create Account
The app comes with a Business Rule that triggers on create or update of a Person Business Object. The Business Rule needs to be configured on the Person BO. The details of the configuration can be found in chapter 5.3.1
The Business Rule does the following:
Creates Account BO and links the Account to the Person
Update Account Settings
Links Account to the configured User Groups
Create External Account for the configured connections
All the required configuration details can be found under the chapter 5.2.1
Manage Person and Account Data
This needs a Business Rule that must be configured on the update of a Person Business Object. The details of the Business Rule configuration can be found in chapter 5.3.2
This Business Rule checks if the fields FirstName, LastName, Start date, End date, and Email of the Person are changed. If any of the fields are changed, the new values are updated on the Account BO or Account Settings BO
When a Person is deactivated (i.e., the status of the Person is changed to an end status (configurable)), the Business Rule does the following steps
Set end date on the corresponding accounts.
The end date of the Account is updated to the day before. That is, if the Person is deactivated today, the Account is updated with yesterday’s date. If the start date is yesterday’s date, then it is moved one day earlier.
End occupancies
A Person can have occupancies indicating the occupancy details of the spaces and workspaces. If the Person that is deactivated has any occupancies, these occupancies are ended with the current day. The User can decide whether to end occupancies, based on a setting.
Unlink Assets
The app also supports unlinking the assets from the Person that is deactivated. It clears the Person reference on the related assets.
Unlink Person and Account Group
In order to unlink the Person and Account Groups from the Person, one can use the Business Rule that needs to be configured on the Account Business Object.
The Business Rule triggers on the update of the Account BO. It checks whether the end date of the Account BO is in the past compared to the current day.
If the end date is in the past, then it removes the links between:
Account and Person
Account and Account Groups
Create and Manage External Accounts
In order to create an External Account for an Account, one can use the Business Rule coming with the app.
The Business Rule checks if the email field on the Account Settings has a value and the Account belongs to one of the configured Account Groups.
If both conditions are met, the rule creates new External Accounts with the new email for each external connection configured and marks them as primary.
All the old External Accounts of the corresponding Account under the configured connections are marked as non-primary.
Installation
This chapter describes the steps required to install this app on your Planon environment.
Installation Process
There are two ways to install the app:
- Using the Marketplace
- Manual installation
Install the app by using the marketplace
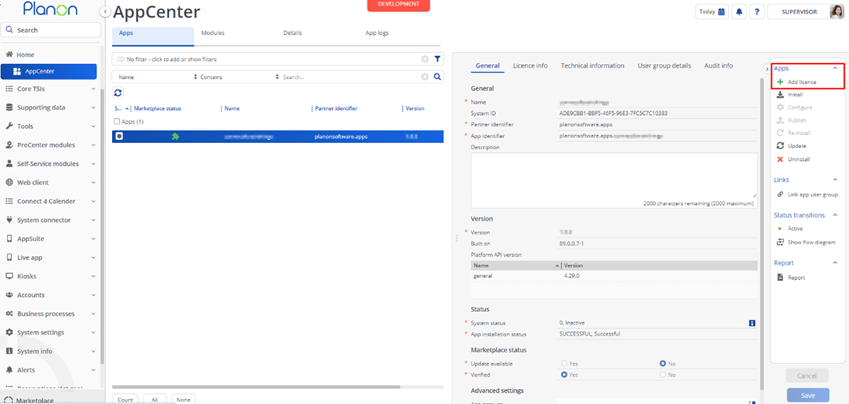
In case your environment is configured to use the Planon app store the only thing required to install the app is to add the app license in the AppCenter TSI. Planon will automatically download and install the app.
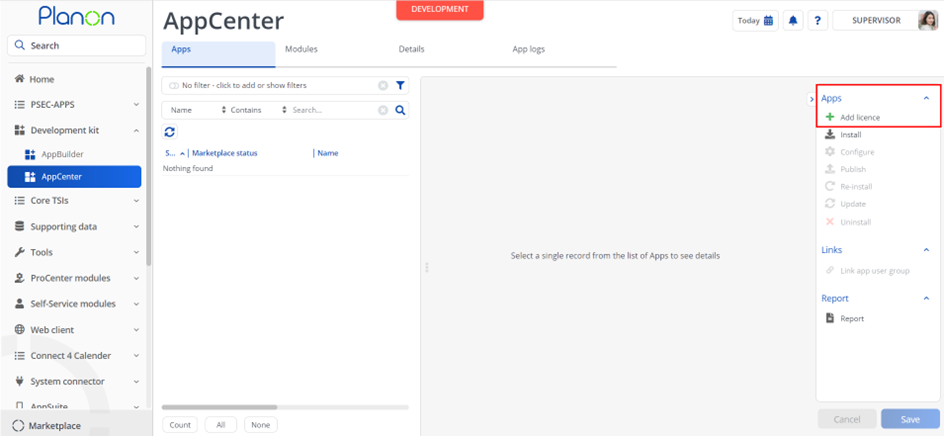
Manual installation
In case you want to perform a manual installation follow the steps below.
- Open AppCenter TSI from Planon webclient and click on install from action menu
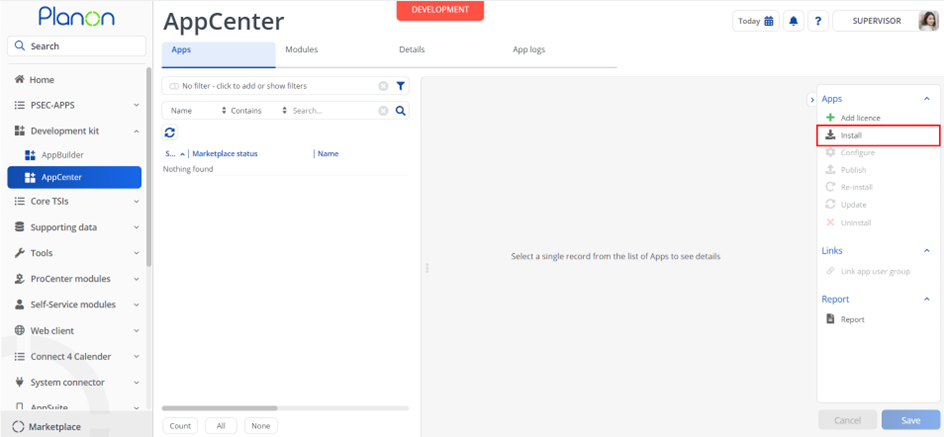
- Browse to the .ppk file
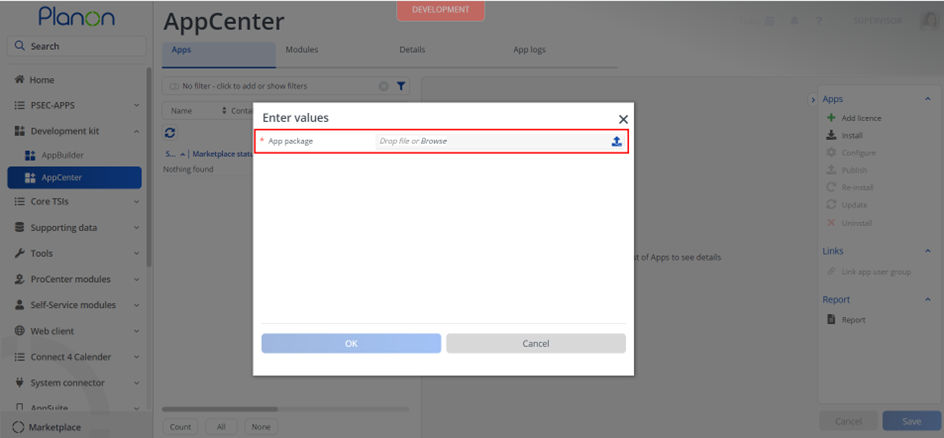
- Click OK to install the app and follow the installation process
- When the app is successfully installed, the app will appear in the AppCenter
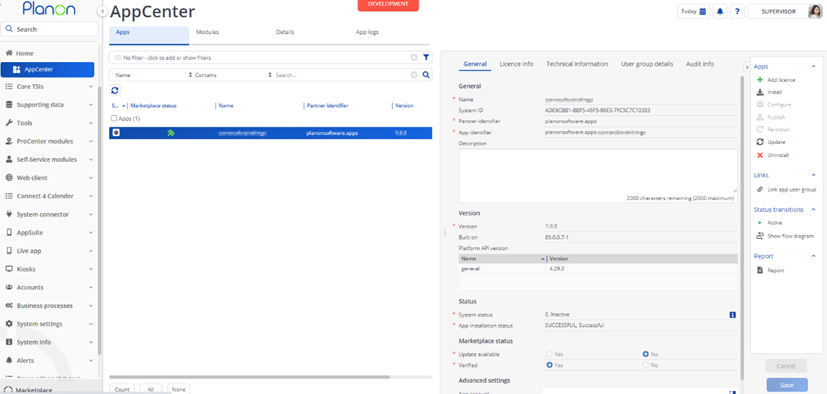
- Add the app license in Apps TSI
Activation
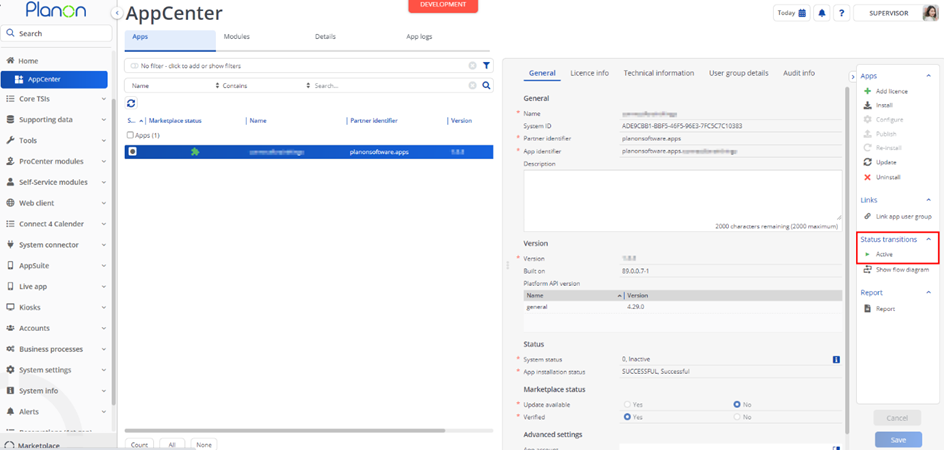
Once the app has been configured, you can activate the app by pressing the Active status transition from the action panel. Always make sure that the required User groups are linked correctly and the Configure action is executed before activating the App.
App settings
Configure the App settings (called ‘Module settings’) by following the steps below.
In the TSI ‘AppCenter’, select the app and drill down to the selection step Details.
Select ‘Module settings’ in the submenu and select the App settings.
On the right, you can view and edit the App settings.
Create Account
| Setting | Explanation |
|---|---|
| createMoveOrder | Create move Order When set to yes, a move order and move line will be created when a new Person is added. |
| fillBccEmailAddress | Fill BCC email address Fill the BCC email address in User Settings (true/false). |
| fillReplyEmailAddress | Fill Reply email address Fill the Reply email address in User Settings (true/false). |
| get24NotationField | 24 Hour Notation Field (if configured) The free field on the Personnel business object from which to get the users “Use 24hour notation” (Use24HoursDateFormat field from type CodesCodeName). |
| get24NotationFieldDefault | 24 Hour Notation Default Default value for 24NotationField on the Account. |
| getAccountNameField | Account name Field Field on the Personnel Business Object from which to create the User’s “User name” (AccountName) field. |
| getAccountSettingPrefix | Account name Prefix Prefix to add in the Account name before creating the Account. |
| getDefaultMeasurementUnit | MeasurementUnit Default Default value for MeasurementUnitField on the Account. |
| getErrorMessage | Error Message This message is shown when a User with an Account Name retrieved from a Person already exists when inserting a new Person or updating a Person to an active state. |
| getExtAccountAppConnectionName | C4C app connection name The name of the C4C App Connection reference on the External Account BO. If empty, the External Account will not be created. Multiple connections can be configured, each separated by a semicolon. |
| getLanguageDefault | Language Default The default Language for the new Account. |
| getLanguageField | Language Field The Language Code field on Person. |
| getMeasurementUnitField | MeasurementUnit Field (if configured) The free field on the Personnel business object from which to get the users measurement unit. |
| getPersonTimezoneField | Person TimeZone Field (if configured) The free field on the Personnel business object which to get a user’s timezone settings from (type String). |
| getTimezoneFieldDefault | TimeZone Code Default Default value for TimeZone on Account. |
| getUserGroups | User groups Default User Groups are added to the UDBO field. Multiple UDBOs are separated by a semicolon. |
| personActiveState | Person active state System name of the Person active state |
| standardMoveOrderCode | Standard move order Code The standard move order to create in case the setting ‘createMoveOrder’ is set to yes. |
| userGroupDependantField | System name of the field on Person BO based on which the User Groups are linked. When this is empty, dynamic User Group linking is skipped. |
| dynamicUserGroups | Use this to configure User Groups to link to the User based on the value of the field configured in the setting ‘userGroupDependantField’. Example value: “Value1=UserGroupA,UserGroupB”,“Value2=UserGroupA,UserGroupC”,“Value3=UserGroupD”. To configure this, click View Code in the top-right corner of the settings. |
Manage Person And Account
| Setting | Explanation |
|---|---|
| endPersonStatus | When a Person’s status changes to this status, update the End Date on the Account and trigger additional logic. |
| unlinkAssets | Set to Yes to clear the Person reference field on Person assets. |
| endOccupancies | Set to Yes to set an end date on Person occupancies. |
| updateReplyEmailAddress | When this is set to yes, the reply email address on the Account Settings is updated when updating the email address of the Person related to the Account. |
| updateSenderEmailAddress | When this is set to yes, the sender email address on the Account Settings is updated when updating the email address of the Person related to the Account. |
| updateBBCEmailAddress | When this is set to yes, the BCC email address on the Account Settings is updated when updating the email address of the Person related to the Account. |
| updateContactEmailAddress | When this is set to yes, the contact email address on the Account Settings is updated when updating the email address of the Person related to the Account. |
| useFirstNameIntheBeginning | If set to yes, the first name is used at the beginning of the Account description. |
| accountNameField | Account name Field Field on the Personnel Business Object from which to update User’s “User name” (AccountName) field on the linked User. |
Unlink Person and AccountGroup Settings
| Setting | Explanation |
|---|---|
| unlinkAccountGroups | Unlink AccountGroups (yes or no) Whether or not to unlink the AccountGroups from the Account when the Account is disabled. |
| unlinkPerson | Unlink Person (yes or no) Whether or not to unlink the Person from the Account when the Account is disabled. |
Create and manage external account
| Setting | Explanation |
|---|---|
| extAccountAppConnectionName | C4C App Connection Name. The name of the C4C App Connection reference on the External Account BO. If empty, the External Account will not be created. |
| userSettingEmailField | Email field in the User Settings BO, where this Business Rule should retrieve the email address from. (Default value: ExchangeEmailAddress) |
| userGroups | System name of user groups to which users are linked who need the external accounts |
Planon Configuration
Log in to Planon ProCenter using the supervisor account (or any account with sufficient rights to ‘UI Configuration’).
Go to TSI Field definer.
Configuration for Create Account
Select the Business Object with system Person.
Set the status of the Business Object to Under Construction.
Select the UDBO for which the Account needs to be created.
Go to the selection level ‘Details’ and select the selection step ‘Extensions’.
Click ‘Add’ in the Action Menu and create the action with the following details.
| Property | Value |
|---|---|
| Class name | planonsoftware.apps.CreateAccount |
| Event type | AI, AfterDBInsert and/or AU, AfterDBUpdate |
| Sequence | Desired execute sequence number for example: 10 |
Go back to the selection level ‘Business objects’.
Set the status of the Business Object to ‘Completed’ via the Action Menu.
Configuration for Manage Person And Account Data
Select the Business Object with system Person.
Set the status of the Business Object to Under Construction.
Select the UDBO for which the Account and Person need to be managed.
Go to the selection level ‘Details’ and select the selection step ‘Extensions’.
Click ‘Add’ in the Action Menu and create the action with the following details.
| Property | Value |
|---|---|
| Class name | planonsoftware.apps.ManagePersonAndAccountData |
| Event type | AU, AfterDBUpdate |
| Sequence | Desired execute sequence number for example: 12 |
Go back to the selection level ‘Business objects’.
Set the status of the Business Object to ‘Completed’ via the Action Menu.
Configuration for UnlinkPerson and Account Groups
Select the Business Object with system Account.
Set the status of the Business Object to Under Construction.
Go to the selection level ‘Details’ and select the selection step ‘Extensions’.
Click ‘Add’ in the Action Menu and create the action with the following details.
| Property | Value |
|---|---|
| Class name | planonsoftware.apps.UnlinkPersonAndAccountGroup |
| Event type | BU, BeforeDBUpdate |
| Sequence | Desired execute sequence number for example: 10 |
Go back to the selection level ‘Business objects’.
Set the status of the Business Object to ‘Completed’ via the Action Menu.
Configuration for Create And Manage External Account
Select the Business Object with system UserSettings.
Set the status of the Business Object to Under Construction.
Go to the selection level ‘Details’ and select the selection step ‘Extensions’.
Click ‘Add’ in the Action Menu and create the action with the following details.
| Property | Value |
|---|---|
| Class name | planonsoftware.apps.CreateAndManageExternalAccount |
| Event type | AU, AfterDBUpdate |
| Sequence | Desired execute sequence number for example: 10 |
- Go back to the selection level ‘Business objects’ and set the status to ‘Completed’.
Troubleshooting
Error handling
- Errors are recorded in the server logs:
- Tomcat log for web components
- Webpages
- PSS modules
- Stepview
- TSI Action
- JAX-RS webservices
- Wildfly log for server-side components
- Business rules
- Scheduled tasks
- Workers
- Event Connector
- Tomcat log for web components
- UI components (TSI Actions) also display errors in the interface