Planon Extension - Kanban Board
Introduction
This document outlines the functionality of the Extension for Kanban board app.
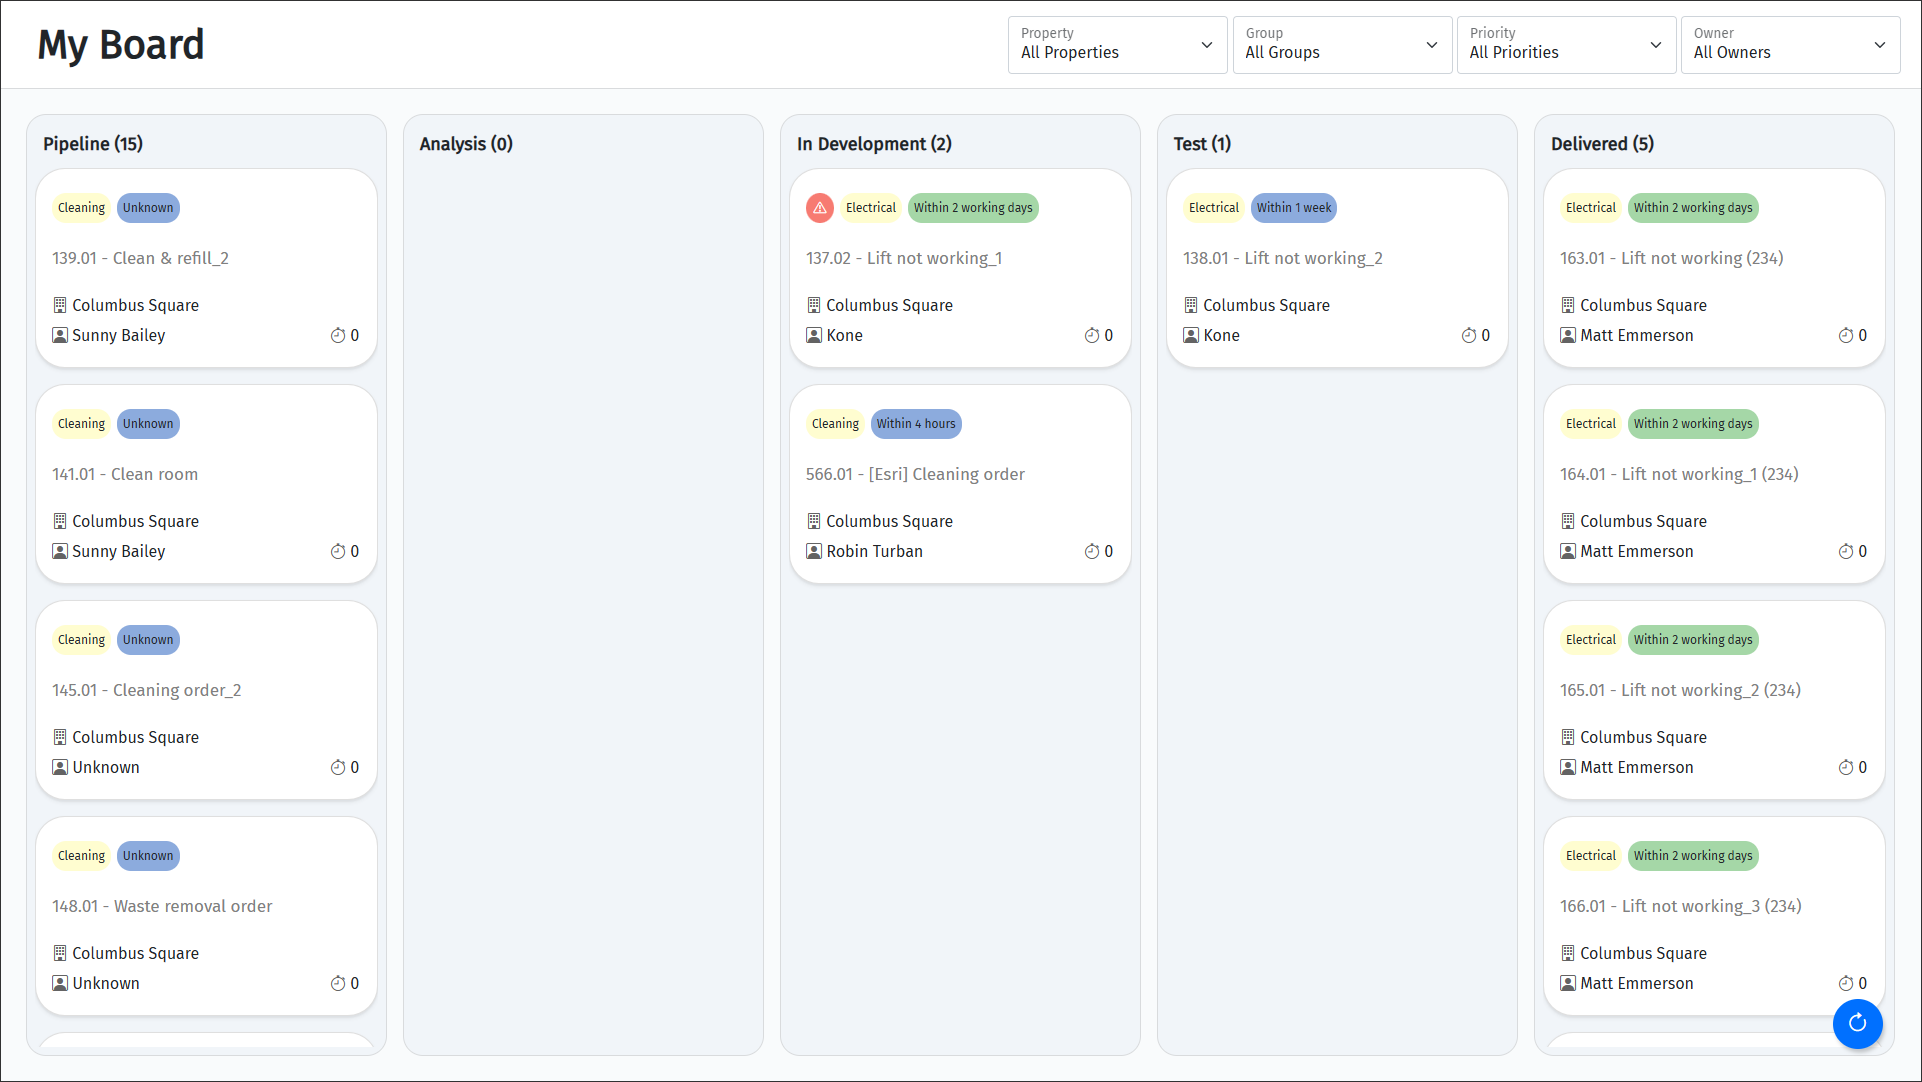
The kanban board app contains a web page that allows to categorize Orders/Request in up to 5 different statuses. This allows to get a quick overview of a team workload. Additionally the cards can also be dragged between statuses and filtered. The page can be accessed using a link and passing an access key in the URL.
Prerequisites
Environment
This app is designed to work with Planon L99 and above.
Constraints
The webpage is intended to show the orders / request for per configured webpage
The webpage only supports browsers as supported by the Planon core product (see supported configurations)
The webpage shows a maximum of 5 columns.
When configuring any fields for fieldsToDisplay, if isEditable is not provided, the field by default will not be editable.
When configuring Reference Field for fieldsToDisplay, for it to be editable we must provide subfields and isEditable as true otherwise the field will not be editable. (Please refer settings for example)
When configuring a ReferenceField on FieldsTo display, maximum of only 5 sub fields can be displayed.
In these 5 subfields,
- we cannot configure fields which are not database fields. (find this detail from field definer.) if configured, this field will be ignored.
- we cannot set editable for insertOnly, ReadOnly fields as true, it will be defaulted to false.
- we cannot configure fields of type Image as subfields.
Required (free)fields
N/A
Assumptions
N/A
Features
This chapter describes the features of the extension for kanban board app.
Overview of tasks
The app creates a categorized overview of Orders/Request on a specific BO. The cards can be categorized in a maximum of 5 categories which correspond with a status in the Planon back-end.
Change task status
The displayed cards can be dragged between the columns, this will also change the state of the order/request in the Planon back-end.
Filter tasks
The displayed cards can be filtered on group, priority and owner using the filters in the top of the page. The cards are sorted alphabetically by their names, with everything selected being the default value.
Show and edit task details
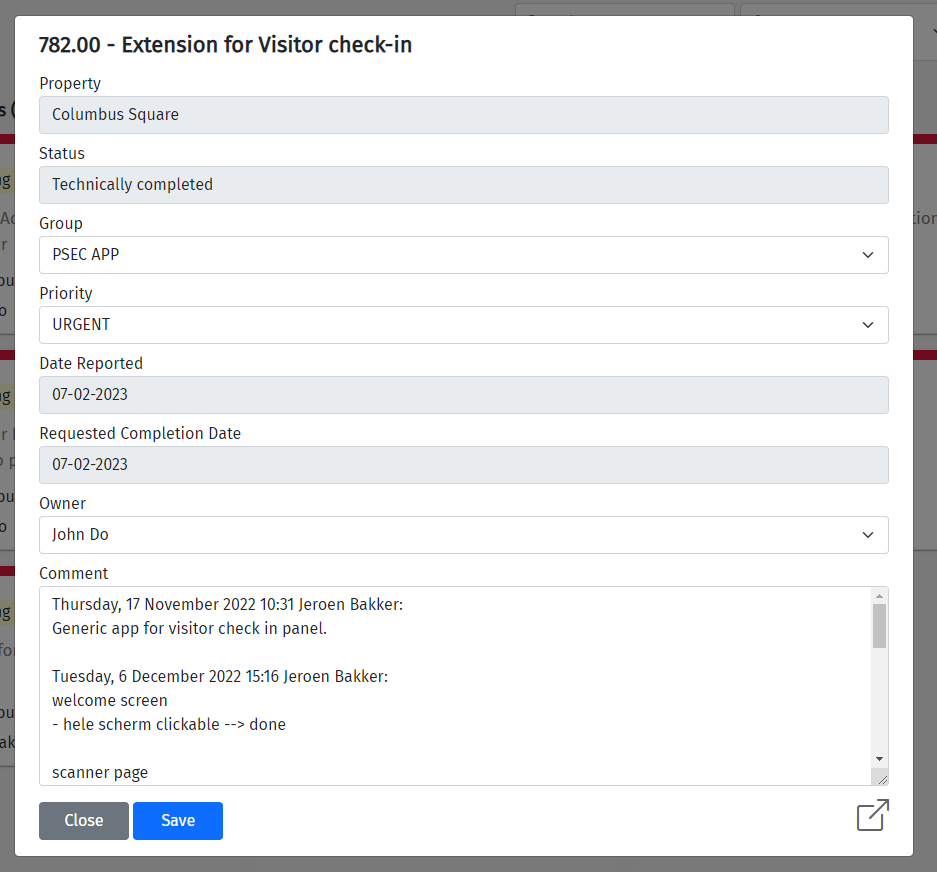
It is possible to show some details of the task and change the fields which are also available for filtering. Additionally, a deeplink to the Planon backend can be accessed from within the detailed view.
How does it work?
This chapter contains the functional and technical description of the features.
Deployment
Once the app is installed and activated, a webpage must be configured through the following planon TSI ‘Web configuration’ to be able to create and configure a webpage that shows a task board.
Most likely the URL will have to be accessed using an access key. In this case a parameter ‘accesskey=
https://webhelp.planoncloud.com/en/index.html#page/Accounts/t_using_access_keys.html
Installation
This chapter describes the steps required to install this app on your Planon environment.
Installation Process
There are two ways to install the app:
- Using the Marketplace
- Manual installation
Install the app by using the marketplace
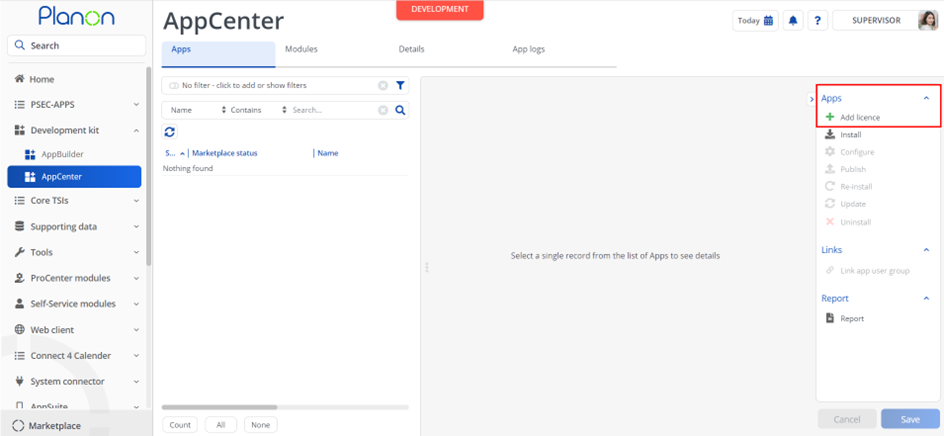
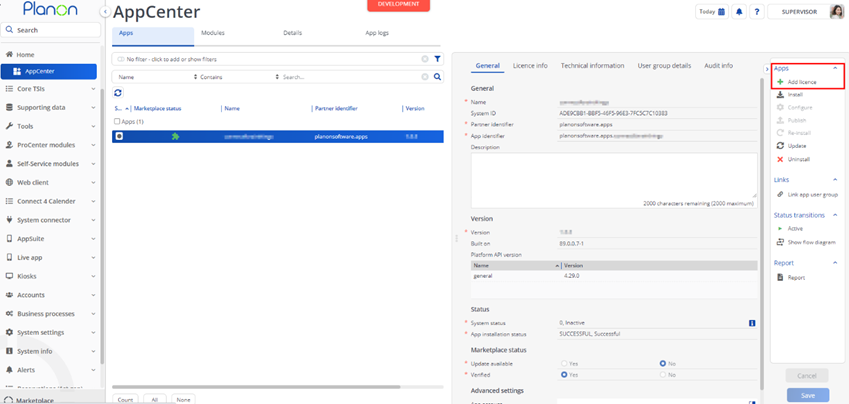
In case your environment is configured to use the Planon app store the only thing required to install the app is to add the app license in the AppCenter TSI. Planon will automatically download and install the app.
Manual installation
In case you want to perform a manual installation follow the steps below.
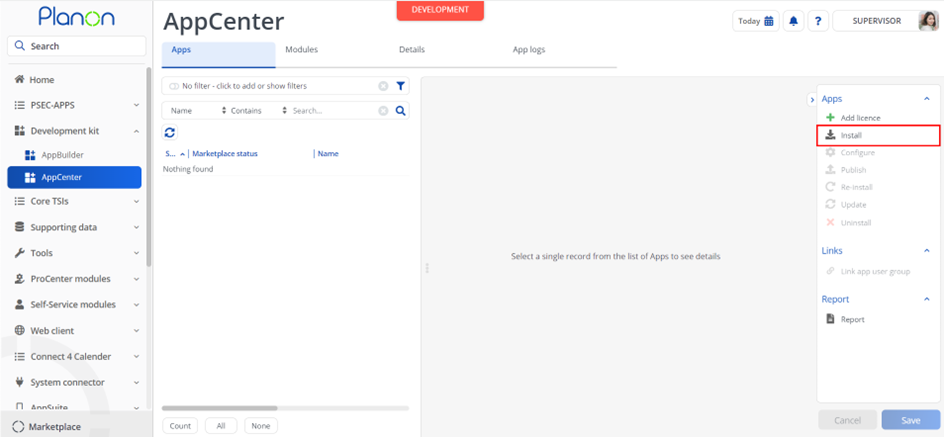
- Open AppCenter TSI from Planon webclient and click on install from action menu
- Browse to the .ppk file
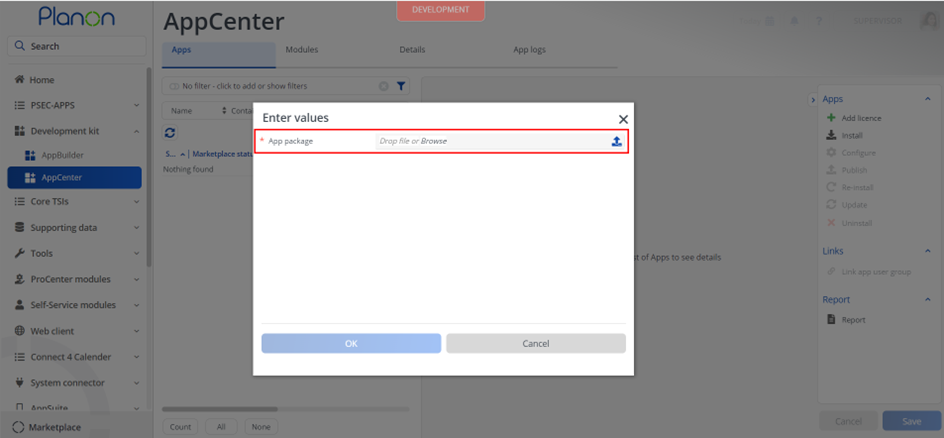
- Click OK to install the app and follow the installation process
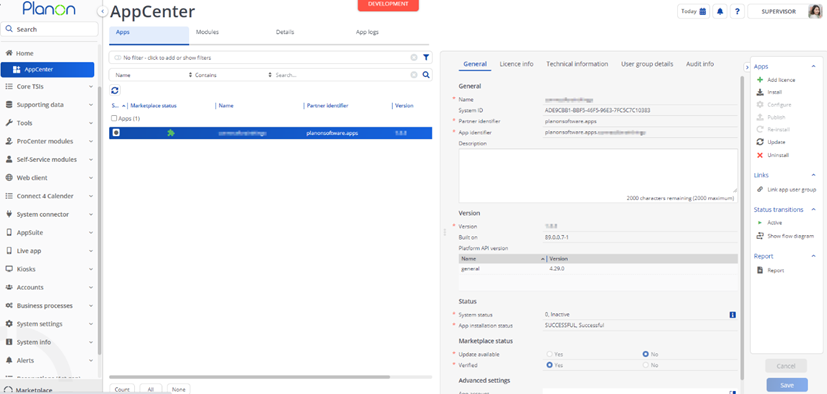
- When the app is successfully installed, the app will appear in the AppCenter
- Add the app license in Apps TSI
Activation
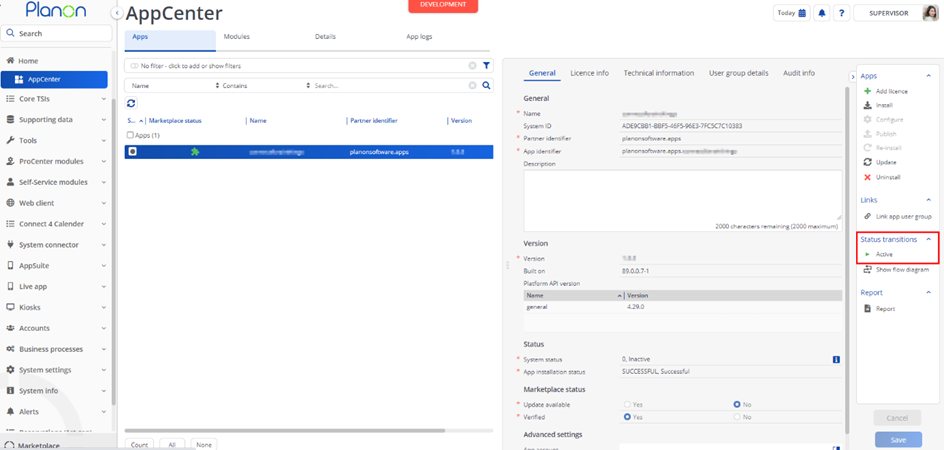
Once the app has been configured, you can activate the app by pressing the Active status transition from the action panel. Always make sure that the required User groups are linked correctly and the Configure action is executed before activating the App.
Configuration
- In order to add/configure the Extension For Kanban App page to Planon, the following steps must be done.
A: Navigate to the following TSI: TSIs.
B: Find the following record within TSIs “ProCenter modules – Web configuration”.
C: Select the found record and set this under construction.
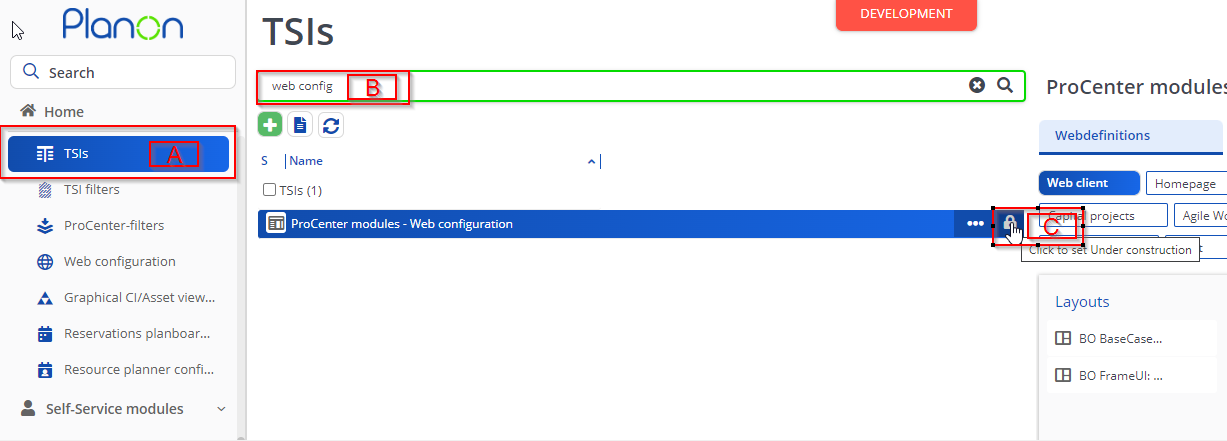
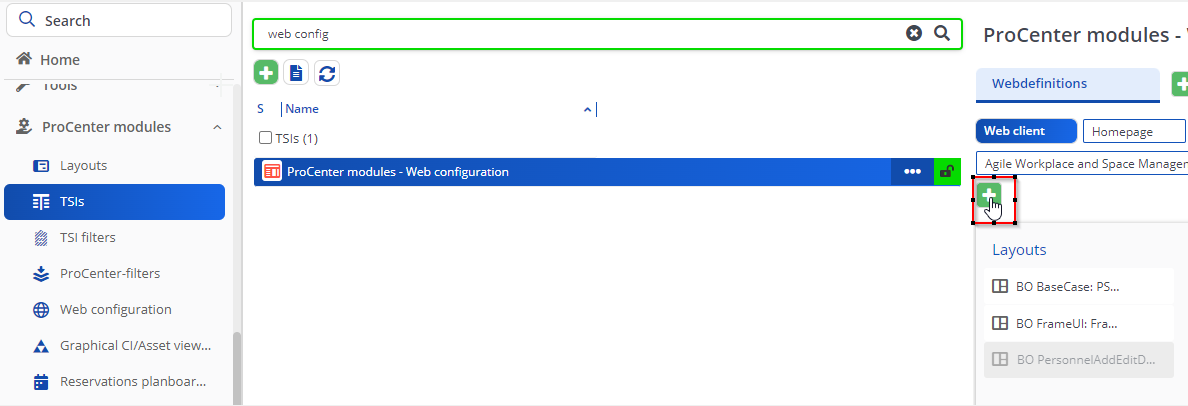
- In order to add/configure PSS KanbanBoard module to Planon you will have to add it as a selection step.
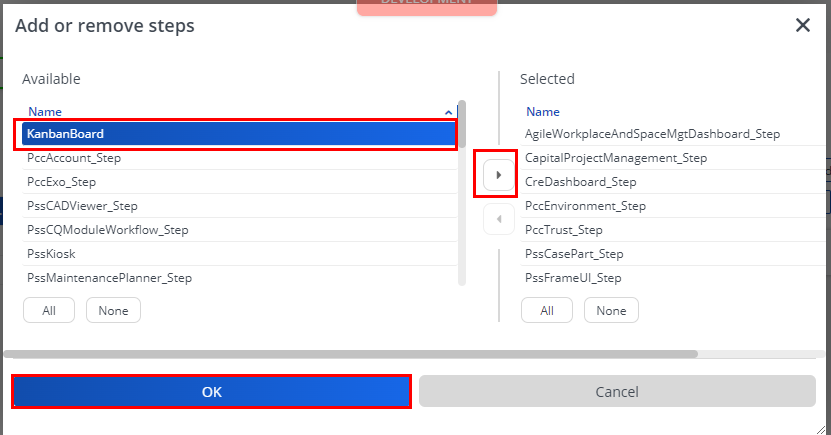
- Add the step KanbanBoard to the selected list
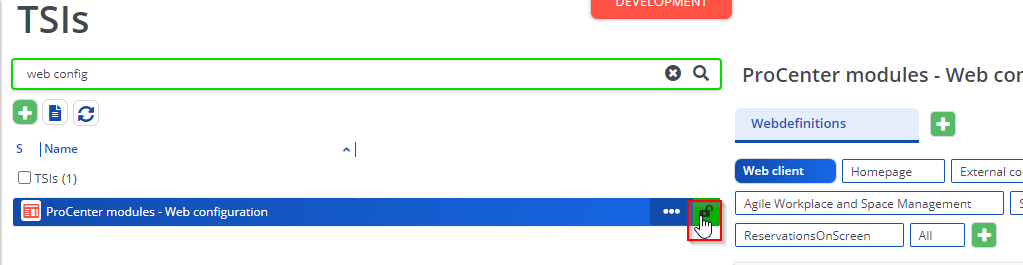
- Set the “ProCenter modules – Web configuration” to completed.
- Navigate to the ‘Web configuration’ TSI and selection step KanbanBoard.
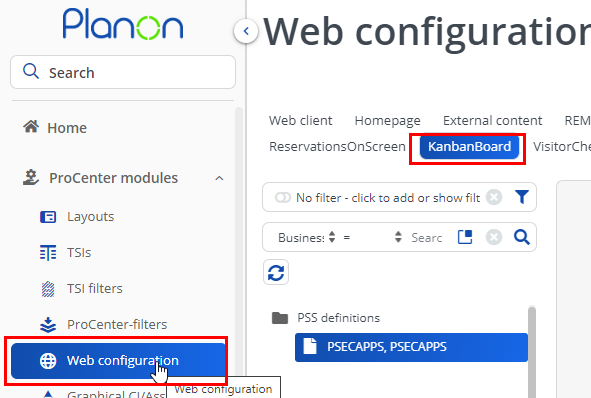
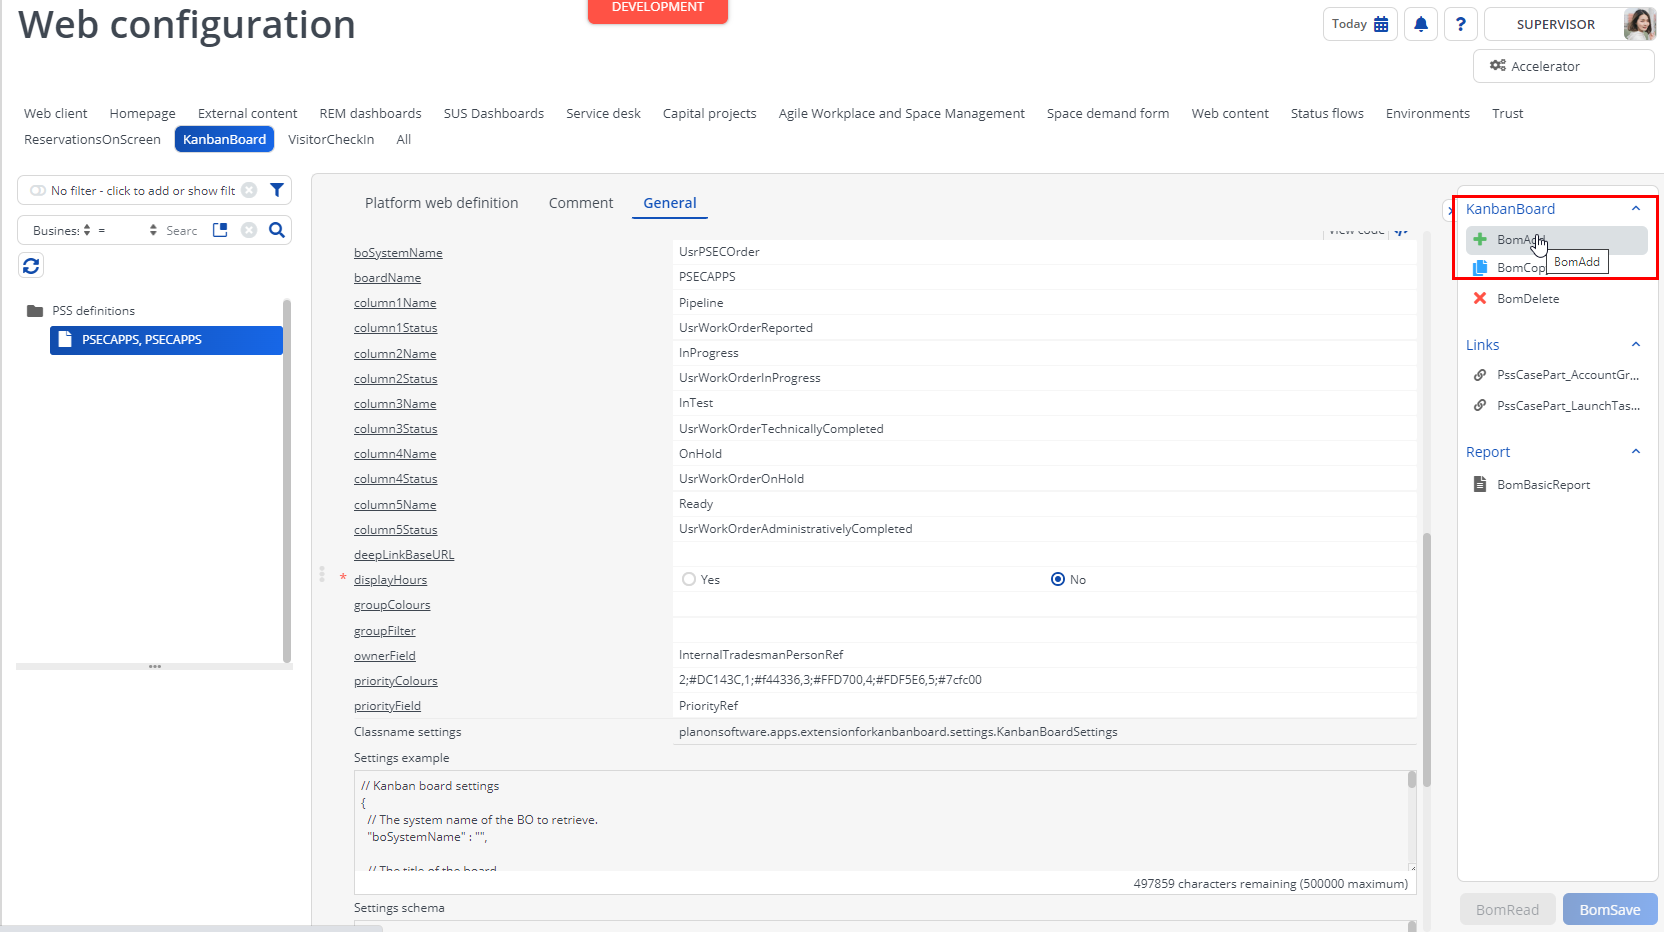
- Now you can add a new definition of your PSS Module in the ‘Web configuration’ TSI and fill the setting according to your liking (on the General tab).
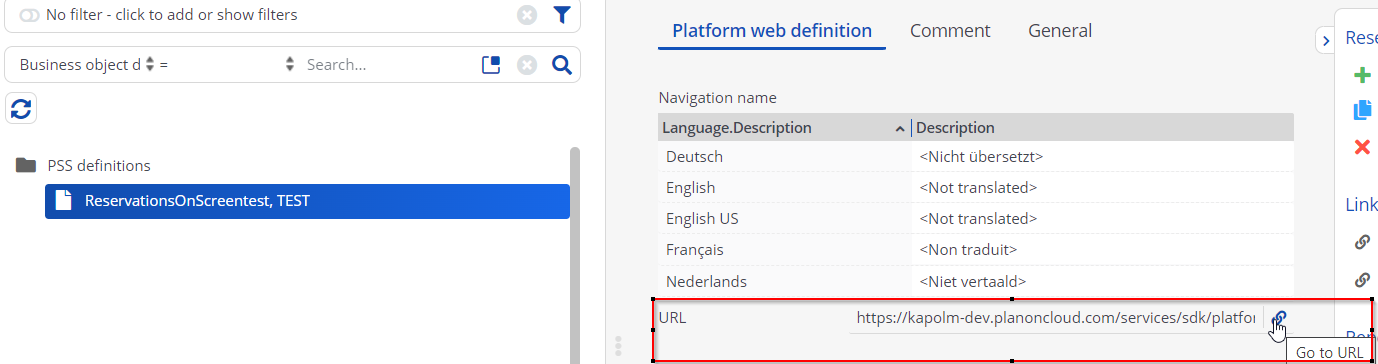
- Visit the webpage by pasting the URL or clicking on the link icon
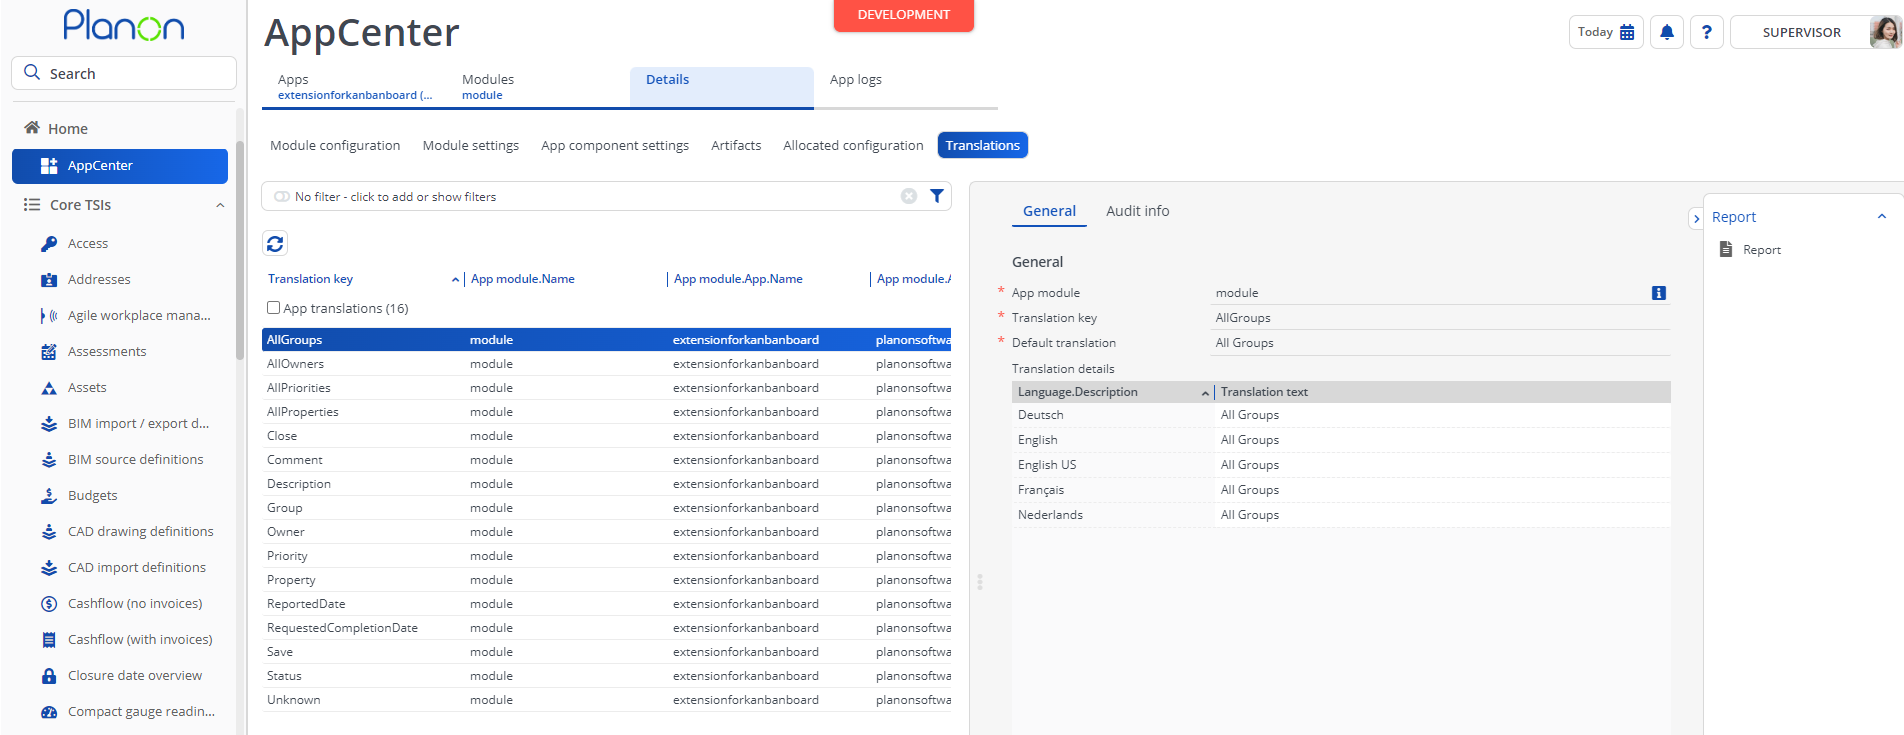
Translations
It is possible to provide a translation for any visible text in the app. Translations can be provided in the AppCenter TSI. Select the app, drilldown to Details, translations.
Third party system configuration
This app does not require any third party system configuration.
App settings
This chapter describes and explains the settings that are available for this app.
Now that the app is installed and configured we can provide the app settings for each webpage we add. In the TSI ‘Web configuration’, select KanbanBoard and add a definition.
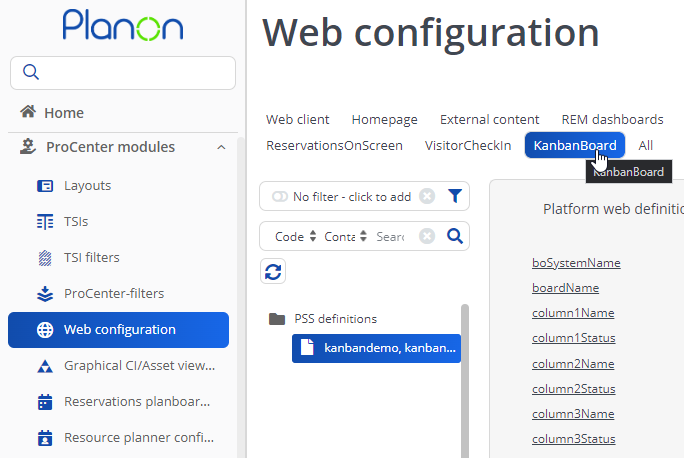
You can add a new definition of your PSS Module in the ‘Web configuration’ TSI and fill the settings according to your liking (on the General tab).
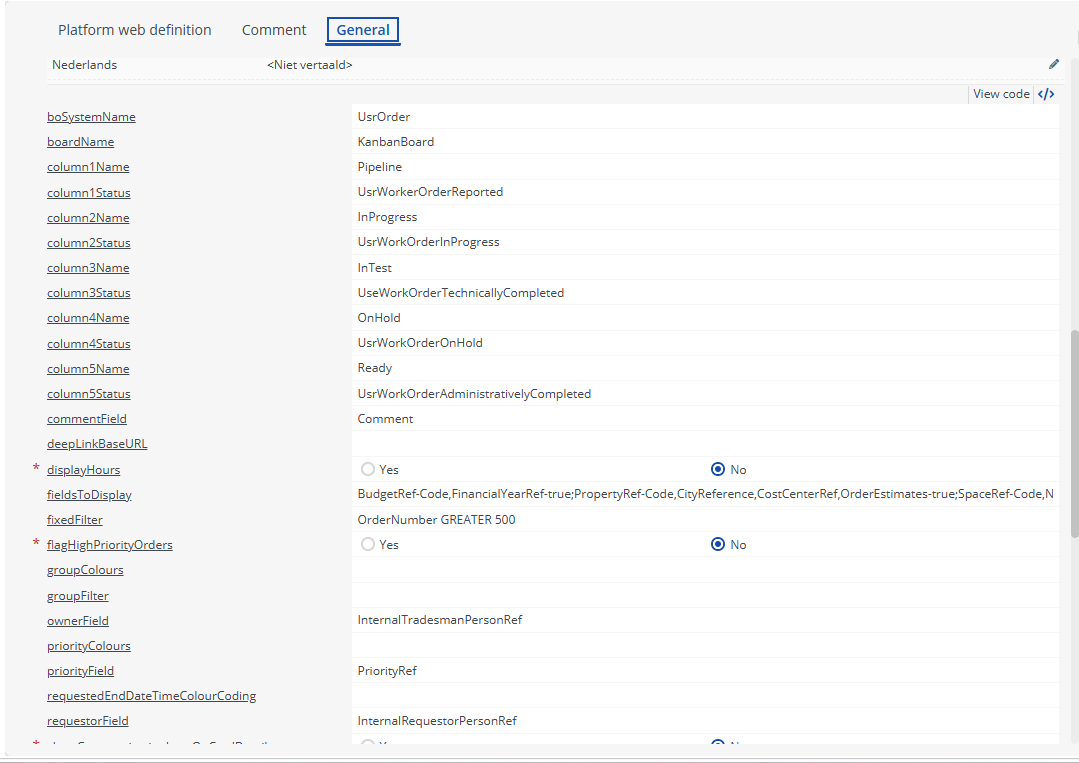
Description of settings
| Setting | Explanation |
|---|---|
| boSystemName | The system name of the BO displayed on the board |
| boardName | The title of the board |
| columnXName | The name of the columns displayed on the board |
| columnXStatus | The system name of the status displayed on the corresponding column |
| deepLinkBaseURL | Use this setting to provide the base URL for deeplinks. The base URL will be appended with ‘OrderNumber:’ containing the order number. So the base URL would for example be ‘https://myplanon-prod.planoncloud.com?dlList_BO=BaseOrder&dlList_NavCode=MY_TSI&dlList_Filter='. See the webhelp for more information about deeplinks. If provided you will be able to jump to the order in the Planon client from the card details panel. |
| displayHours | Set whether to display the total count of related order hours on a card. |
| groupColours | Use this setting to configure colours for each order group which will be shown as a label in the card. Format is ‘Group Code;CSS colour code’. Comma seperated. |
| groupFilter | Provide the composite codes of the groups to query in the dashboard (comma separated). |
| ownerField | The card owner field. Should be of type PersonRef. |
| priorityColours | Use this setting to configure colours for each priority which will be shown as a bar on top of the card. Format is ‘Priority Code;CSS colour code’. Comma separate |
| priorityField | The systemname of the field on Order BO to use for the priority filtering. This has to be a reference field or code/descriptive field. |
| showCommunicationLogsOnCardDetails | When set to ‘yes’ the communication logs of the order will be shown in the card details. When set to ’no’ the order comment field will be shown. |
| requestedEndDateTimeColourCoding | Use this setting to apply colour coding based on the requestedEndDateTime field. When the remaining time (in minutes) is within the specified range the colour will be applied on the card. The format is lower range (in min);upper range (in min);hex colour code. Multiple values possible (comma seperated). Please note either priorityColors OR requestedEndDateTimeColourCoding can be used. |
| fixedFilter | Use this setting to apply a fixed filter on the board. The format of the setting is ‘field systemname operator value’. For example ‘PropertyRef EQUAL 14’. For NULL and NOT_NULL operators, the format is ‘field systemname operator’. For example ‘WBSItemRef NULL’ and SpaceRef NOT_NULL. Multiple values (in case of IN operator) can be combined using ‘,’. Multiple filters can be combined using the ‘and’ keyword. Reference fields will be filtered based on the lookup field of the referenced business object (usually ‘Code’). Supported operators - EQUAL - NOT_EQUAL - LESS - LESS_EQUAL - GREATER - GREATER_EQUAL - IN - NOT_IN - CONTAINS - STARTSWITH - NOT_STARTSWITH - ENDSWITH - NOT_ENDSWITH - NULL - NOT_NULL |
| userDetailsFieldOnComlog | Use this setting to decide whether to show the user name or the description of the user who added the comlog on the order. Supported Values Accountname or Description |
| flagHighPriorityOrders | When this setting is set to ‘Yes’ orders that are marked as High Priority (based on the field ‘HighPriority’) will be marked on the board and placed on top. |
| fieldsToDisplay | Use this setting to configure the fields that are displayed on the card details and the order details card. Provide the list of fields (separated by “;”). Each field contains 2 elements (3 elements for reference fields) separated by hyphen (-). Configuration details: => Non-reference fields: <SystemName of the field>-<true or false, defining whether the field is editable>=> Reference fields: <SystemName of the reference field>-<comma-separated fields from the referenced BO>-<true or false, defining whether the field is editable>.Example: OrderNumber–false;RequestedEndDateTime-false; PropertyRef-Code,SpaceRef,Description-true A default value is provided out of the box: PropertyRef-Code,Name-false;SpaceRef-Code,Name-false;RefBOStateUserDefined-Name-false;OrderGroupRef-CompositeCode,Name-true;PriorityRef-Code,Description-true;InsertDateTime-false;RequestedEndDateTime-false |
Troubleshooting
This chapter describes common things and known issues to check in case the app is not working as expected.
Error handling
For all components the errors will be written in the server logs. For this app this can be either in the Tomcat or WildFly logging.