Planon Extension - Key Management
Introduction
The standard Planon Key Management module Core – Access only offers rudimentary means of managing locking systems, keys and cylinder locks. Therefore the existing features will be expanded and supplemented by new configuration and implementation (PaaP-App).
The following functionality should be covered in this App:
Maintaining data for locking systems, cylinder locks and key sets, keys
Issuing key sets and keys (using Service Requests)
Via PSS – Planon Self Service
In the backend
With signatures and transaction documents
With historic data for each key / key set
Reporting
Lock Plan
Transaction reports
This will be done within two new TSIs Access and Key Distribution, which will be based on Core – Access and Core – Orders respectively. The two TSIs will be grouped in the new navigation group Key Management.
This document will describe both the available functionality and the setup of the system that is necessary in addition to (and after) installing the PaaP App.
Prerequisites
Environment
This solution will be designed to work with Planon Live L132 and above.
Constraints
The customer needs to have a licence for the Standard Key Management in Planon.
Required (free)fields
This app requires some configurations to be made prior to the installation of the app.
They will be described in the chapter Planon configuration in the Fields subchapters.
Assumptions
This design and functionality of the solution is based on the assumption, that the configuration described installation and planon-configuration has been done.
Features
Access
The TSI Access allows the user to maintain all their locking systems, including keys, locks, key storage, key sets, key definitions and lock definitions. Furthermore it shows all transactions of keys as well as a lock plan to visualize the hierarchies between different key and lock definitions. Several reports are also available.
Reports
For most of the above mentioned (User Defined) Business objects a report is provided, which merely contains some standard columns. Through drill down and filtering it is highly configurable to the users needs, e.g. a list of all currently issued keys might use the same template as a list of all lost keys, if the user filters for issued / lost keys before executing the report. The title then can or should also be adjusted to reflect the contents accordingly.
Level Locations
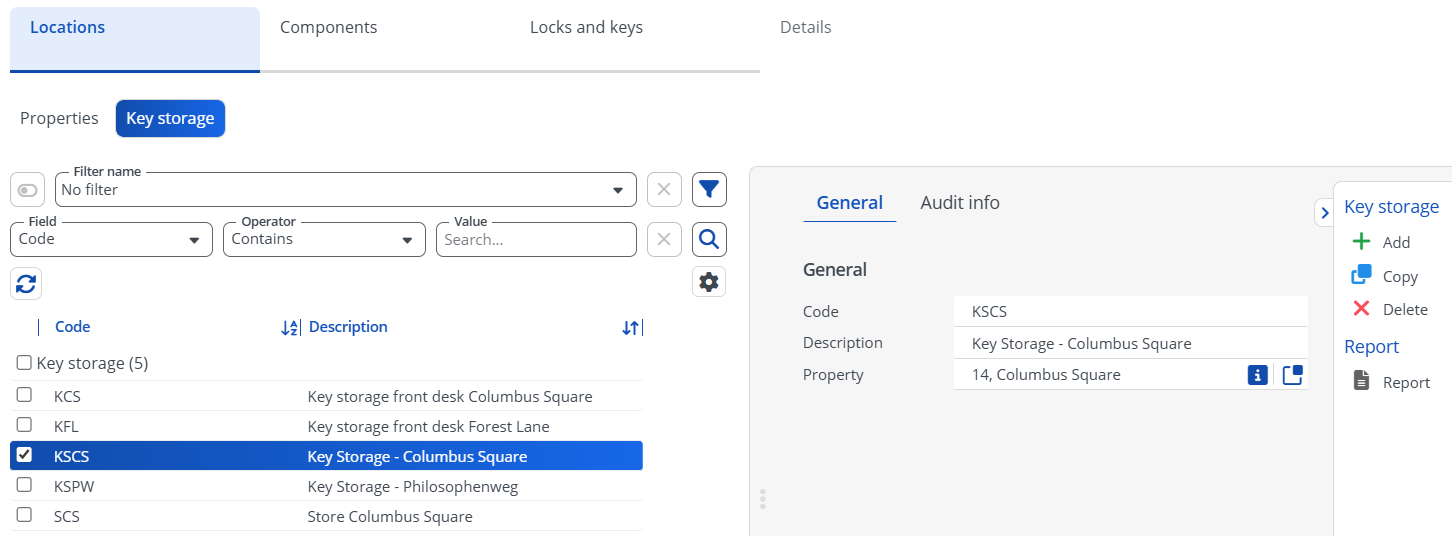
In the step Properties the user can select for which property he would like to see the locks and keys. Alternatively in step Key storage he can choose for which key storage he would like to see them. Here the key storages can also be added and maintained.
Level Components
On this level lock definitions, key definitions and key sets can be created and maintained. A key set is a collection of several case that will be issued together, e.g. an employee might need several keys for multiple buildings he needs access to. Lock and key definitions define the type of lock/key, of which there then might be several identical locks/keys, which can be created and maintained in the next level. All three steps can also be used to further filter down the results in the next level.
Assets
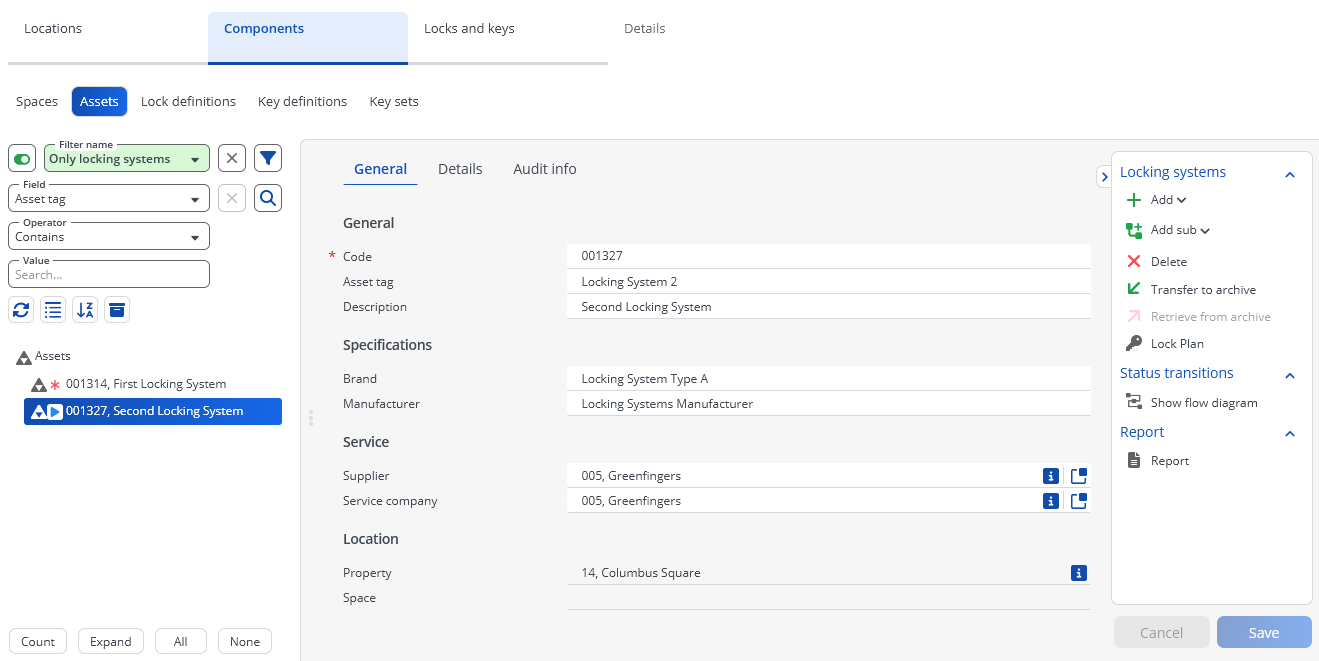
A locking system is an asset that combines all its locks and keys, e.g. a large building might have a locking system. It is not necessary to create locking systems in order to use the Key management, they are simply available should the user like to organize their key and lock definitions in this way. Both have a field Locking system in which the locking system can be entered.
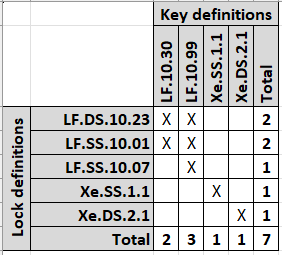
Under Locking Systems on the right side the lock plan can be found. It visualizes the hierarchy between lock definitions and key definitions or between locks and key definitions of a locking system. In the following steps this lock plan can also be called on without utilising a locking system.
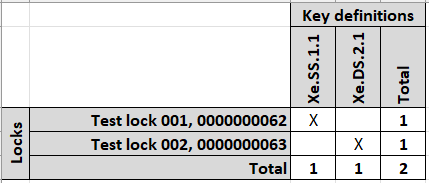
Lock plan (LD) Lock plan
Lock / Key definitions
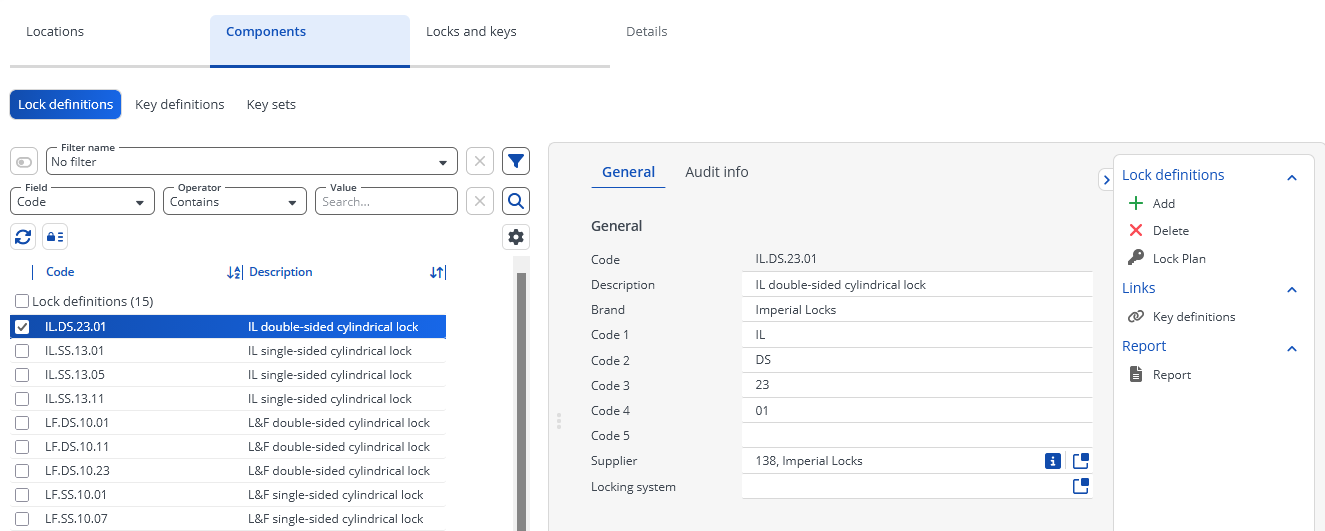
Under Links on the right side lock and key definitions can be linked to each other, creating a hierarchy. A key definition linked to a lock definition means that all keys belonging to this key definition are able to open all locks belonging to this lock definition.
Key sets
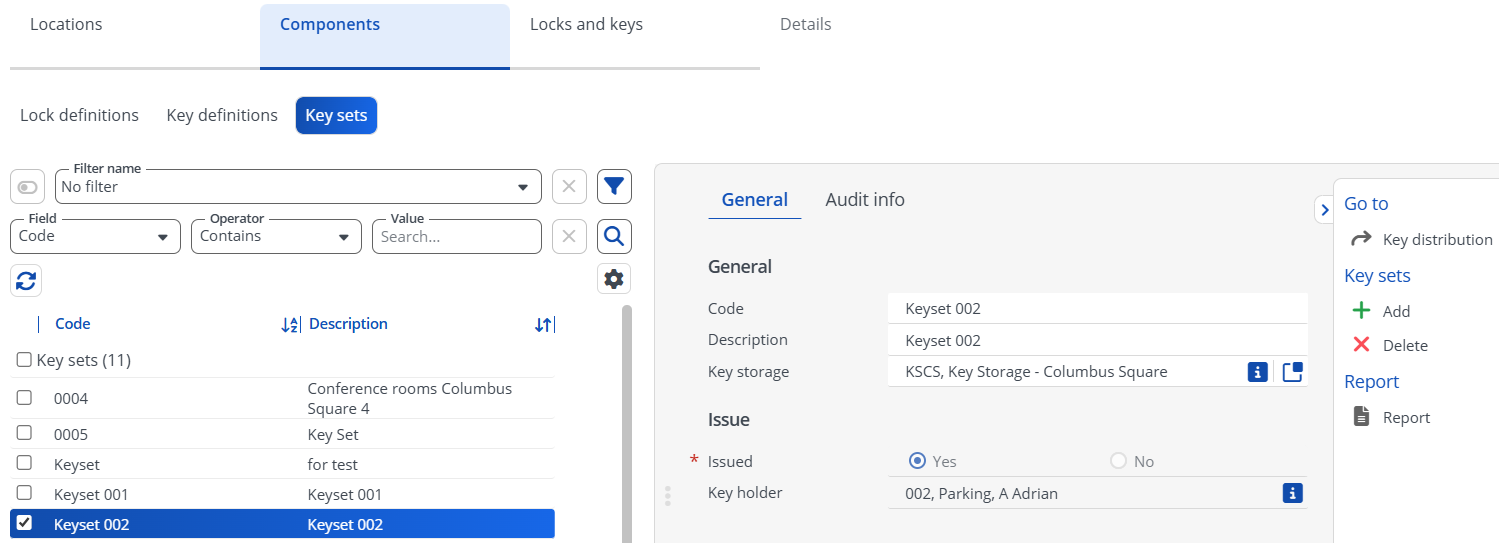
The layout for key sets looks slightly different. At the top some general information can be maintained, the bottom holds information about whether or not the key set is currently issued and if so, who holds it. This information is always read only and will be automatically filled in based on the corresponding request. On the right side under Go to a jump link to the TSI Key distribution and the with this key set associated request can be found. The details will be explained in level-key-distribution.
Level Locks & Keys
This level offers 3 steps, Locks, Keys and Key set transactions. Note that their visibility depends on what has been selected in the previous level, e.g. if lock definitions have been selected, then only the step Locks will be visible here.
Locks
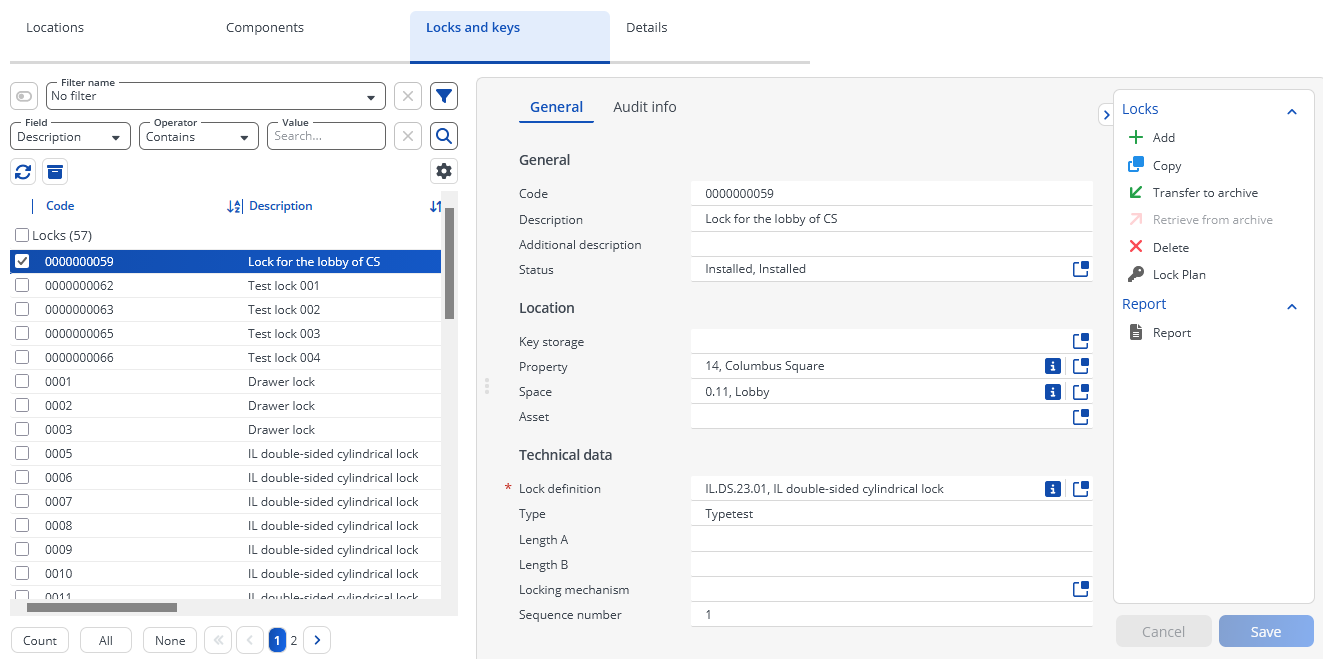
For each look several specifics can be maintained, as shown in the screenshot above. Note that from here the assets can be accessed as well.
Keys
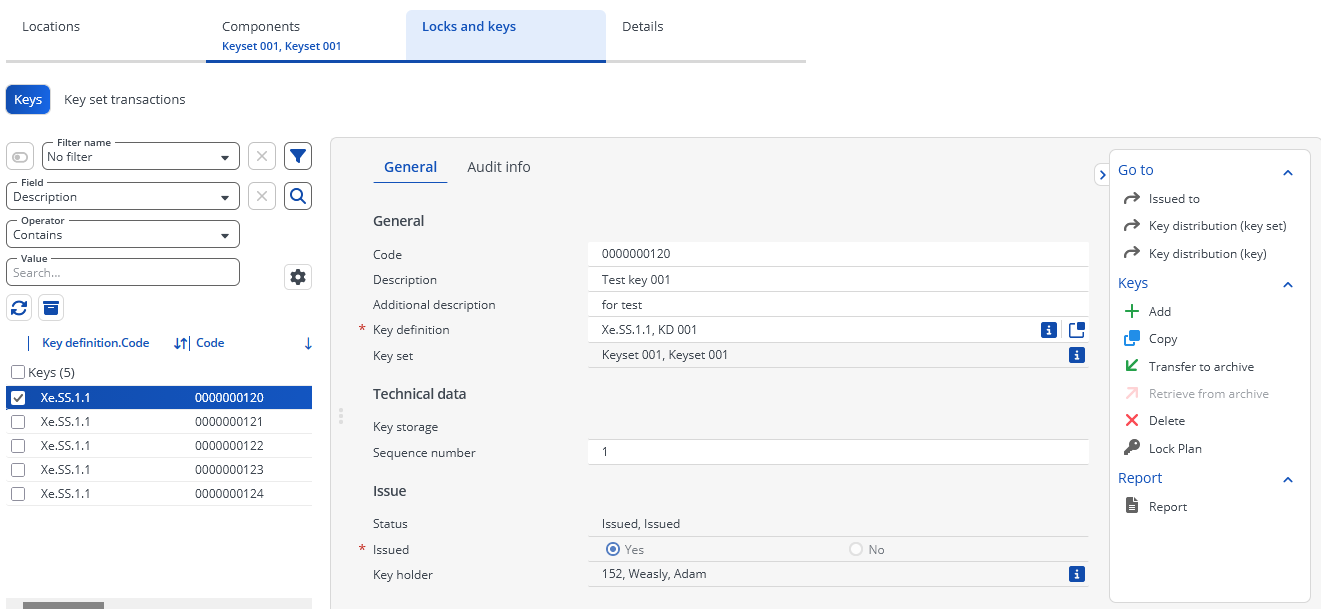
For keys a lot of specifics can be maintained as well, including assigning a key to a key set. Like key sets, keys also have read-only information about whether they’re currently issued or not and who the key holder is. Additionally the status is displayed which corresponds to the status of the connected request.
With the jump link Issued to the TSI Personnel will be opened, showing the information of the current key holder. With the jump link Key distribution the corresponding request will be opened in the TSI Key Distribution. Use the option (key set), if the key is part of a key set, and the option (key) otherwise.
If in the key definition the field Locking system is filled, then the lock plan can also be opened from here.
Key set transactions
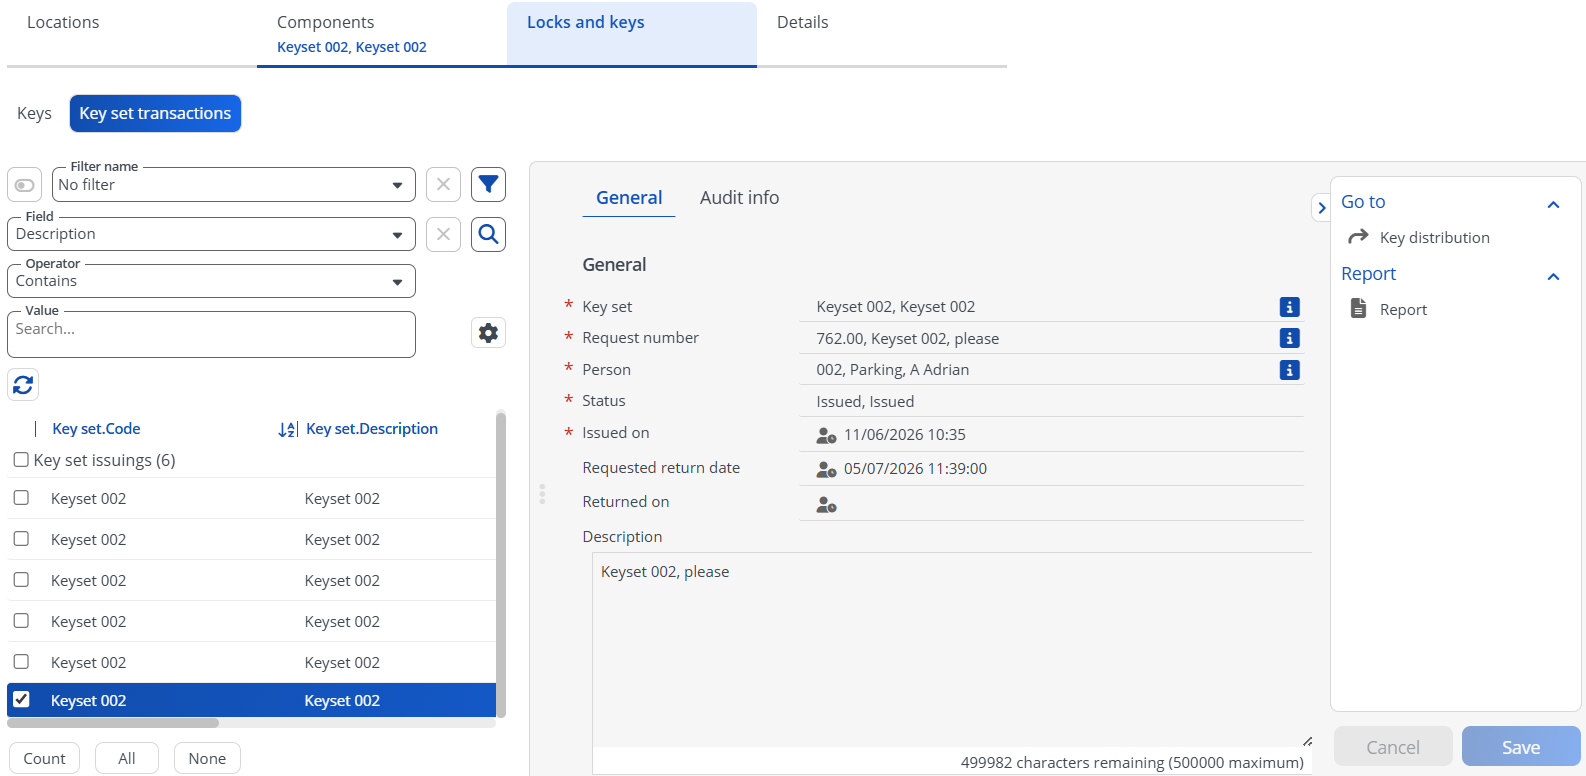
If a key set has been issued in the TSI Key distribution the corresponding request can be moved through all its statuses. A key set can e.g. be issued, lost, found and returned, then issued again. For each of those changes an entry will be created on this step, showing the information present in the screenshot about. If a key set is returned, the field Returned on will be filled with the current date, etc. From here it is also possible to jump to the corresponding request using the jump link on the right.
Level Details
Key transactions
This step is equal to Key set transactions, except of course here only the transactions for all keys are shown.
Matching Locks / Keys
If in the previous level a key was selected, then this step will show all locks that this key will open and vice versa.
Key Distribution
This TSI is where the key distribution is carried out, utilising service requests. This can be done for both keys and key sets, for simplicity in the following chapters only keys will be mentioned, but the same actions are possible for key sets as well, unless otherwise described.
Level Key Distribution
Statuses
In order to understand the routes that a key can take through the process it is best to understand the possible statuses and their transitions first.

KM01 Requested Someone requested a key, a new service request is created in the status requested. The person responsible for key distribution can then decide how to proceed with this request.
KM02 Deposited A key may be deposited with a middle man, e.g. a doorman, before being handed out to the final recipient.
KM03 Issued Once the key has reached its recipient, now the key holder, the status of the request will be issued.
KM04 Extended If the key has been issued with a dedicated end date, then the key holder might request to extend it, if he needs the key for more time. If this request is granted, the request gets this status.
KM05 Returned When the key holder has returned the key, it will be returned.
KM06 Lost A key holder might lose his key, …
KM07 Found … and find it again.
KM08 Destroyed If a key is faulty or not used anymore, it might be destroyed. This action is irreversible.
Creating a request
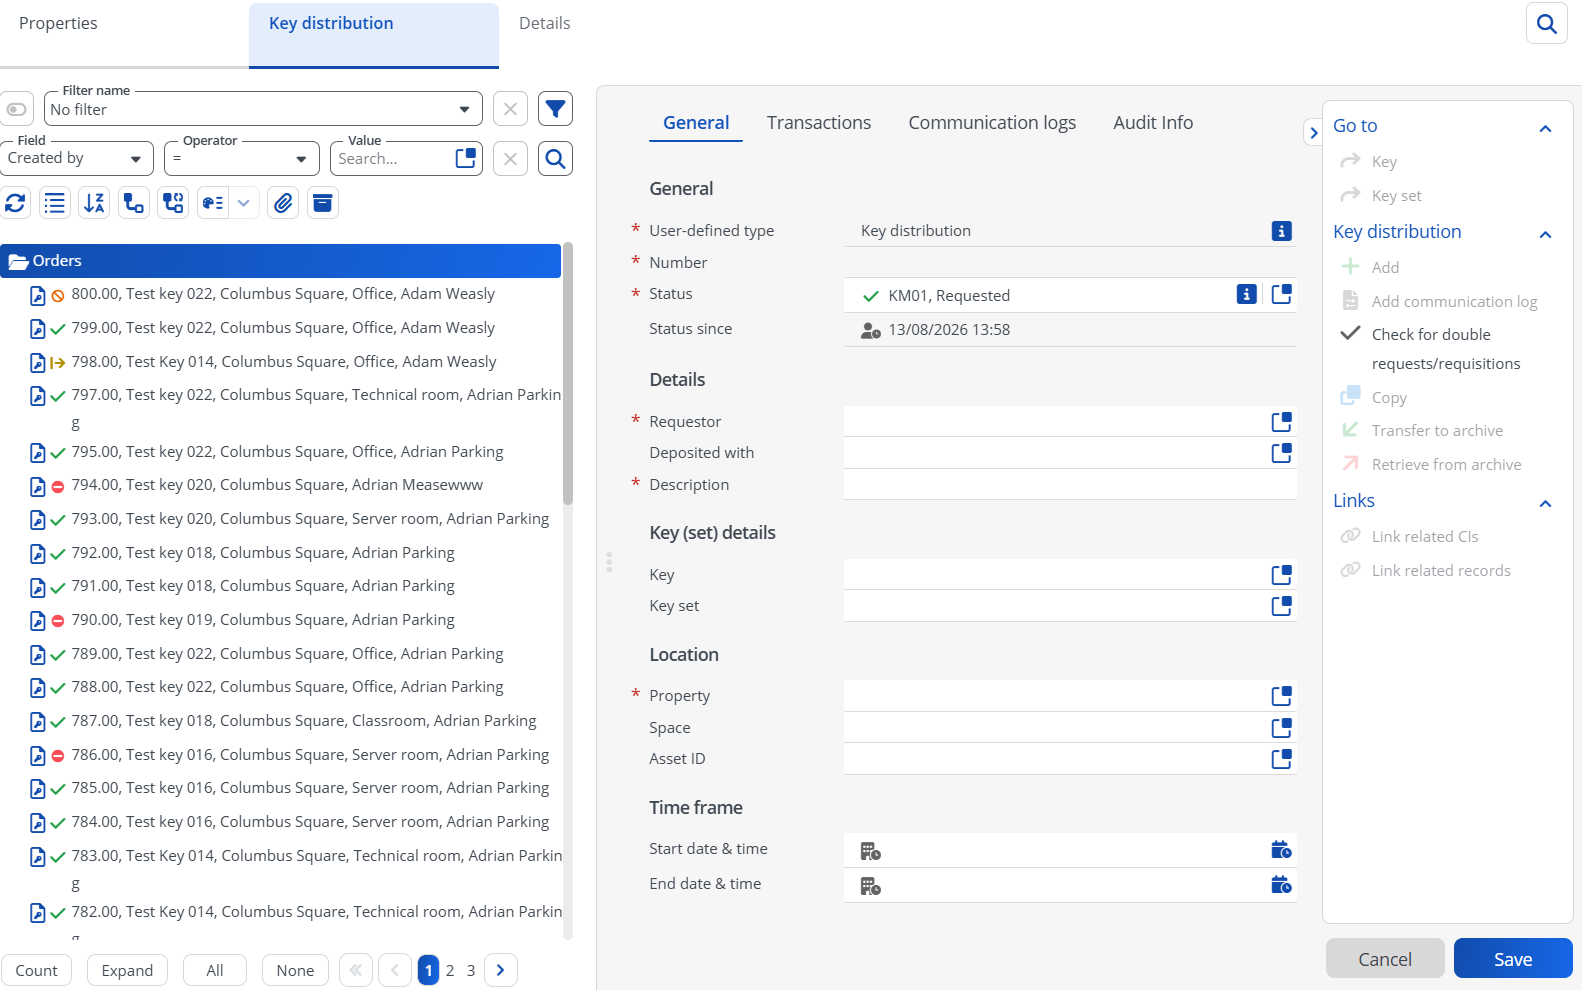
If the request is made in this TSI then all the above visible fields can be populated. If it is made in Planon Self Service (PSS) then some fields are not visible. In that case the requestor would already be filled in by default as the currently logged in user, and the key field would not be visible. The requestor would simply state to which room or building he needs access and a responsible person would decide on which key to give out. This TSI is essentially the master version of the key management, where the most options are available, in PSS only the necessary info will be shown.
In order to create a request all mandatory fields must be filled, everything else is optional and can be decided on at a later stage. When the form is saved, the request is created and has the status requested.
Note: The fields Key and Key set only show all available keys, not keys that are e.g. issued or lost. It is possible to create several requests with status requested with the same key, but as soon as this key gets issued, i.e. the status of the request is deposited / issued, then no other request with this key can created until it has first been returned.
Note: This document assumes that moving service requests through their different statuses is knowledge the reader already possesses, therefore going forward only the special cases will be explained in this chapter.
Request an extension
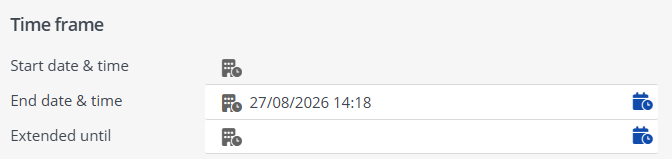
If the key holder needs the key beyond the end date he can request an extension by simply filling out the field Extended until and saving the request. No status change is necessary and if done in PSS also not possible. When the extension has been requested, a responsible person for the key management can choose to extend the key by then changing the status of the key to extended. In that case, the date in Extended until will become the new End date & time and Extended until will be cleared. That way another extension can be requested in the future.
Reports
On this step a standard report (All key distributions) is provided, which merely contains some standard columns. Through drill down and filtering it is highly configurable to the users needs, e.g. a list of all currently issued requests might use the same template as a list of all lost requests, if the user filters for requests in status issued or lost before executing the report. The title then can or should also be adjusted to reflect the contents accordingly.
Transaction reports
For each transaction a transaction receipt is created, which can be viewed in the Communication logs:
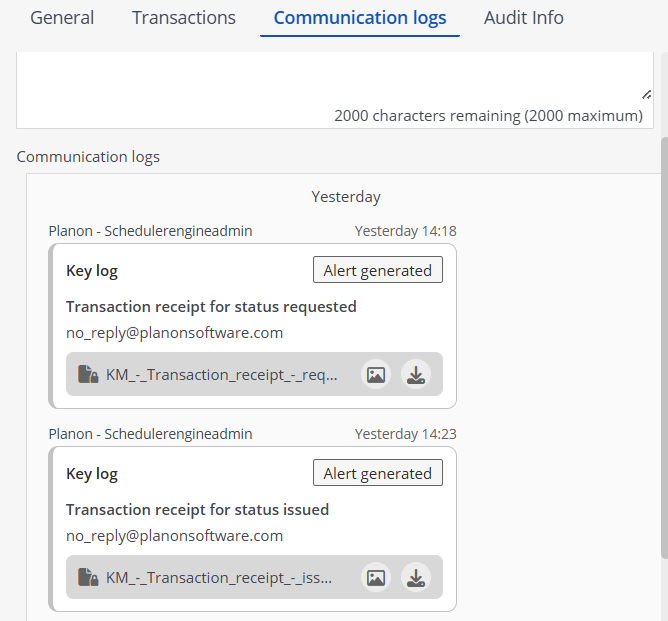
Note: The scheduler runs only every 5 minutes, so it can take a little while until the transaction report is visible here.
A receipt for the status returned might look like this:

Further information on how to set these up can be found in the Specification.
Level Details
History
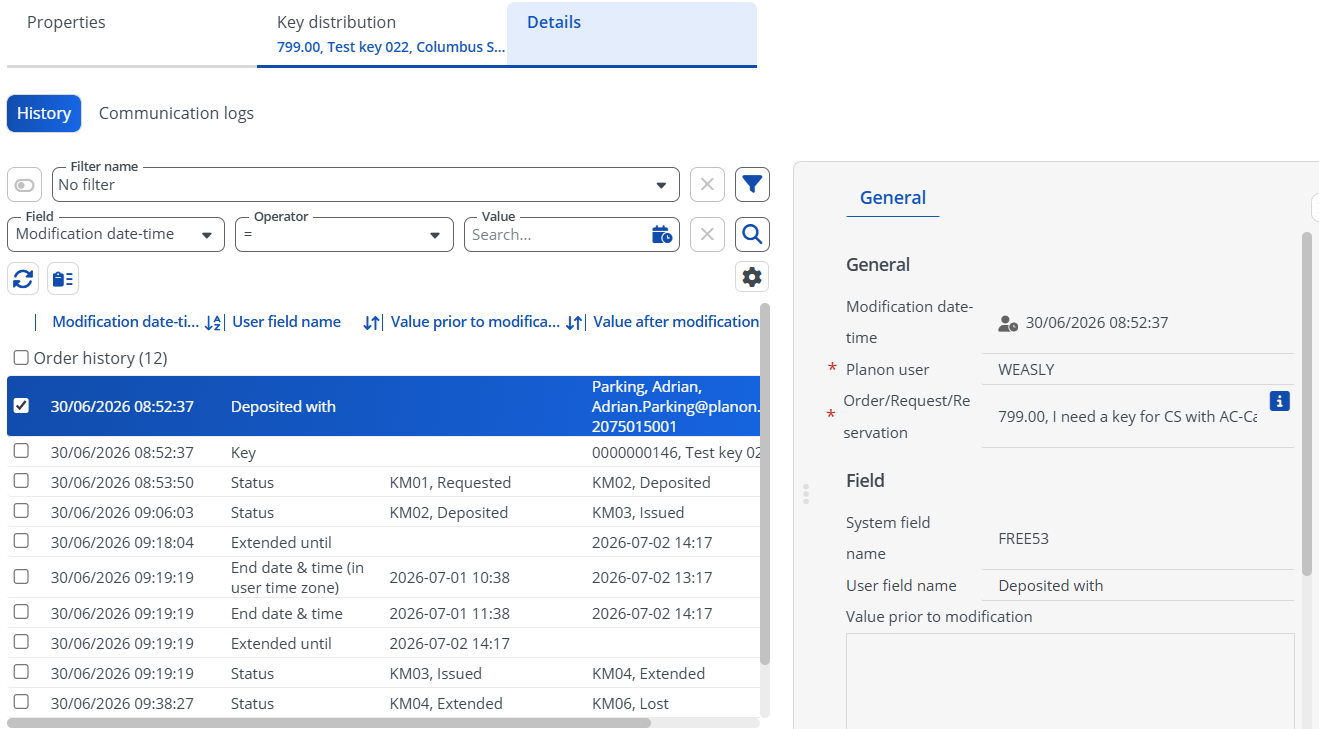
This step provides the user with the history of all transactions of a request, similar to Key (set) transactions. This page is simply informative.
Communication Logs
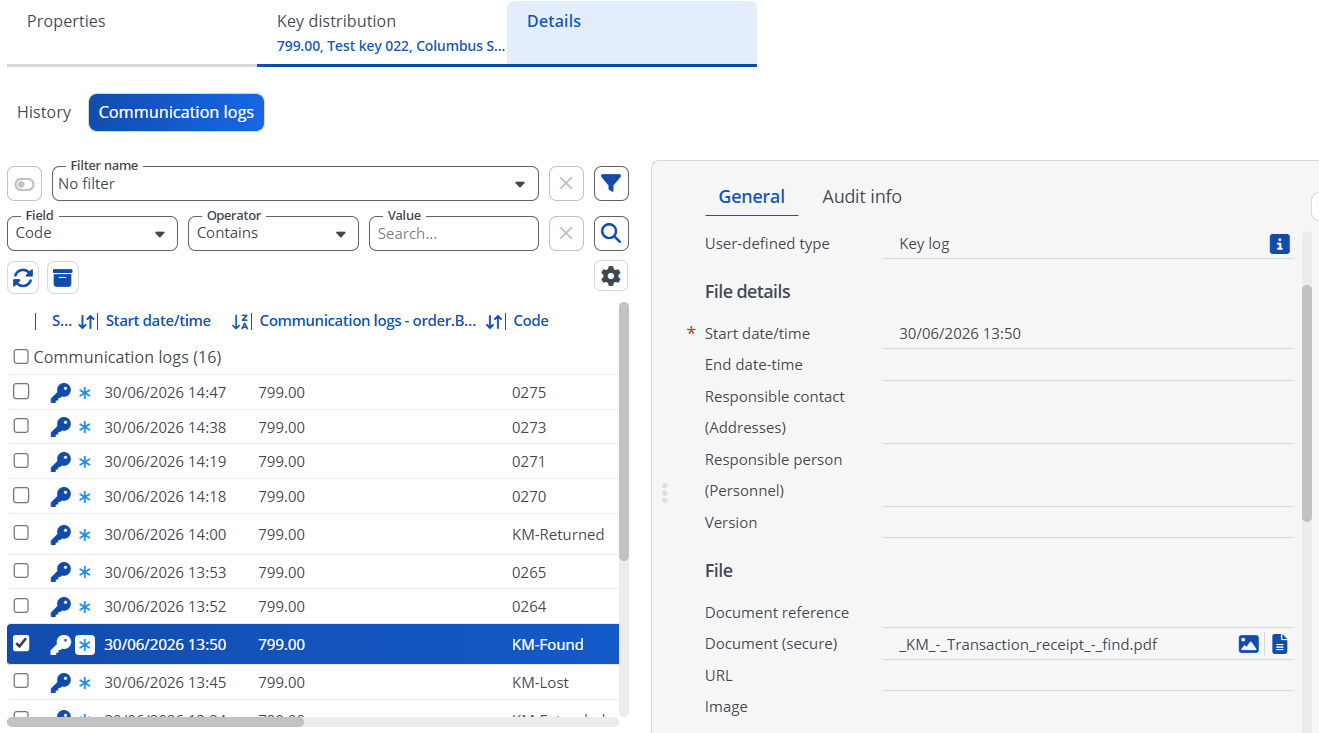
In this step all communication logs belonging to the selected request are shown and can be downloaded. Those might be comments made in the request, signatures, or transaction reports.
Planon Self Service (PSS)
Almost all functions for Key distribution can be done via PSS. The PSS forms are divided into three categories, depending on who will use the forms. One is for administrative purposes, i.e. the person(s) that manage and issue the keys, one is for a “middle man”, i.e. if a key is deposited at a building reception prior to being handed out to its recipient, and the third is for the recipient.
Since these forms can be taken over into the target system via configuration transfer, they will not be explained in detail. They will merely be listed and their intended purpose will be explained.
Note: In this paragraph for simplicity the descriptions will mostly contain “key”, but they’re also applicable to “key sets”.
Note: In almost all steps of the progress a comment can be attached to further describe the situation. The comments will be attached as Communication Logs of type Key log.
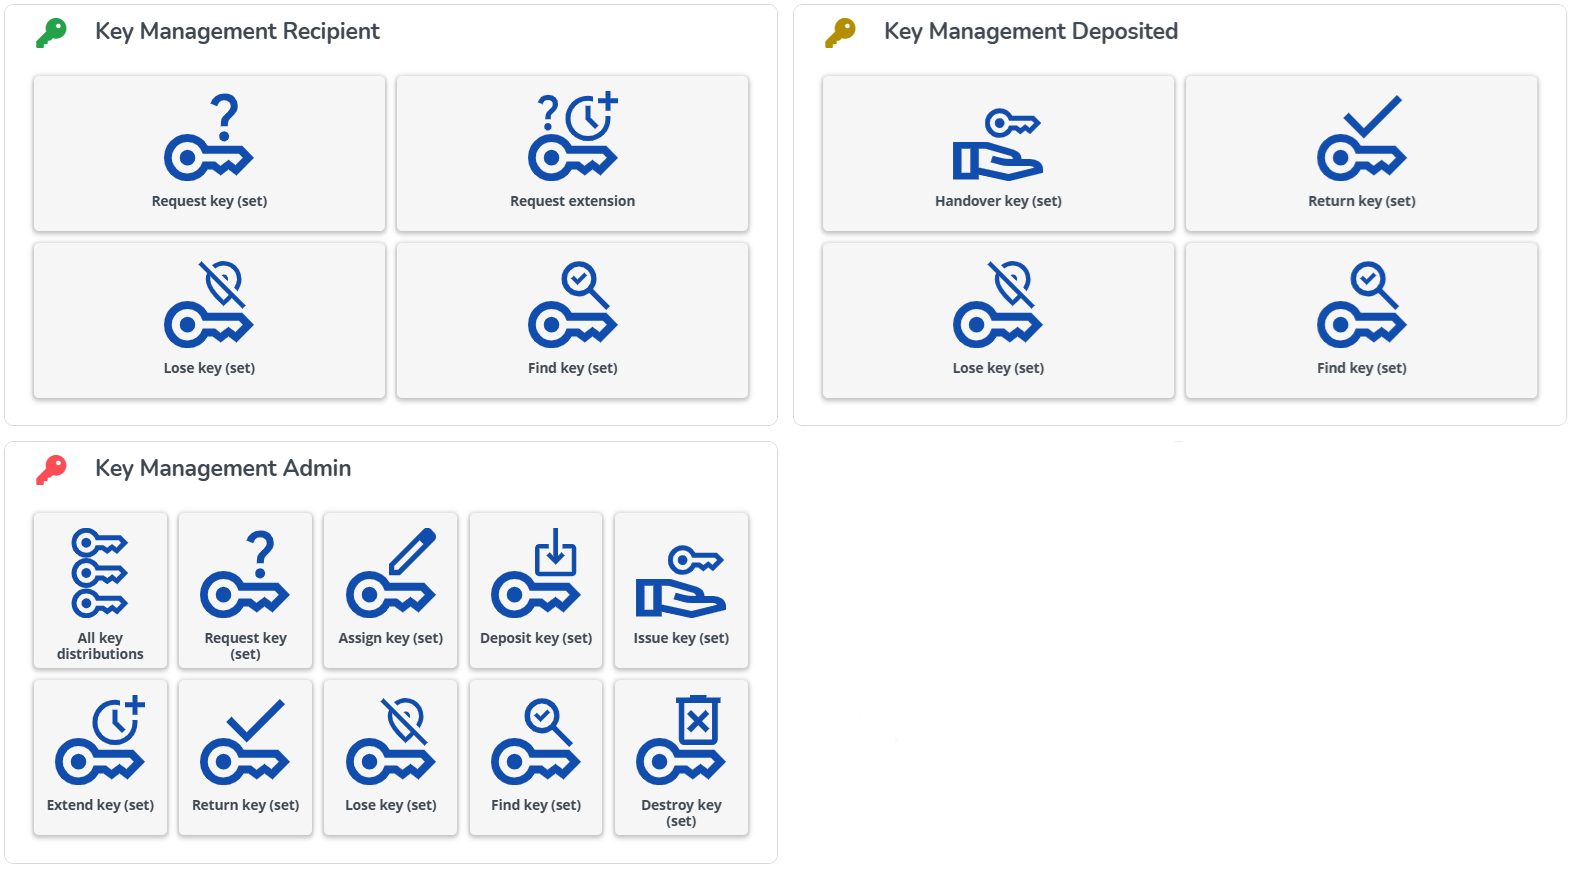
Recipient forms
These are all the forms intended for the final recipient of a key, e.g. an employee who requires access to a certain room.
Request key (set)

When someone requests a key, they need to provide a provide a location where they need access to and a description. They may also enter a time frame.
This form creates a new Key distribution request which will then be in the status Requested. The admin can then take further steps to assign a key first or to directly issue a key.
Note: A key can also be requested by an admin directly. In that case they can also already enter a key. This might be necessary to mark a key as lost or to destroy a key, since those statuses can only be reached by moving a request through the workflow and not by simply creating a request with status Lost or Destroyed.
Request extension
This list form will show all Key distribution requests of status Issued or Extended where the currently logged in user is the Key holder and an End date is specified.

When an end date is specified in a key distribution request the recipient / key holder can request an extension. In this form the field Extend until needs to be filled.
With this form no status change takes place yet. The admin can now see that an extension has been requested and can choose to extend the key.
Lose key (set)
This list form will show all Key distribution requests of status Issued or Extended where the currently logged in user is the Key holder.

When the recipient / key holder has lost their key, they can use this form to make it known.
This form will change the status of the Key distribution request to Lost.
Note: Keys can only be destroyed if they’re in the status Lost. They can also be found again.
Find key (set)
This list form will show all Key distribution requests of status Lost where the currently logged in user is the Key holder.

If the recipient / key holder has found their key again, they can use this form to make it known.
This form will change the status of the Key distribution request to Found.
The recipient can now continue to use or hold the key until they return it.
“Middle man” forms
These are all the forms intended for a middle man with whom a key is deposited, e.g. a building reception.
Handover key (set)
This list form will show all Key distribution requests of status Deposited where the currently logged in user is entered in Deposited with.

The admin can either issue the key directly to the recipient or they can deposit it with a middle man, e.g. with a building reception, which will then handover the key. In either case the recipient goes to collect the key and has to sign in the signature pad in the form.
The status of the Key distribution request changes to Issued.
The recipient / key holder can next request an extension or return it.
Return key (set)
This list form will show all Key distribution requests of status Deposited where the currently logged in user is entered in Deposited with.

If the key is deposited but for whatever is not needed to be handed over to the final recipient anymore, the key can simply be returned.
The status of the Key distribution request changes to Returned and the key can be issued again.
Lose key (set)
This list form will show all Key distribution requests of status Deposited where the currently logged in user is entered in Deposited with.
Find key (set)
This list form will show all Key distribution requests of status Lost.
Administrative forms
These are all the forms intended for an administrator, who handles the key distribution.
All key distributions

This list simply gives a read only overview over all Key distribution requests.
Request key (set)
Assign key (set)
This list form will show all Key distribution requests of status Requested.

After a Key distribution request has been created, a key can be issued. In the issue form a key can be specified. Depending on the end users workflow it might be necessary for Person A to decide which key needs to be issued and for Person B to actually issue the key. In this case Person A can assign a key in this form and Person B can issue (or deposit) it.
Keys can only be selected to be assigned if their field Issued is No and if their Status is empty or Returned.
This form will not cause a status change.
Deposit key (set)
This list form will show all Key distribution requests of status Requested where the field Deposited with is filled.

Sometimes the admin can not directly hand out the key to its final recipient. In that case he can choose to deposit the key with a middle man, e.g. with a building reception, who will later handover the key to its recipient.
The status of the Key distribution request will change to Deposited.
Issue key (set)
This list form will show all Key distribution requests of status Requested where the field Deposited with is not filled.

Extend key (set)
This list form will show all Key distribution requests of status Issued or Extended where the field Extended until is filled.

When the user has requested an extension for a key, the admin can decide here if they want to grant it.
The Key distribution request will change status to Extended (unless it is already in status Extended). The new end date will be taken over into the corresponding field, the field Extend until will be emptied, and the key holder can again request a new extension if necessary.
Return key (set)
This list form will show all Key distribution requests of status Issued or Extended.
When the key holder wants to return the key, they go to the admin and the admin signs this form. Once the key is returned it can be issued again.
The Key distribution request changes status to Returned.
Lose key (set)
This list form will show all Key distribution requests of status Requested.
Find key (set)
This list form will show all Key distribution requests of status Lost.
Destroy key (set)
This list form will show all Key distribution requests of status Lost.

When a key needs to be destroyed for whatever reason this form can be used.
The Key distribution request changes status to Destroyed.
Installation
This chapter describes the steps required to install this app on your Planon environment.
Installation Process
There are two ways to install the app:
- Using the Marketplace
- Manual installation
Install the app by using the marketplace
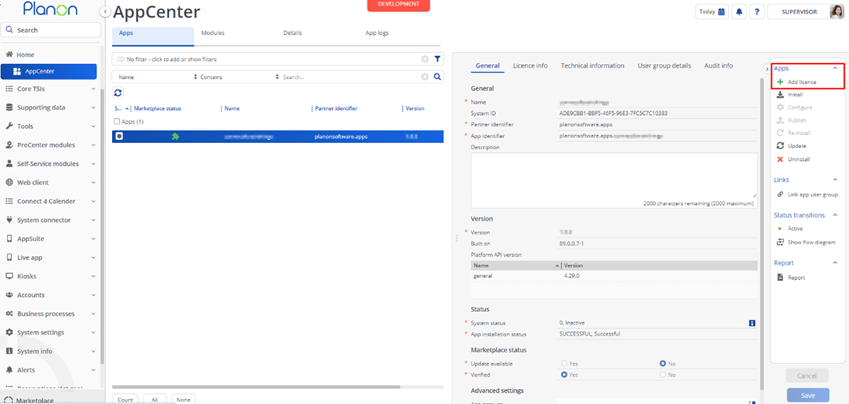
In case your environment is configured to use the Planon app store the only thing required to install the app is to add the app license in the AppCenter TSI. Planon will automatically download and install the app.
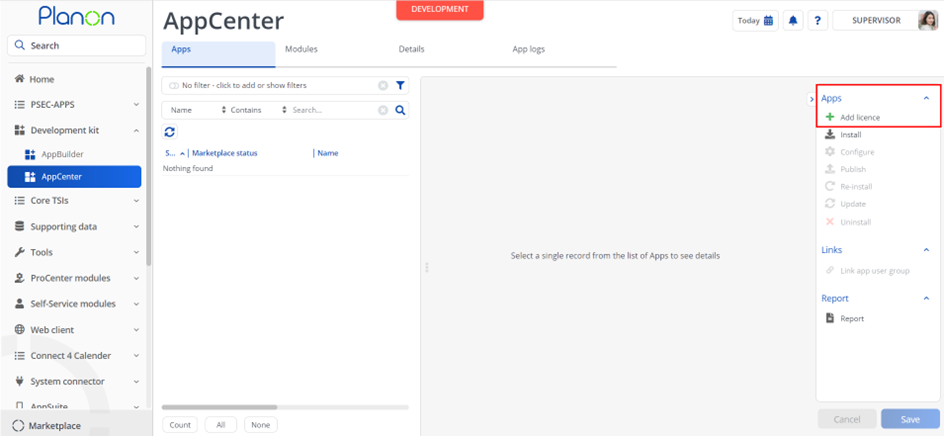
Manual installation
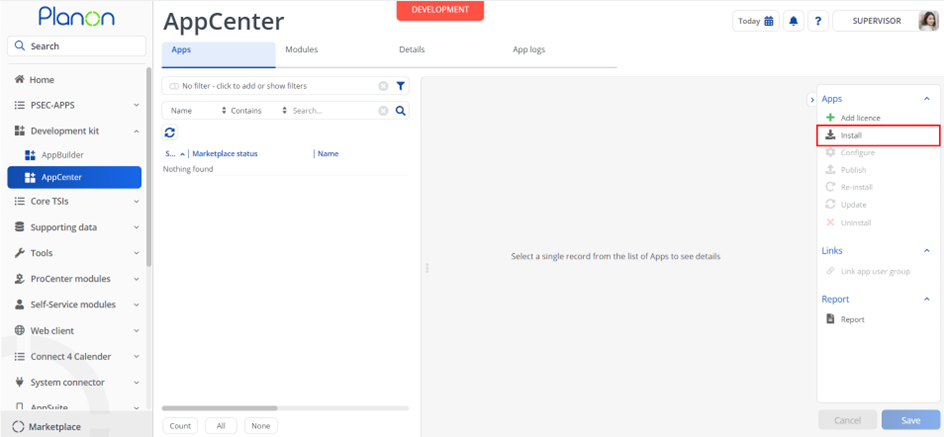
In case you want to perform a manual installation follow the steps below.
- Open AppCenter TSI from Planon webclient and click on install from action menu
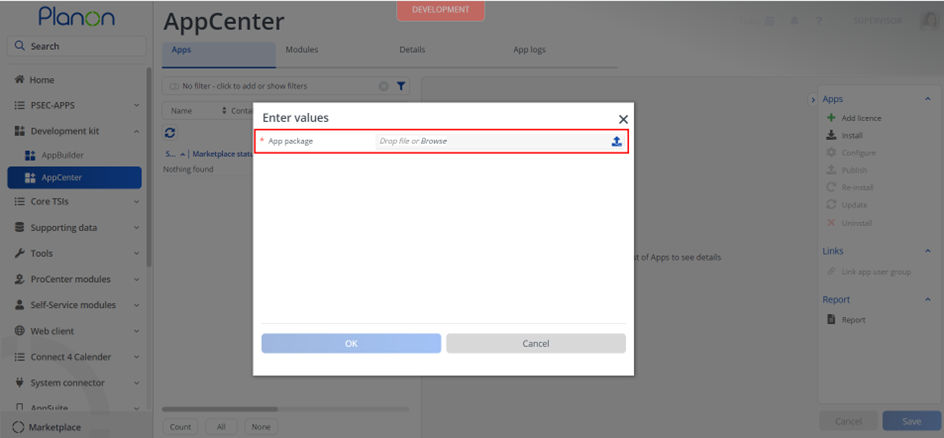
- Browse to the .ppk file
- Click OK to install the app and follow the installation process
- When the app is successfully installed, the app will appear in the AppCenter
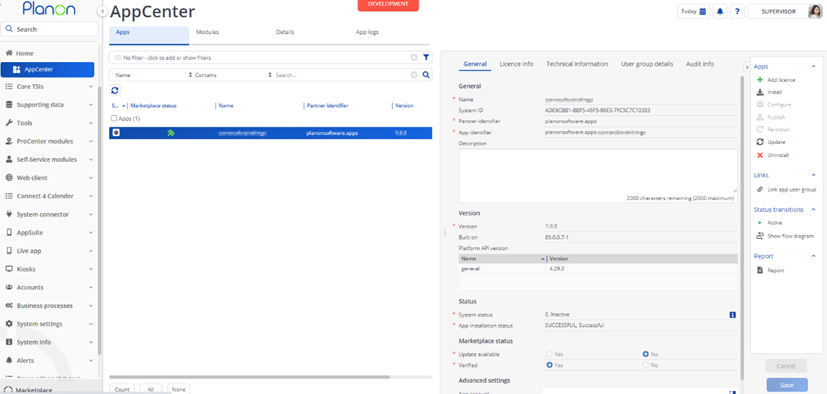
- Add the app license in Apps TSI
App settings
The functionality of key management is based on the keys and their corresponding orders having specific statuses like it is detailed in this document. Theoretically the customer could name these statuses differently or even create their own. In this case the settings need to be edited to include their status names, so the app knows the mapping between the new status and the originally intended one.
Description of settings
AvailableKeyStatus: For when the key (set) is available, someone could borrow it.
DepositedKeyStatus: For when borrows a key (set) but it is deposited with a third person for pickup.
DestroyedKeyStatus: For when the key (set) is permanently destroyed, end of life.
ExtendedKeyStatus: For when a key (set) is borrowed and an extension of the end date was granted.
IssuedKeyStatus: For when a key (set) is borrowed by someone.
ReturnedKeyStatus: For when a key (set) was borrowed but now is returned.
UnavailableKeyStatusList: List of all statuses marked as unavailable. For keys in those statuses no request can be made.
Example settings
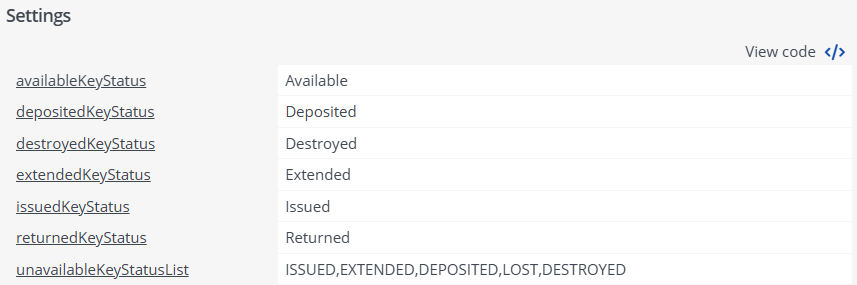
Those are the standard settings based on the statuses created in this document
Activation
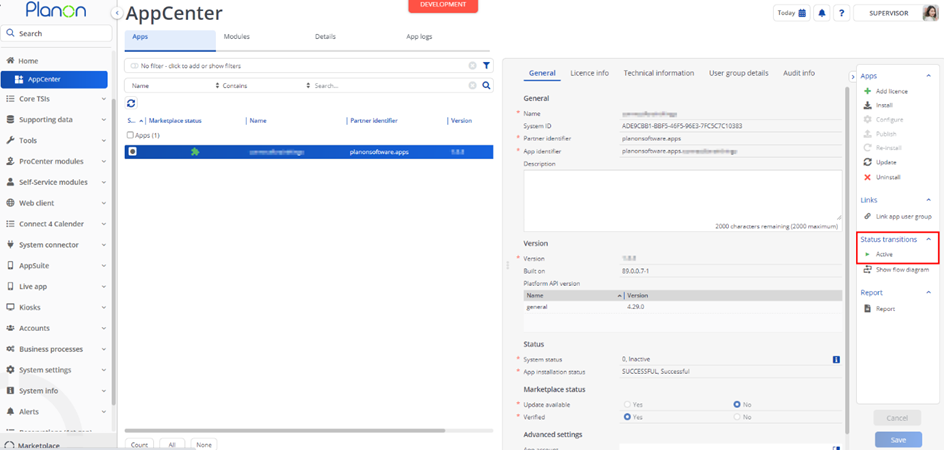
Once the app has been configured, you can activate the app by pressing the Active status transition from the action panel. Always make sure that the required User groups are linked correctly and the Configure action is executed before activating the App.