Planon Extension - Mobile Visitor QR-code
Introduction
This document describes the installation and configuration of the MobileInternalVisitorQRCode app.
This app consists of two parts; a business rule and a mobile card.
The first part is the AddVisitorToReservation business rule. This business rule triggers on the creation of a (flexibel workspace)reservation. When the reservation is made, an internal visitor (based on the reqeustor of the reservation) is automatically created and added to the reservation. Based on Order group, it is possible to distinguish (flexible workspace) reservations that need to create an internal visitor or not.
With the QRCodeGenerator app (separated app) a QR-code is generated for this created internal visitor. To show a QR-code in the Planon Workplace Engagment App (PWEA) this is required.
The second part is the mobile card, This card shows the QR-code belonging to the internal visitor of a flexibel workplace reservation in the PWEA.
The main goal of the app is to support the process ‘Access to Work’. This is normally based on the reservation of a flexibel workspace, but could also be done on a reservation of a meeting room and (unlikely) on a reservation of equipment. The creation of the internal visitor is based on requestor of the reservation.
In this document we use the reservation of a flexible workspace to describe the function and installation.
Prerequisites
Environment
This solution will be designed to work with Planon Live L76 and above.
Constraints
The business rule that creates an internal visitor when a (flexible workspace) reservation is made, only works on the the insertion of a reservation and not on a update of the reservation.
As an internal visitor is created based on a person in Planon (BO Personnel) the person (requestor) has to be recorded in Planon.
It is required that the field Requestor is mandatory filled for the applicable UdBO (Reservation Flexible Workspace).
Required Apps
The QRCodeGenerator app is required. This app is creating the QR-code (image) on the internal visitor record. This QR-code is shown in the mobile card in PWEA.
See the UserGuide of the QRCodeGenerator app for prerequisites and installation. For a more appealing look in the PWEA, it is recommended to set the ‘withBorder’ setting of the QRCodeGenerator to ‘false’.
Required (free)fields
It is not needed to create a new (free)field for this app.
For the QRCodeGenerator app free fields are used, see the UserGuide of the QRCodeGenerator app.
The only field that is used for the VisitorQRCode app is the image field that stores the QR-code, belonging to the visitor BO.
Assumptions
To distinguish the creation of an internal visitor for some part of the flexibel workspaces, an extra (sub) ordergroup has to be created. This split can be for example a split between buildings.
The ordergroup(s) set in the businiss rule is then used to make an internal visitors for these reservations. As it is possible to created a sub ordergroups we assume that the impact of this will be nil on the current configuration.
Features
This chapter describes the features that this app contains.
Feature 1 – Add Visitor to Reservation
The first feature is a business rule that will be triggered when a reservation is made. On the creation of a reservation, the business rule automatically creates an internal visitor and adds this internal visitor to the reservation.
Feature 2 – QR-code mobile card
The second feature creates a mobile card that will be shown in the reservation details page of a reservation in the Planon Workplace Engagement App. The mobile card shows the QR-code belonging to the internal visitor of the reservation.
How does it work
This chapter contains the functional and technical description (if applicable) of the features as described in chapter 4.
Description of AddVisitorToReservation
The AddVisitorToReservaton business rule creates an internal visitor whenever a reservation is made that meets the specified filters.
Technical details
This business rule needs to be added to the reservations BO (or at the applicable UdBO). When a reservation is made the business rule will trigger.There are two filters that can be configured to filter whether a visitor should automatically be created for this reservation or not, both these filters can be defined in the component settings of the business rule.
Note that if a reservation does not contain a requestor, no visitor will automatically be created.
The first filter is the status. A visitor will only be created for reservations with the same status as one of the in the settings defined status.
The second filter is the Order group. In the settings one or more Code group(s) of an Order group can be added. A visitor will only be created if the Code group of the reservation matches one of the in the settings defined Code group(s).
Note that this filter does not work hierarchical, this means that only the Code group(s) defined in the settings will be allowed. For example: when “02.01” is added to the settings, a reservation with Code group “02.01.02” will not be allowed and a visitor will NOT automatically be created for this reservation.
It is also possible to copy the value of fields from the reservation to the visitor. This can be done by using the “extraField” setting. When adding the system name of a field from the reservations BO and the system name of a field from the visitors BO, the value of the field from the reservation will be copied to the visitor field.
Note that this only works if both fields are of the same field type. It is also possible to copy more than one field from the reservation to the visitor. More information about this setting can be found in chapter 5.2.3 “Description component settings AddVisitorToReservation”.
Description of QR-code mobile card
The app automatically creates a mobile card and adds this card to the reservation details page of a reservation in the Planon Workplace Engagement App. This card shows the QR-code of the visitor that is part of the reservation.
Technical details
When the app is activated a mobile card is added to the Planon Workplace Engagement App. This card is part of the reservation details page. The app checks if a visitor with a QR-code is coupled to current reservation. If this is the case, the app adds the QR-code to the mobile card in the reservation details page. The check on the QR-code makes use of the in the settings defined QR-code field. This settings is the user-defined system name of the field that contains the QR-code.
When clicking on the QR-code mobile card, it enlarges the image and adds a white border around the QR-code to make it easier for the scanner to read.
Installation
This chapter describes the steps required to install this app on your Planon environment.
Installation Process
There are two ways to install the app:
- Using the Marketplace
- Manual installation
Install the app by using the marketplace
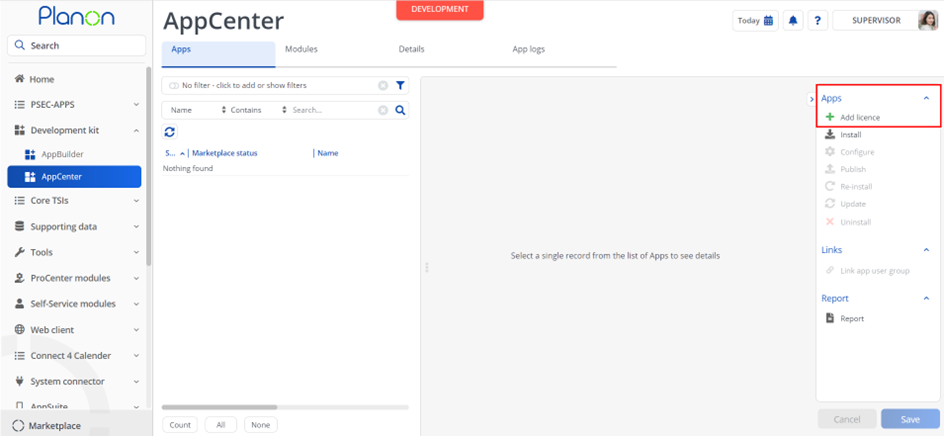
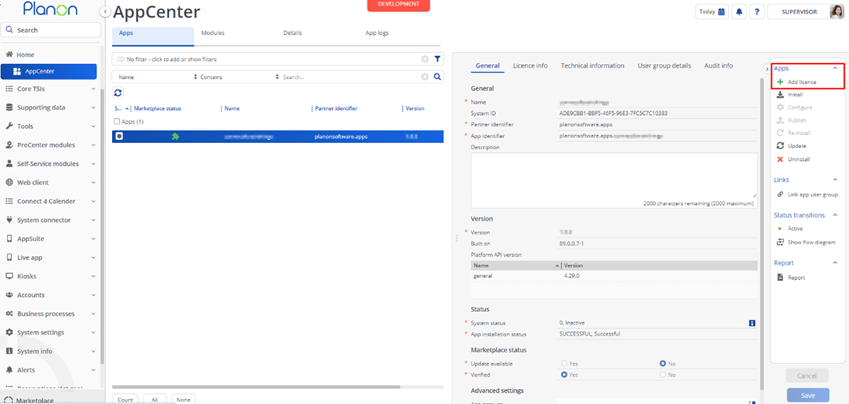
In case your environment is configured to use the Planon app store the only thing required to install the app is to add the app license in the AppCenter TSI. Planon will automatically download and install the app.
Manual installation
In case you want to perform a manual installation follow the steps below.
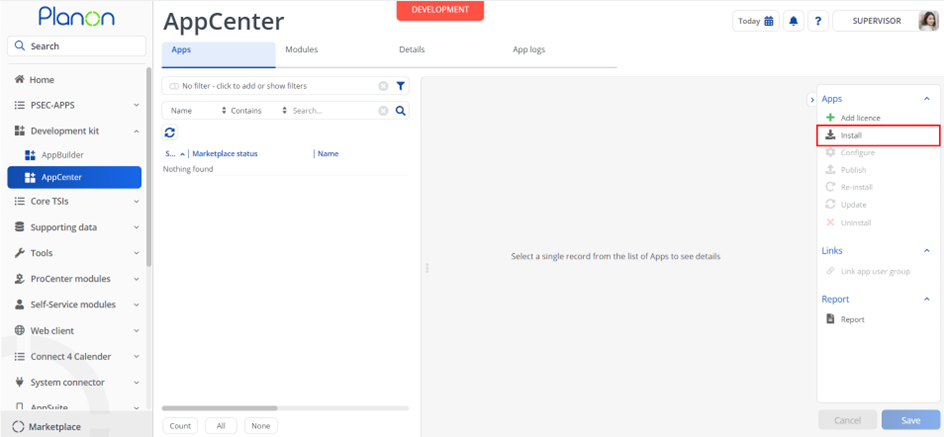
- Open AppCenter TSI from Planon webclient and click on install from action menu
- Browse to the .ppk file
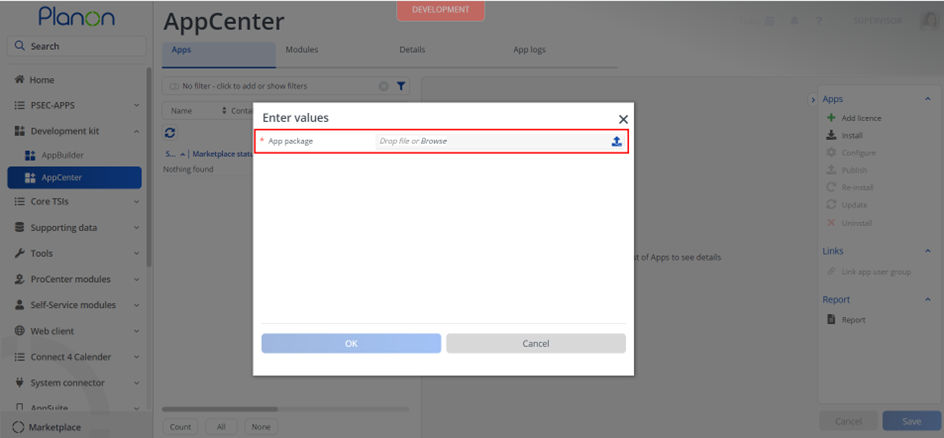
- Click OK to install the app and follow the installation process
- When the app is successfully installed, the app will appear in the AppCenter
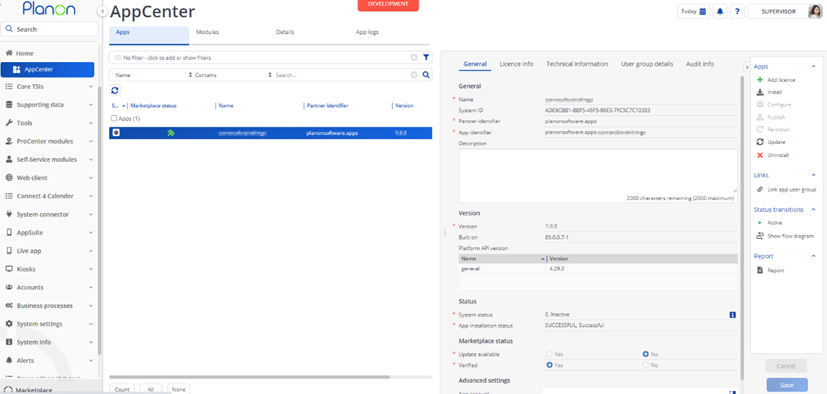
- Add the app license in Apps TSI
Activation
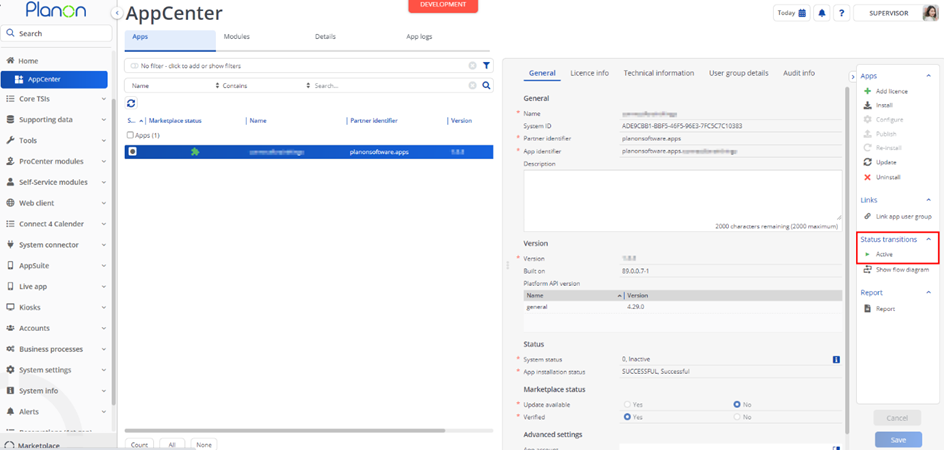
Once the app has been configured, you can activate the app by pressing the Active status transition from the action panel. Always make sure that the required User groups are linked correctly and the Configure action is executed before activating the App.
App Settings
This chapter describes and explains the settings that are available for this app. This app makes use of module settings as well as component settings. These settings will be used to define which fields to use for what purpose(s). The component settings are part of the AddVisitorToReservation business rule. When the description of a setting states that the (user-defined) system name of a field has to be filled in, it is possible to either add the system name or the user-defined system name of the field.
Description of module settings
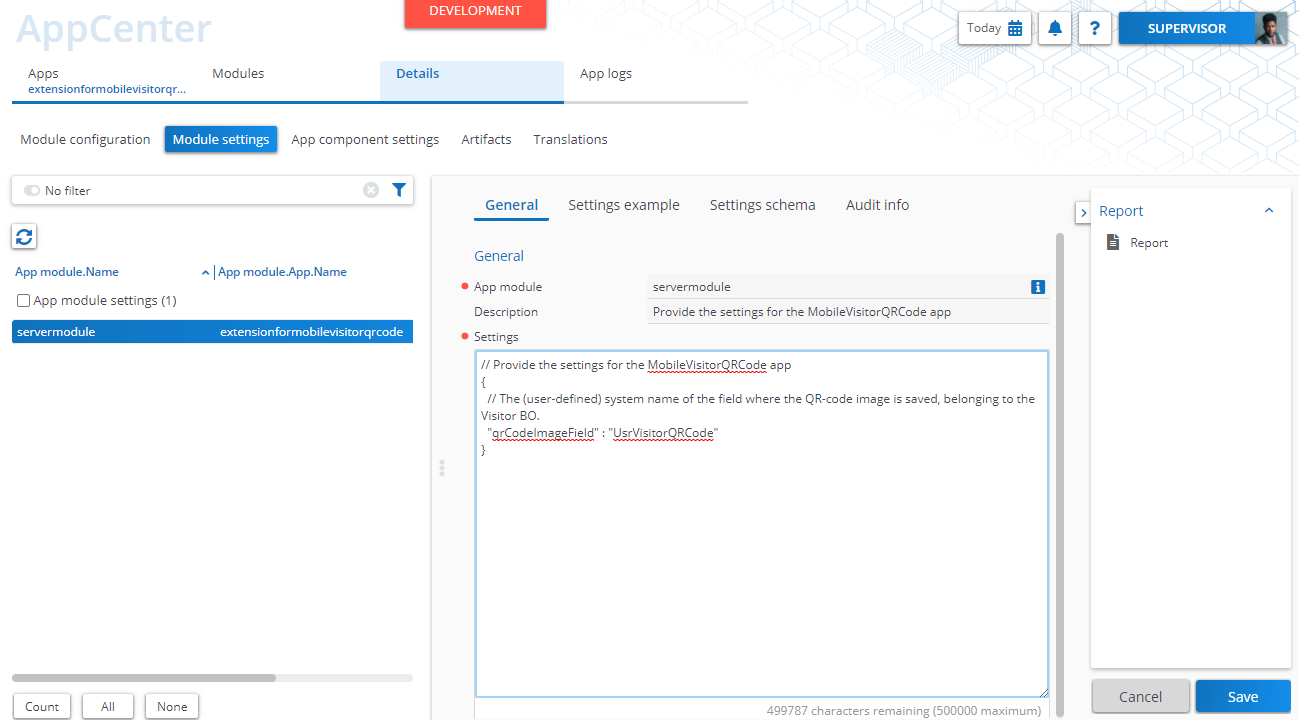
The ‘qrCodeImageField’ parameter should either containt the system name or the user-defined system name of the field where the QR-code image is saved. This field is part of the Visitor BO.
Example module settings
// Provide the settings for the MobileInternalVisitorQRCode

{

// The (user-defined) system name of the field where the QR-code image
// is saved, belonging to the Visitor BO.

"qrCodeImageField" : "UsrVisitorQRCode"

}
Description component settings AddVisitorToReservation
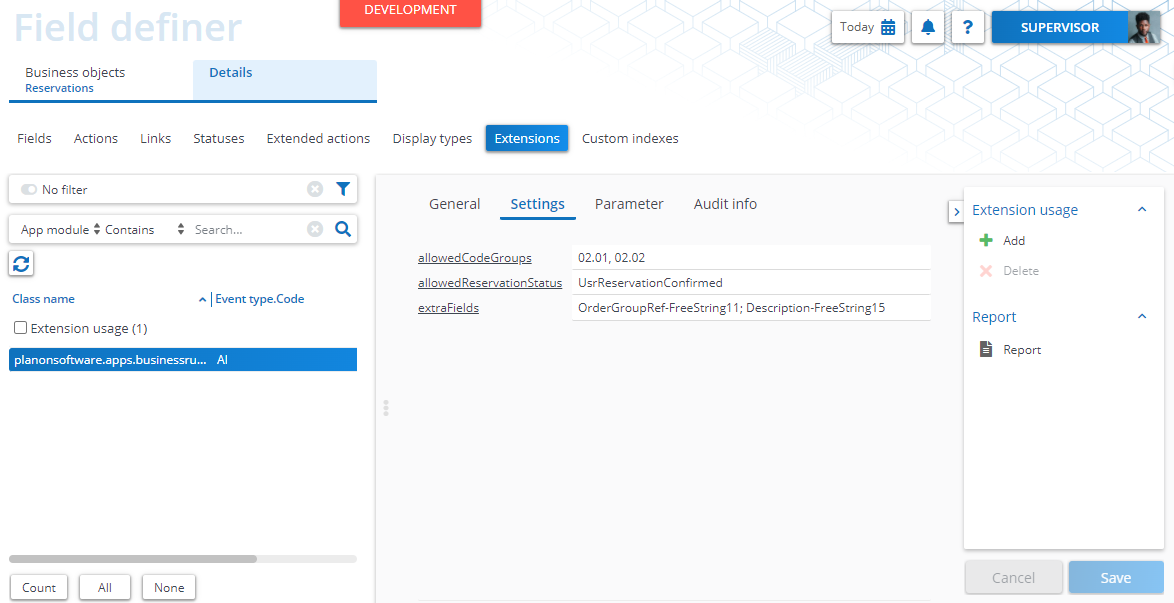
The ‘allowedReservationStatus’ parameter should contain the name(s) of the status that a reservation must have. Only if a reservation has the given status, a visitor will automatically be created when the reservation is made. When using multiple names a comma (,) must be used to separate the names.
The ‘allowedCodeGroups’ parameter should contain the Code group(s) of the Order group(s) for which a visitor will automatically be created when a reservation is made. When using multiple names a comma (,) must be used to separate the names.
Note that this filter does not work hierarchical, this means that only the Code group(s) defined in the settings will be allowed. For example: when “02.01” is added to the settings, a reservation with Code group “02.01.02” will not be allowed and a visitor will NOT automatically be created for this reservation.
The ’extraFields’ setting is used to copy the value of a field from the reservation to the visitor. When used, this settings must at least contain the system name of a field which is part of the reservations BO, and the system name of a field belonging to the Visitors BO.
Note that both of these fields must be of the same field type. These system names must be separated by using a dash ( - ). When copying more than one field, the system names must be separated by using a semicolon ( ; ). For example: “OrderGroupRef-FreeString11; Description-FreeString15”. It is also possible to get the value of fields via a reference field. For example when you want to use the name of a property you can use PropertyRef.Name as input. For example: “PropertyRef.Name-FreeString15”.
Example component settings AddVisitorToReservation
// Provide the settings for the AddVisitorToReservation Business rule belonging to the MobileInternalVisitorQRCode app

{

// The Code group(s) of the Order group(s) for which a visitor will automatically be created. When adding multiple Code groups a comma (,) must be used to separate the codes.

"allowedCodeGroups" : "02.01, 02.02",

// The system name(s) of the status that a reservation must have. Only if a reservation has the given status, a visitor will automatically be created. When using multiple names a comma (,) must be used to separate the names.

"allowedReservationStatus" : "UsrReservationConfirmed",

}

// The system name(s) of fields from which the values need to be copied from the reservation to the visitor. The first field must belong to the Reservations BO and the second field must belong to the Visitor BO, a dash (-) is used to separate the names. When more fields must be copied from the reservation to the visitor, a semicolon (;) is used to separate the fields.)

"extraFields" : " OrderGroupRef-FreeString11; Description-FreeString15"
Configuration
This chapter describes the required configuration in the application such as adding a TSI Action to field definer / lay outs (if applicable) and/or configuring any free fields.
Configure the AddVisitorToReservation business rule
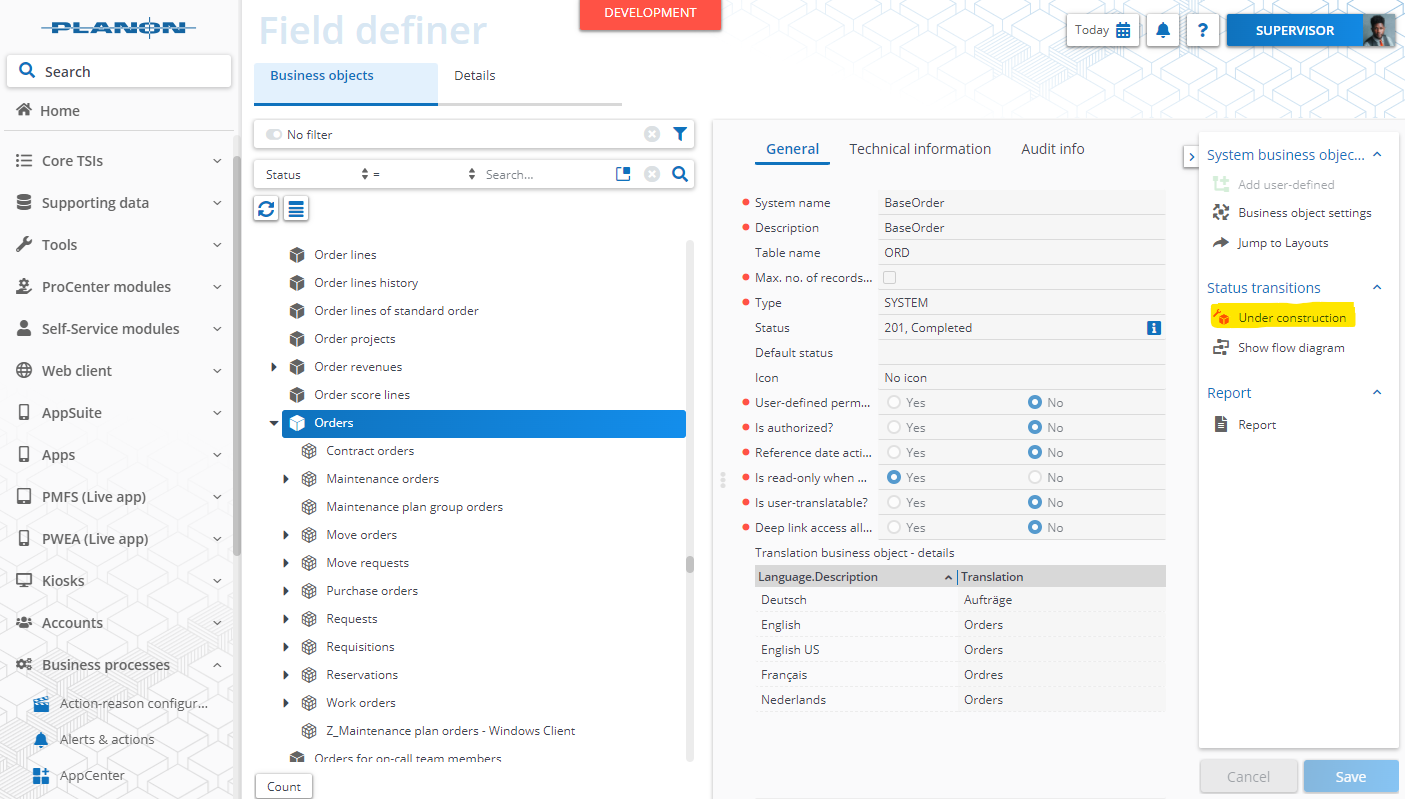
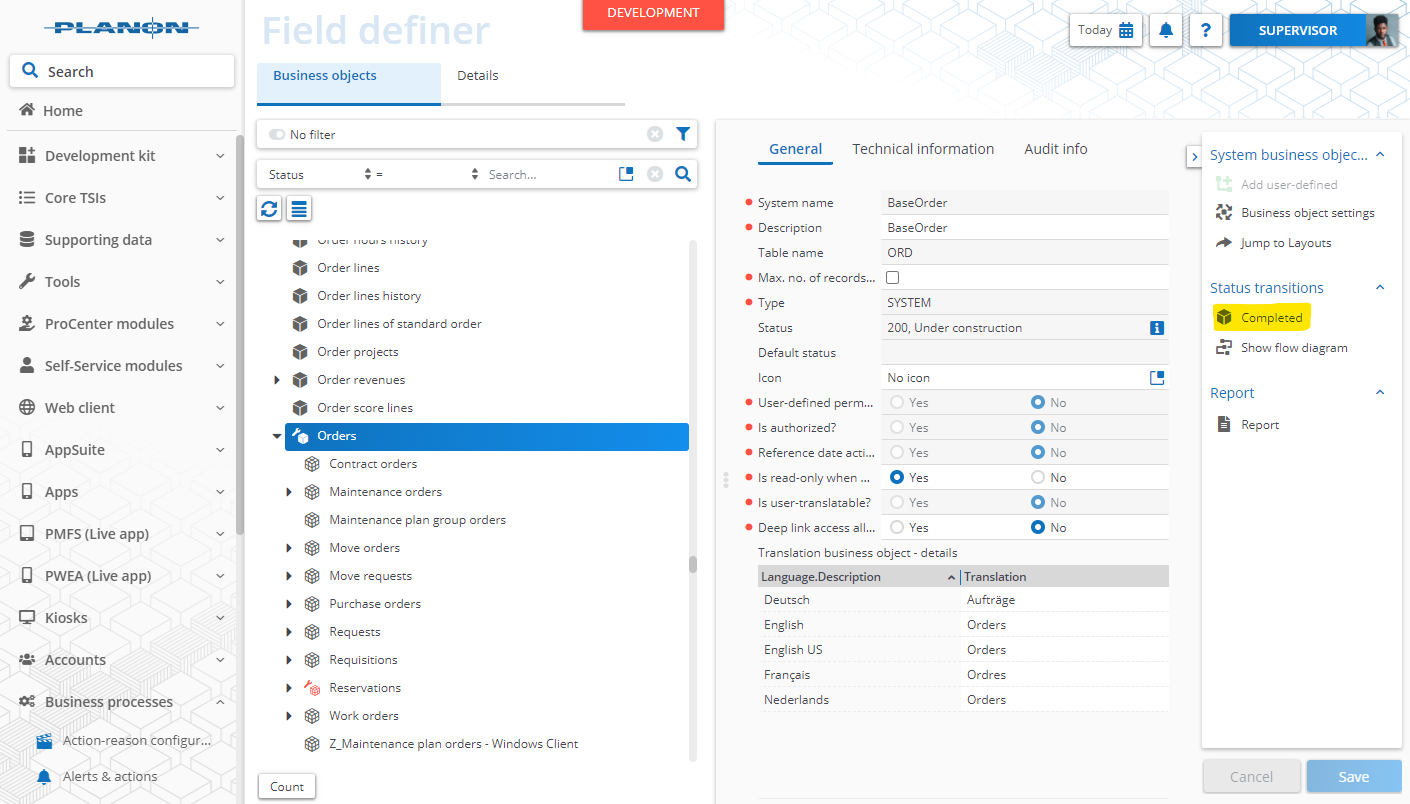
- Now that the app is installed we can add the business rule to the Reservations BO. Go to the field definer, select the Orders BO and put the status to “Under construction”.
- The second step is to select the Reservations BO.
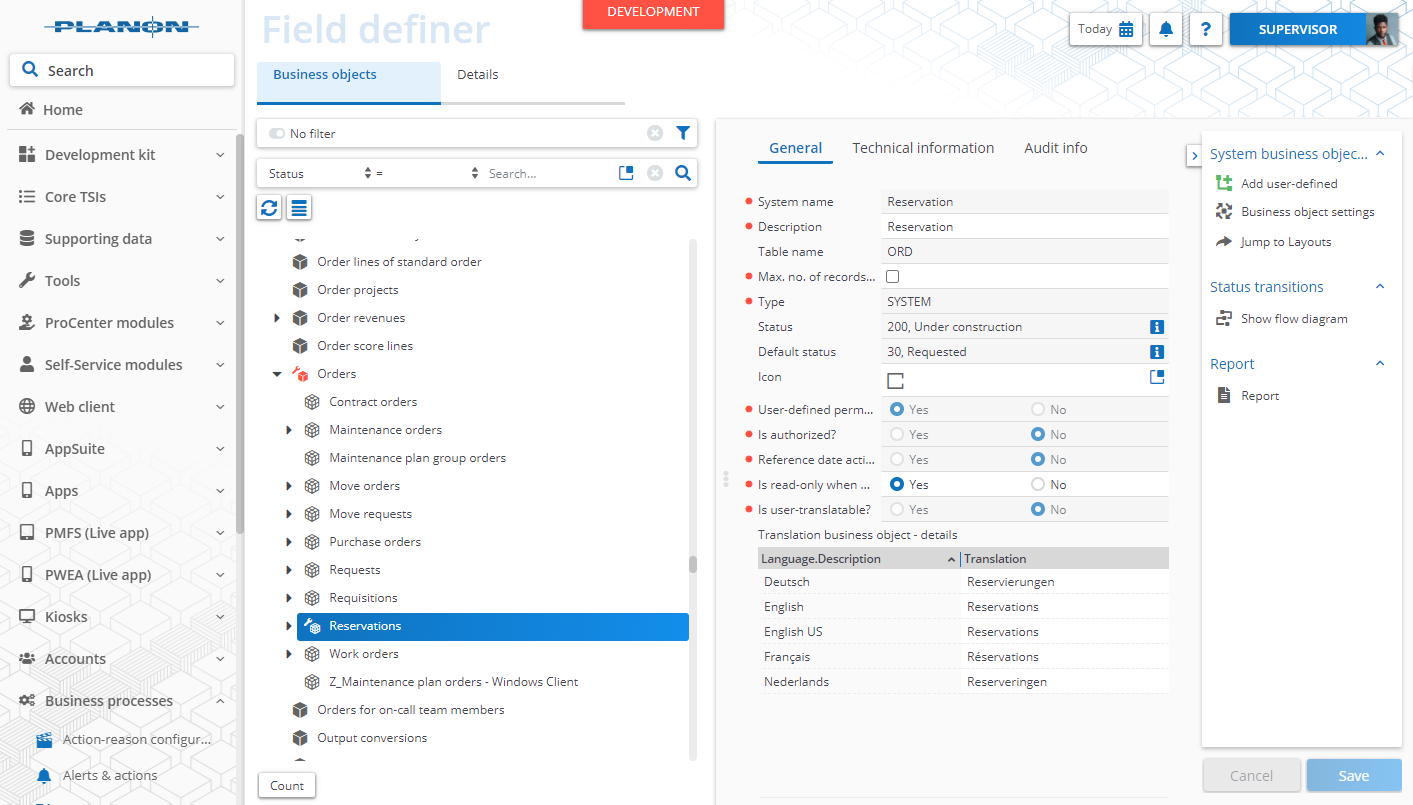
After selecting the Reservations BO go to the selection level “Details” and click on the selection step “Extensions”.
Now click on the “Add" button in the action menu.
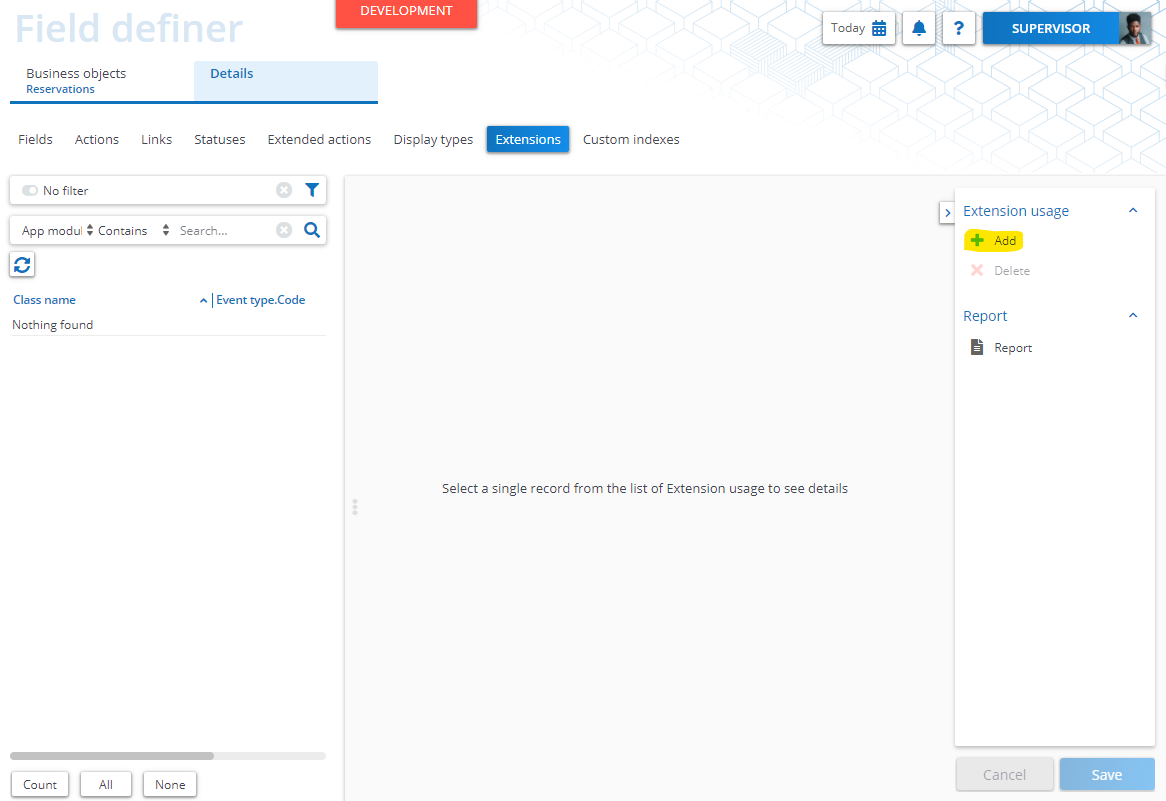
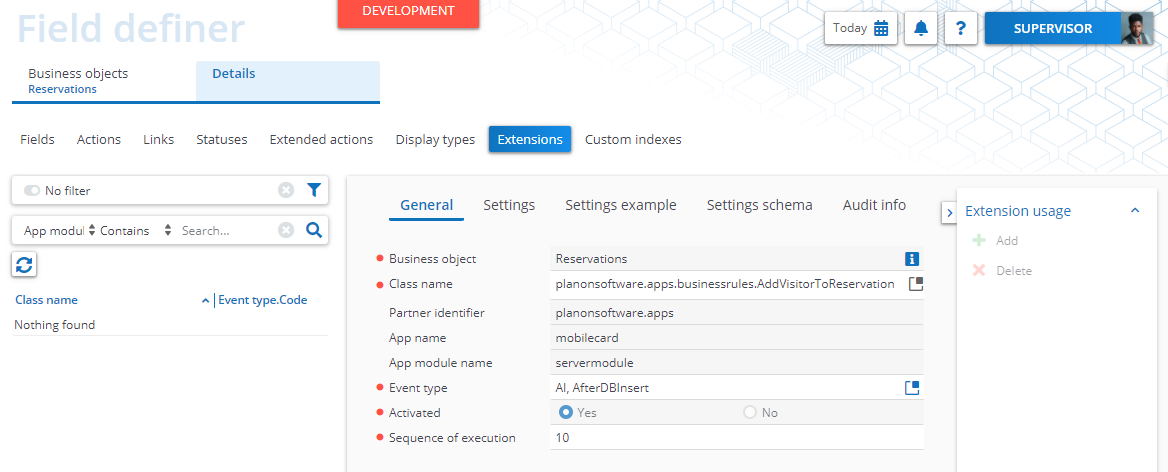
- After clicking the “Add” button it is time to configure the business rule. The image below shows an example configuration of the general settings.
- The next step is to click on the “Settings” tab to configure the component settings. These settings can be configered as desired, an example configuration will be shown in the image below . Do not forget to click on the “Save” button in the bottom right corner.
- The last step is to go back to the Orders BO and click on “Completed”.
Add the QR-code mobile card
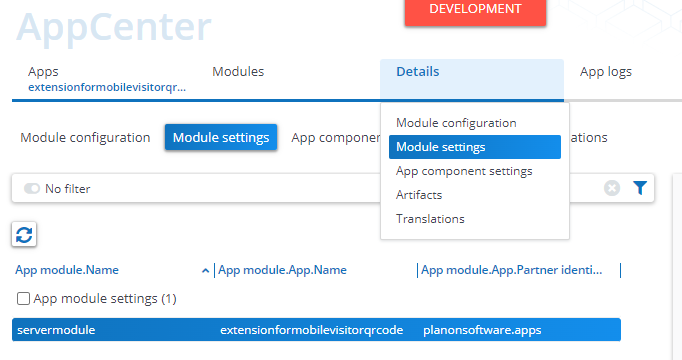
- After installing the MobileVisitorQRCode app go to the “Module settings” selection step which can be found in the “Details” selection level.
- The next step is to configure the Module settings. These settings can be configered as desired, an example configuration will be shown in the image below (more information about the Module settings can be found in chapter 5.2 App Settings). Do not forget to click on the “Save” button in the bottom right corner.
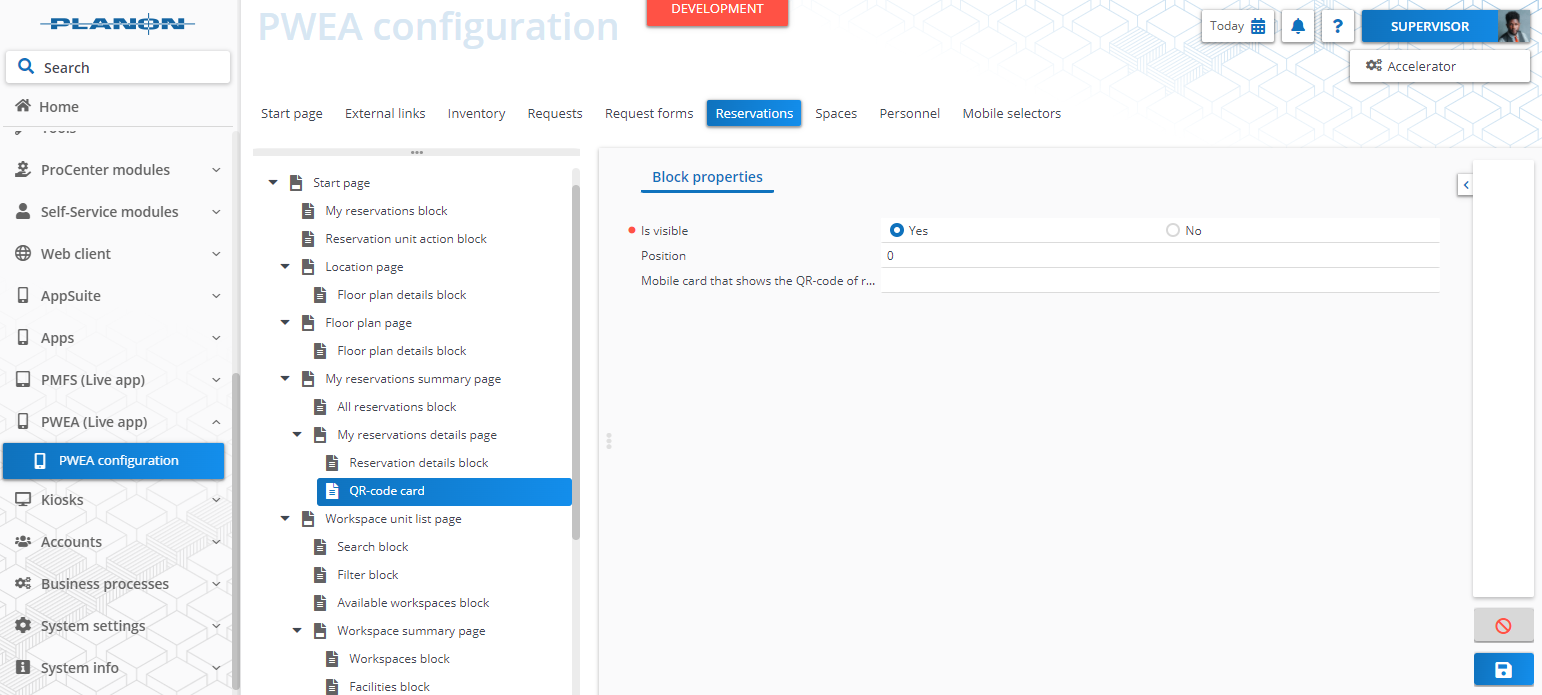
Now go to the Planon Workplace Engagement App (PWEA) TSI and select the “Reservations” selection step. In these configurations look for the card named “QR-code card”. This card can be found at the following place: Start page > My reservations summary page > My reservations details block > QR-code card.
Select this card and set “Is visible” to “Yes”.
After clicking the “Save” button the configuration for QR-code mobile card is finished.
Troubleshooting
This chapter describes common things and known issues to check in case the app is not working as expected.
Error handling
For all components the errors will be written in the server logs. Components that also have an UI (like TSI Actions) will also display any errors in the interface.